- Companies
-
- Sales
- Multi-currency for Sales
- Invoicing items that aren’t in stock
- Drop shipping workaround
- Managing your Quote pipeline
- Direct Debits
- Sending Statements
- Backorder Invoices
- Progressive revenue
- Subscriptions
- Bulk send Invoices
- Credit Notes
- Taking a Deposit
- Creating Invoices
- Create Freight Quotes
- Getting Started with Web Quotes
- Sales Orders
- Card Payments
- Payments
- Repeating Invoice Placeholders
- Creating Repeating Invoices
- Online Invoice Templates
- Online Sales Order Templates
- Set Up Web Quote Templates
- Quotes
- Quotes
Creating Quotes
This page will guide you through how to create new Quotes. You can also set preferences for your Quotes at a system level using this guide.
See also:
- Learn how to set up item-based and proposal-based Web Quote Templates.
- Click here to learn how to create and use Quote Form Templates.
- Click here to learn how to manage your Quote pipeline.
- Learn to create Email Templates and SMS Templates to send out your Quotes.
- Customise your PDF Quote Templates.
- See how customers can accept & pay their Quotes online.
- Customers can submit Quote requests to you online via Customer Portal.
- How to use the online Q&A function in Web Quotes.
There are numerous ways that you can create a new Quote in CRM.
From Sales > Quotes
Here you can use the:
- New Quote button: this opens up a blank form.
- Quote From Template button: this allows you to select from pre-filled Quote Form Templates that have been created earlier.

From a customer record
Open any Contact or Company record and ensure the “I sell to” box is ticked.
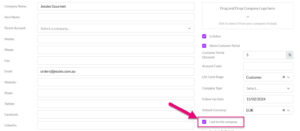
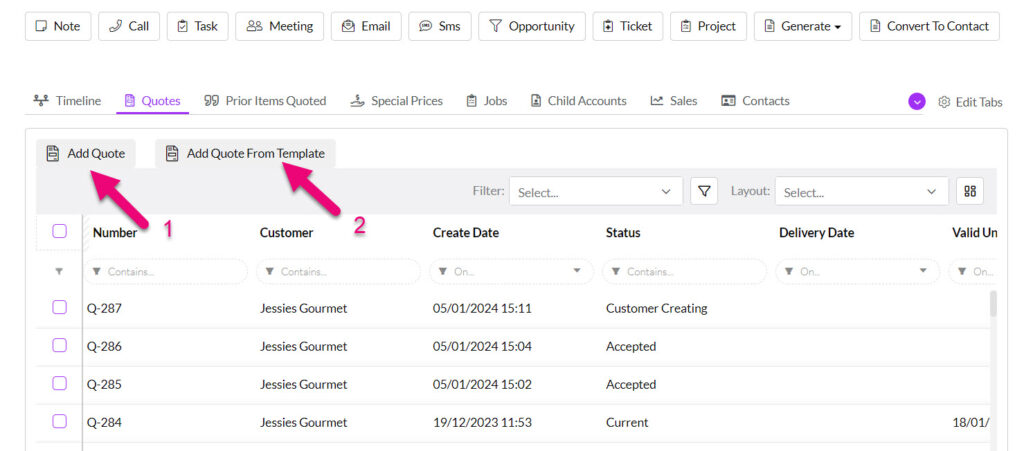
Then navigate to the Quotes tab – here you can use the:
- New Quote button: this opens up a blank form.
- Quote From Template button: this allows you to select from pre-filled Quote Form Templates that have been created earlier.
If you can’t see the Quotes tab it may be hidden, and you need to edit the record tabs to make it visible.
Copy an existing Quote
Open any existing Quote record and click on the Copy button to reveal:
- Copy As New: makes a copy of the record and if the record is linked to an Opportunity or Project, the links to these records will remain in the copy, but you will be able to edit or delete them, if desired.
- Copy With Locked Links: if the record is linked to an Opportunity or Project, the links to these records will remain in the copy and will be locked, meaning that they cannot be deleted or changed.

From Opportunities, Projects, Tickets, Jobs
You can create new Quotes from all these records, and view associated ones from the Quotes tab.
On Opportunities, Projects and Tickets you have the following options:
- New Quote button: this opens up a blank form.
- Quote From Template button: this allows you to select from pre-filled Quote Form Templates that have been created earlier.
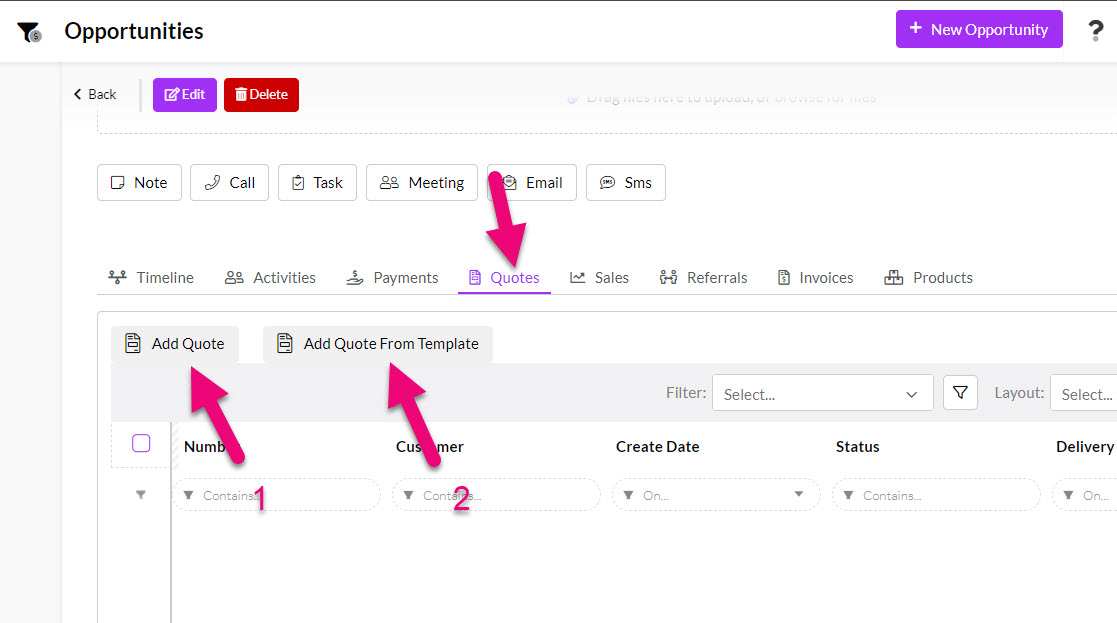
Quote options on an Opportunity
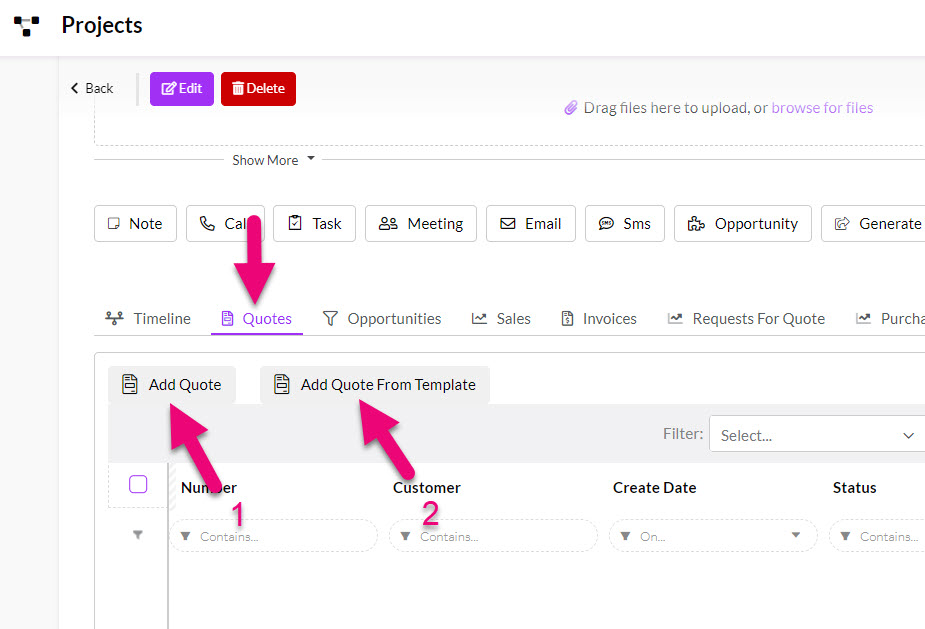
Quote options on a Project

Quote options on a Ticket
On Jobs you have the following options:
- Generate Quote: this option takes any existing items you have on the record and adds them to a new Quote that is linked to the record.
- Add Quote: this generates a blank Quote that is linked to the record, and you can then add items to it.

Quote options on a Job
Via Customer Portal
If you’ve given your customers logins for Customer Portal, they can request Quotes from you online.

The first part of the screen describes to whom the quote will be sent. Start typing a Contact or a Company name. The list of options on each dropdown list will filter automatically to display any relevant matches.
You’ll note that when looking up a Contact the name of the linked Company (if relevant) is also shown in brackets, and if the person you choose is related to a company that field will be filled in automatically.
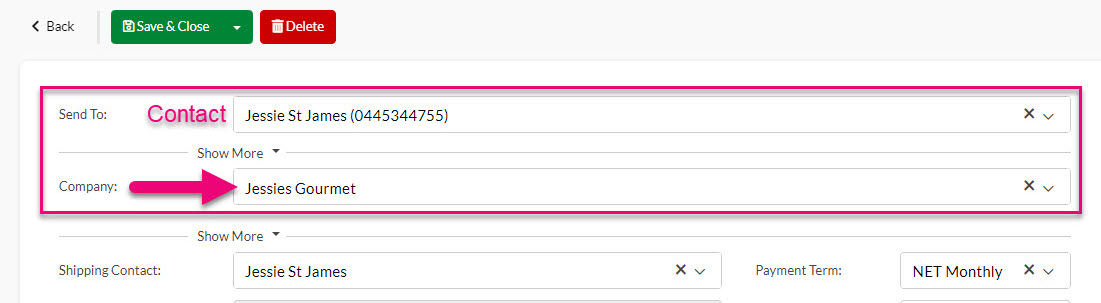
If the Contact or Company you are looking for isn’t already in CRM, you can quickly add them inline – just type in the name and if a match isn’t found, click to create a new record.


When the record is saved, CRM will create a new Company and/or Contact record for you and link the Quote.
Parent-child & third-party billing
If you have a third-party billing relationship or parent-child hierarchy in place for the Company on the order you will see an alert message beneath the Company field to remind you of the circumstances.
In the parent-child example below, a new field (Invoice To) shows beneath the Company field, allowing you to select from child accounts via the dropdown.

CRM will automatically generate quote numbers sequentially, starting from 1 and using a “Q” prefix i.e. “Q-1”.
If you want to manually edit this number, you can turn on the ability to edit the Number field from your sales & purchase settings.

The Number field greyed out/locked
If you want to change the starting number or prefix, please email us at [email protected] with your requirement (e.g. “QU-746”) and we will be happy to assist.
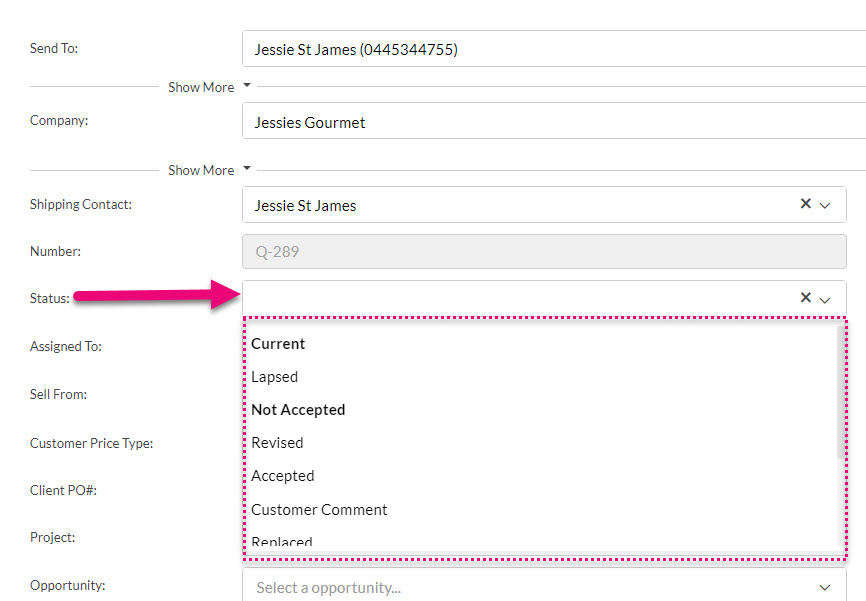
The Status field will be automatically updated when certain actions take place:
- Current – this is the default status for a new record.
- Accepted – when accepted online via the Web Quote, the system will automatically update the status.
- Sent – when the quote has been sent out via Email or SMS the system will choose this status. You can also manually select this if you have sent the quote outside of CRM.
- Customer Comment – when a customer has added a comment to the Web Quote, this status will indicate that.
- Customer Creating – means that a customer is working on a quote request via Customer Portal.
- Customer Submitted – means that the quote has been submitted via Customer Portal.
There are also several options you can manually select on the list:
- Lapsed
- Not Accepted
- Revised
- Replaced
- Sent
- Deleted
This field allows you to choose from Users in your system to select the person the record should be Assigned To.

At a system level, you can select whether reporting is based on who the record is Assigned To or who the Account Manager on the customer record is via your reporting preferences.
Note that you can set a follow-up notification alert/reminder for a different User with the Follow Up Date and Follow Up Assignee fields.
This is only applicable if you have multiple Locations in your database.
At a Quote level, you can choose the Location you want to sell goods from via the Sell From field, which will show a list of your active Locations.
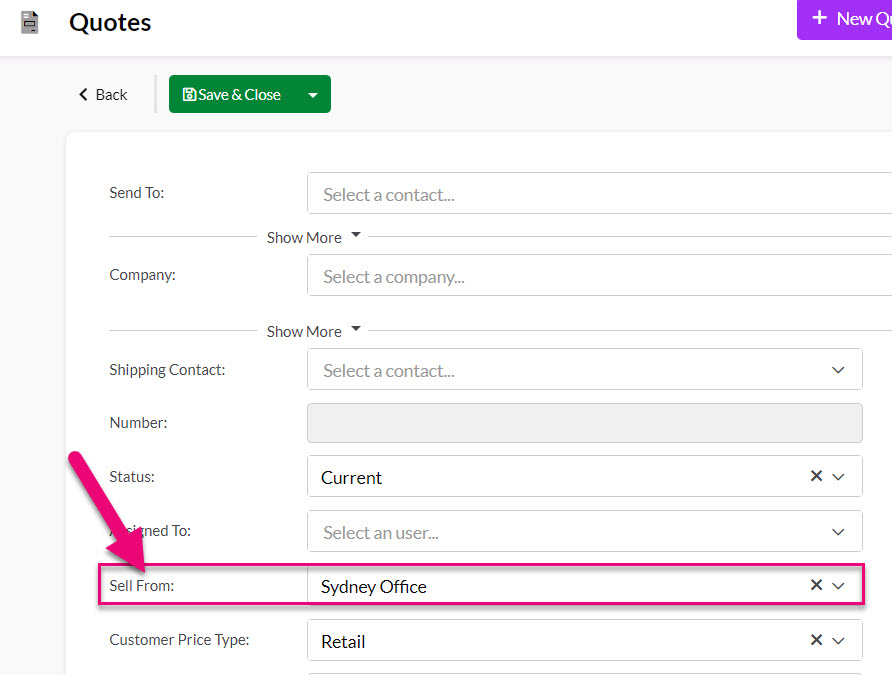
You can also specify a different Sell From Location per item.

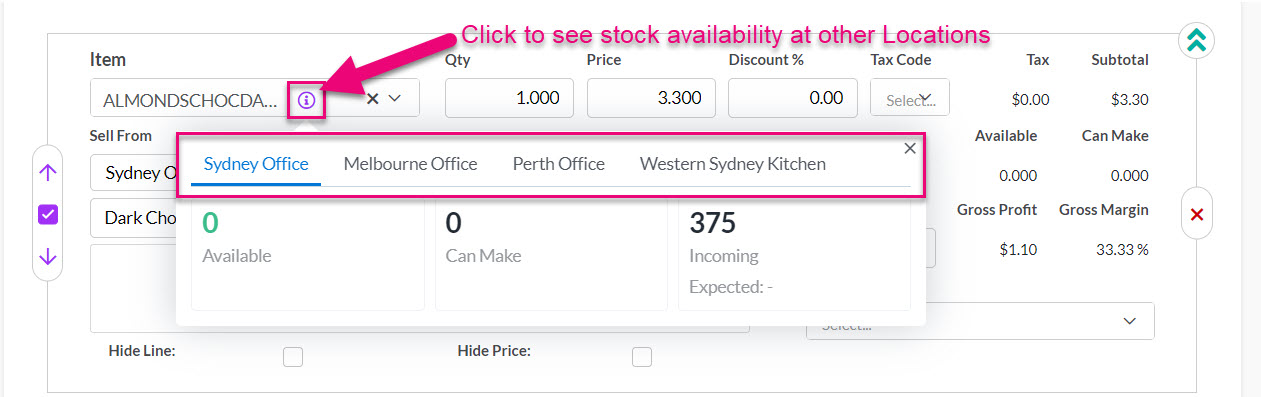
If you want to check available stock of an item at another Location, click on the “i” to reveal other Locations and then click on a name to reveal the stock position there.
Pricing
If you have configured pricing for sales in CRM, the Customer Price Type field will be automatically populated from the customer record (if it has been filled in) and can also be applied or edited here.
This means that pricing you’ve already configured will automatically be applied to the Quote.

You can also manually work with pricing for each item and see margin information in real-time.
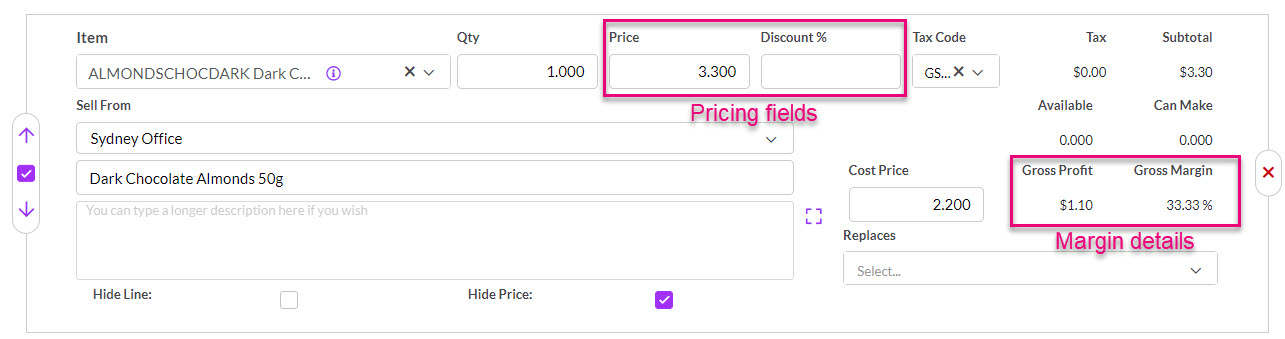
If you don’t want margin information to be visible to all Users, you can limit access using a Team.
Once you save the Quote, you will see overall margin information in the top right-hand corner.

Note that if you have entered in custom pricing and then update the quantity of items, the system will perform a lookup and then return the relevant pricing, overriding your custom price. You can disable the price lookup from your system pricing settings.
Tax
You can determine at a system level via your pricing settings whether or not prices are shown inclusive or exclusive of GST.
That choice will flow through to all Quotes and can then be amended, if required.

Discount visibility
If you are using the Discount field, you can choose whether or not this is visible to the customer via your Web Quote Templates.


Discount options on a Web Quote Template
You can use the Client PO # field to capture this information.

If you are using Web Quotes with online acceptance, the customer can also add this reference in themselves, which will flow through to this field on the Quote in CRM.

You can use the fields here to link a Quote to other types of records, such as Project, Opportunity and Campaign.

If you have created the Quote initially from one of these other record types, the link will be filled in for you automatically.
You can select a probability that the Quote will proceed from select from the list and then use this information to segment and sort your sales pipeline.

See our guides on Taking a Deposit and Progressive Revenue Recognition.

If this is set up on the customer record, it will automatically flow through to the Payment Term field on the Quote.

This field can be used to track the customer’s required despatch or delivery date.

You can set a default validity period for your Quotes at a system level in your Quote Settings. This will then populate the Valid Until date field with the desired value on all your Quotes.

You can also manually change this date by editing any record and adjusting the field value – just click Save & Close when done.

If you want the customer to be able to accept the Quote online, you need to ensure the Can Accept Online box is ticked.

This guide will show you how to set this option as the default on a system level.
The options in this field can be customised to suit your needs from Admin > Settings > Quoting And Selling > Source Of Business. The field is shared across Quotes, Sales Orders and Invoices.

This information will also flow through to Dashboards and Reports.
You can set your default templates at a system level via your Web Quote Templates.

You can also edit the template choices per Quote using the template fields.

Or by selecting a different Email or SMS Template when sending out a Quote.

If you are printing out copies of your quotes, this field allows you to sort which have been printed – just click the checkbox.

These fields allow you to specify a date and User to receive a notification alert in CRM that the Quote needs to be followed up.

The chosen User will then receive notification alerts on the specified day in CRM, as per the following examples.

See our guide on Notifications & Reminders for more information.
This field allows you to record a date for tracking purposes so that you can easily sort your Quotes.

If this are set up on the customer record, it will automatically flow through to the Currency field on the Quote, allowing you to populate the Exchange Rate field.

See our guide on multi-currency for sales for further information.
These fields will be automatically populated when you send the Quote out using the Email or SMS buttons.
If you send the Quote externally to CRM (e.g. via Outlook), you can manually fill in these fields.

If you don’t want to sync a record with your accounting system, you can prevent it by using these boxes.
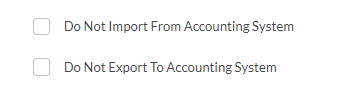
Once you select a checkbox, you get an additional box for text called Reason.
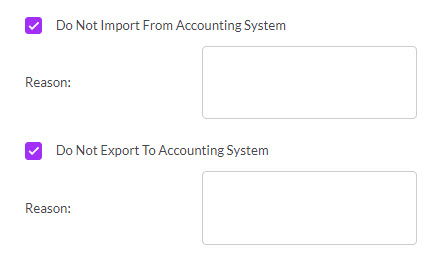
For more information about how data syncing with your accounting system works, see our guides for MYOB and Xero.
If you have selected a Company or Contact with existing address information, this will be brought through to the Quote automatically.
You can use the Shipping Address and Billing Address dropdown fields to select from existing addresses in the system.
If you want to copy an address from Shipping to Billing you can do so quickly by pressing the double arrow button.

You can also manually enter in address information in either section, just note that this will not populate back to the Company/Contact record automatically – you will need to update the customer record separately.
Add single items
When you create a new Quote, the system will pre-load a blank item for you, you just need to select the name of the item from the dropdown list.

You can also see the Add Item button to add additional items.
Add multiple items at once
Click on the arrow next to Add item to reveal the option to Select Products.

This opens a box where you can search, filter and sort your products and then select multiple items to add to the Quote – just click on OK when you are done.

Item groups
Click on the arrow next to Add item to reveal the option to add a Group.

A group of items allow the use of several options:

- Adds a single line item to the group.
- Brings up a search box to add multiple items at once to the group.
- Adds a comment line to the group.
- Adds a freight line to the group.
- Allows you to enter in a description, instruction or sales text.
- Click on the box to open the text editing window for the description box.
- Min/Max Selection allows for a mandatory number of items to be selected within the group before the Quote can be saved.
- Show Subtotal determines whether or not the Group Subtotal figure will be shown.

A Group with multiple options applied
You can then contract or expand the group using the green arrows on the right-hand side.

Add Subtotals
Click on the arrow next to Add item to reveal the option to add a Subtotal.

This will add a subtotal line and can be used as many times as required.

A Subtotal line on a Quote
Add Comments
Click on the arrow next to Add item to reveal the option to add a Comment.

This will add a comment line and can be used as many times as required.

A Comment box on a Quote
Add Freight
Click on the arrow next to Add item to reveal the option to add Freight.
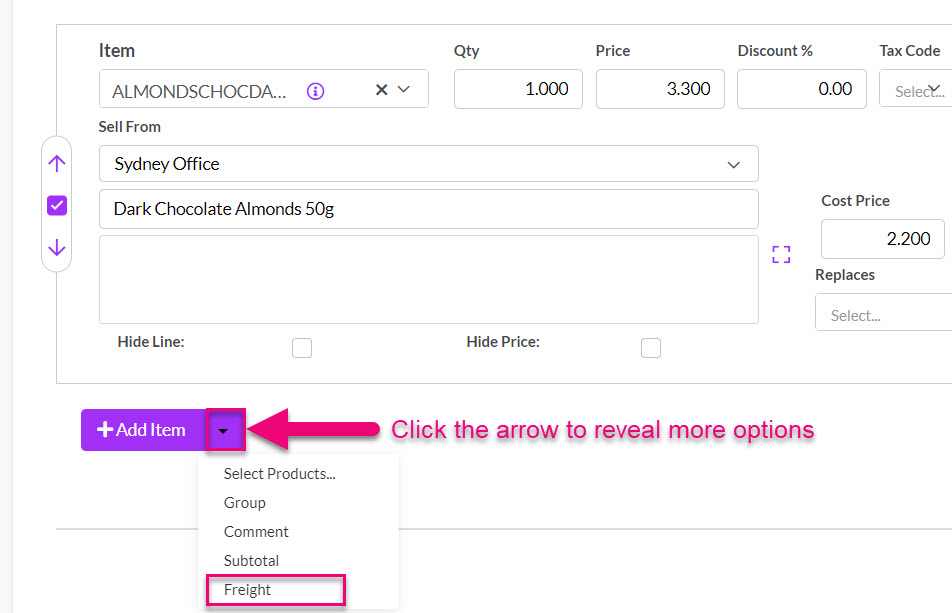
This will allow you to create a freight quote (if you are integrated with Machship).
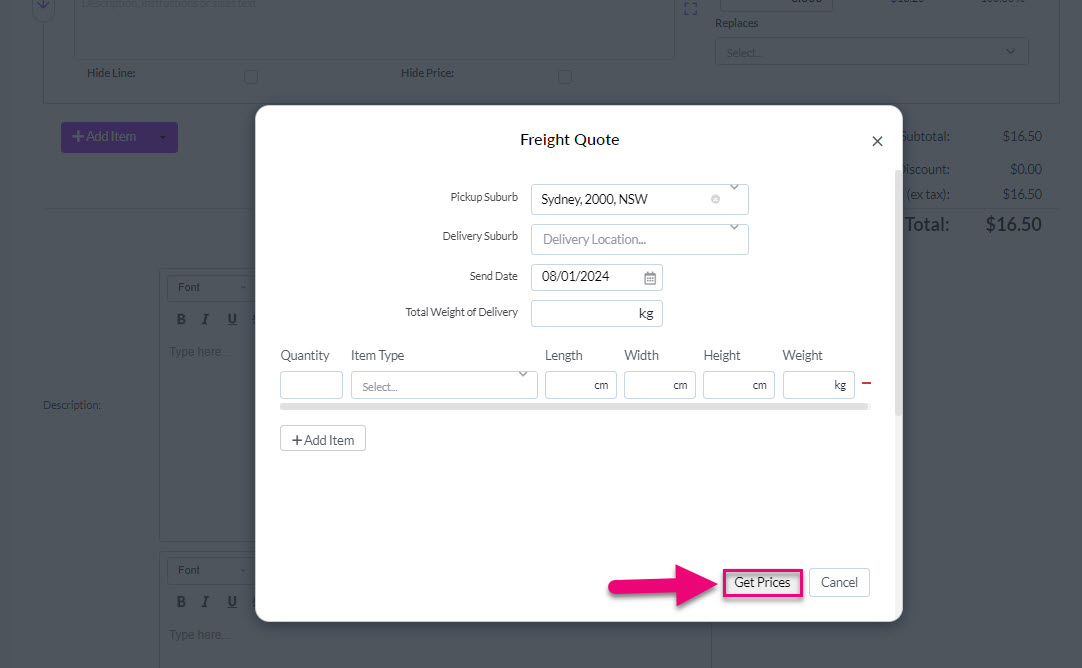
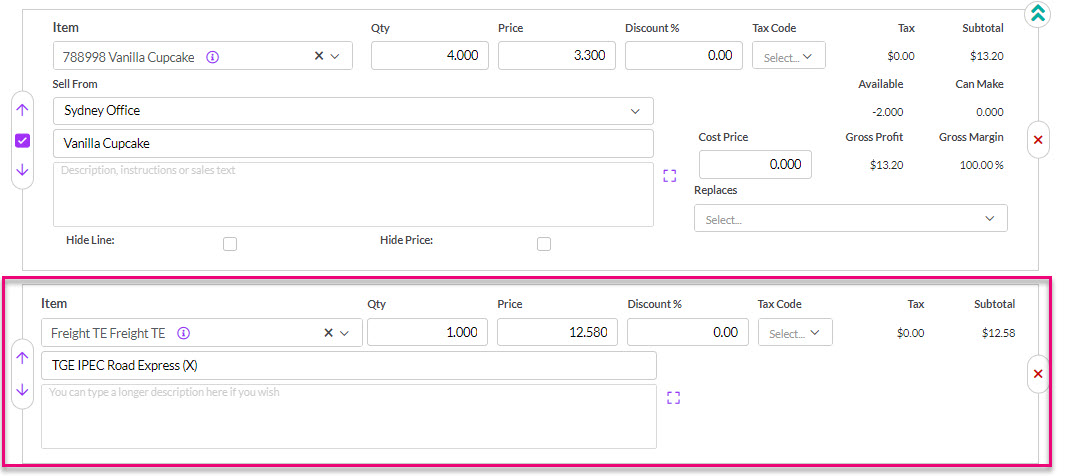
You can then select a freight quote from the options.

It will be added as a line item on the Quote.
Once you have selected an item, you can edit the text in the following boxes. This information will pull from the chosen Product record.


You can click on the purple square to the right of the description box to open up the text editing box. When you are done, click on the purple cross to close the box.

To remove an item, just click on the red “X” on the right-hand side of the item.

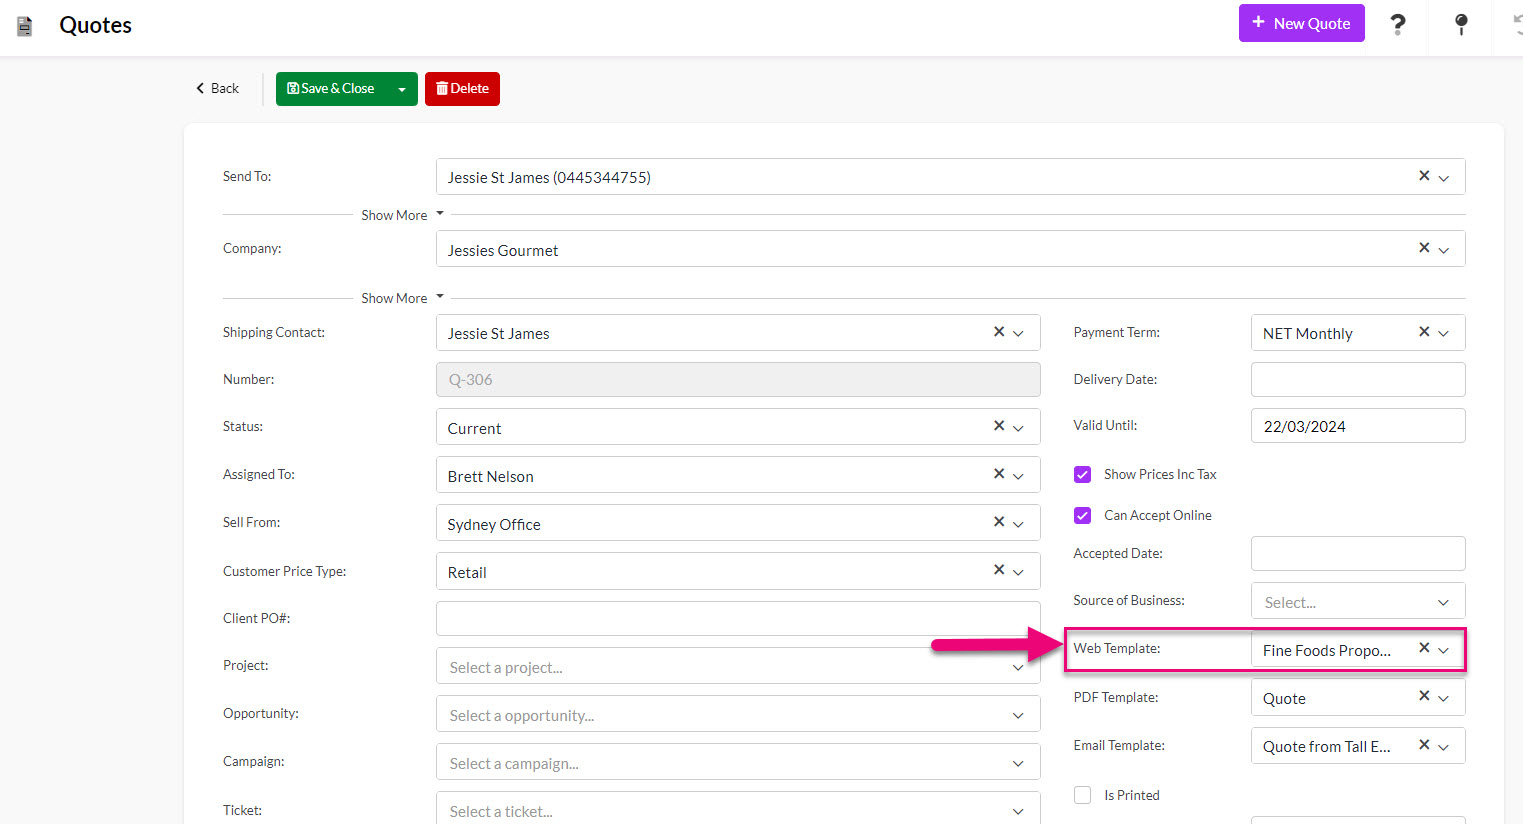
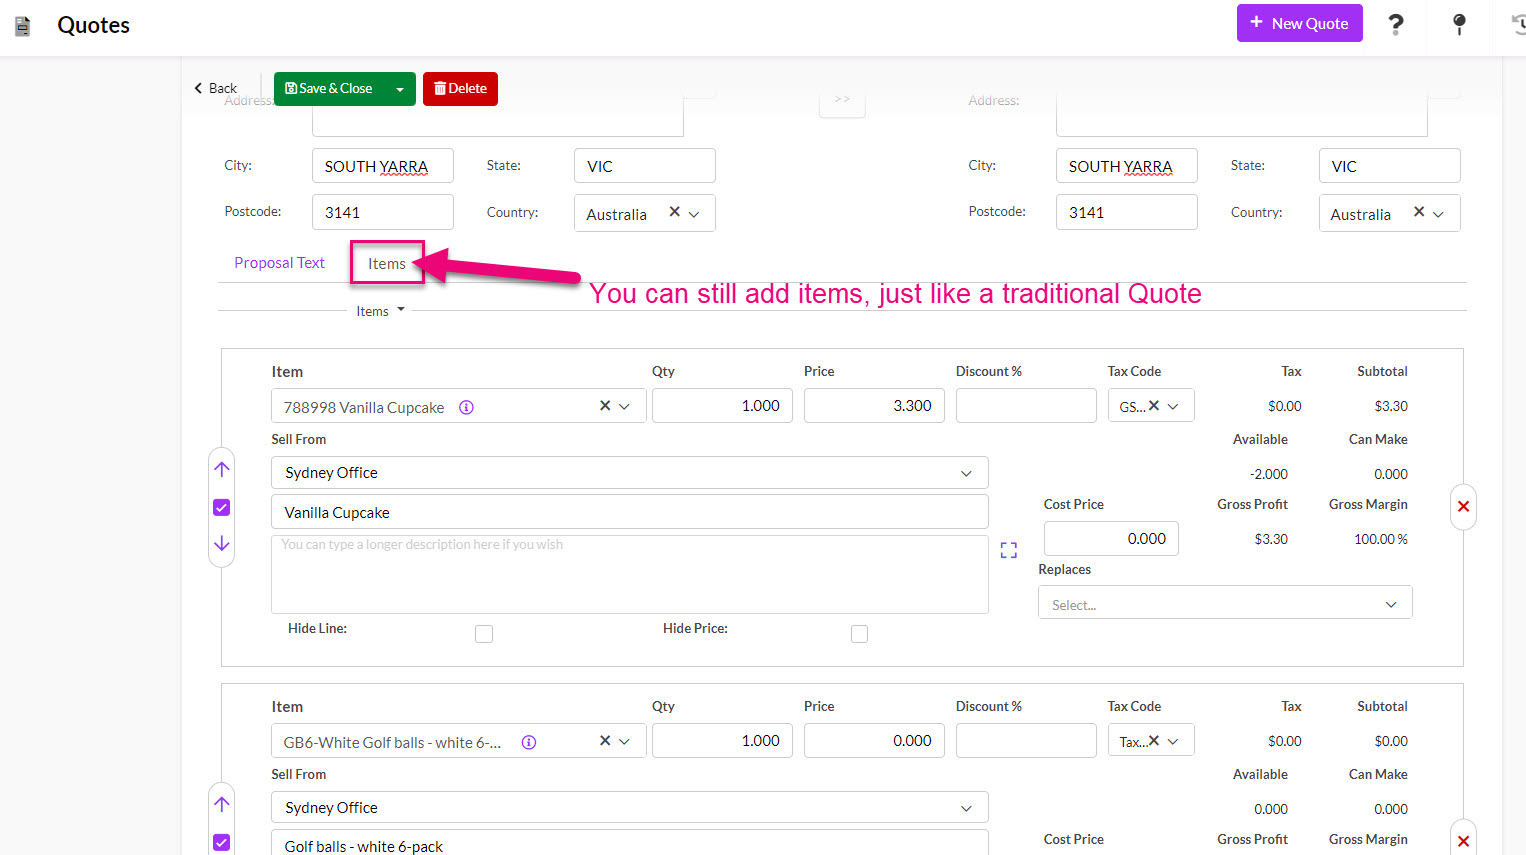
When working with Quotes, you will be able to select from web templates you have created by making a selection in the Web Template box.
- When the system detects that a proposal-based template is being used, it will automatically display a tab for Proposal Text – this is where all the text from your template is placed and you can now edit it, if required.
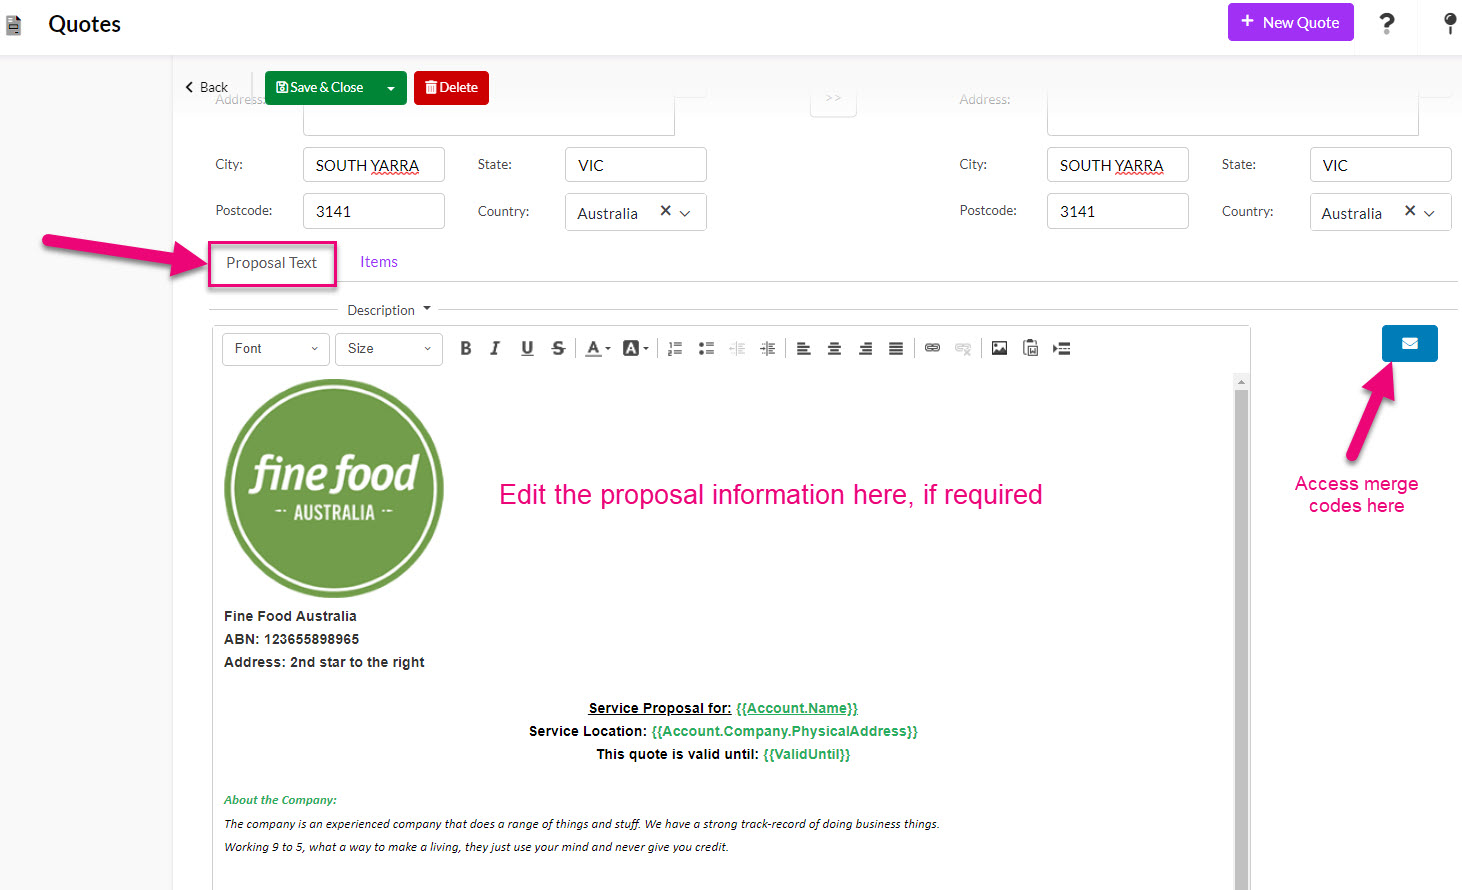
- You can also still add items, just like you can with a regular item-based Quote – just click on the Items tab.
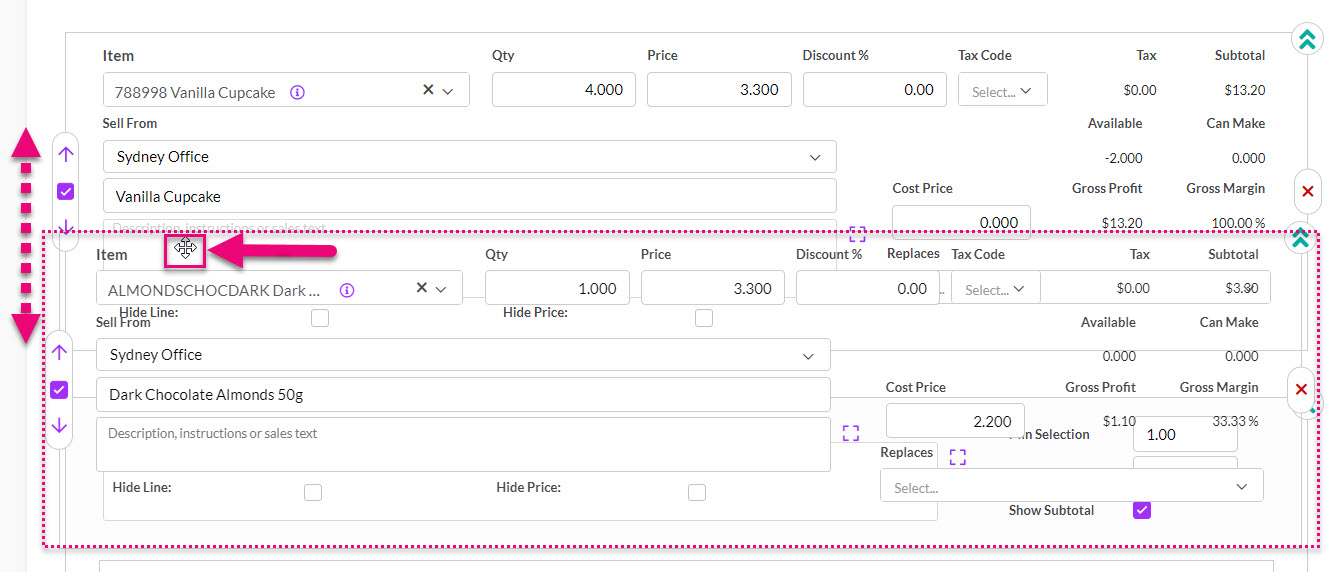
You can do this in one of two ways.
1. Use the arrows on the left-hand side of the item to move them up/down in the order.
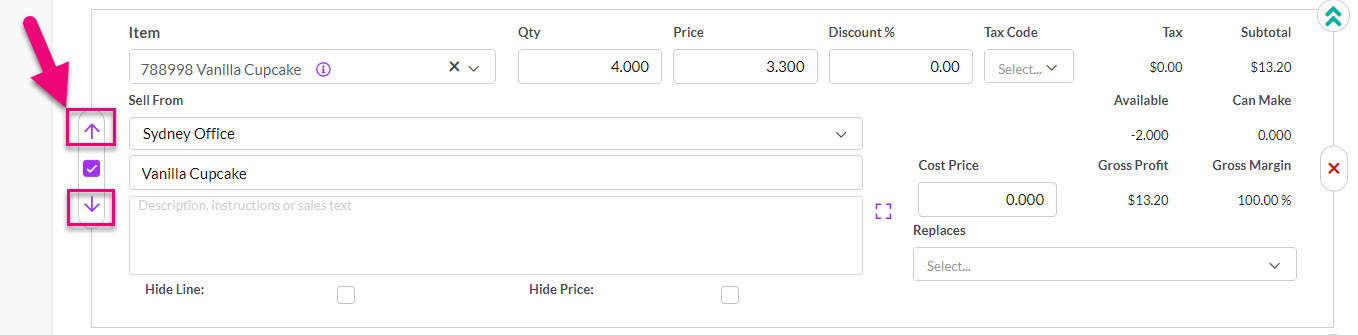
2. Click & hold on the top of an item and then drag & drop it into a new position.
When first adding an item to a Quote (before you have saved it) you can hide or show the description box by using the green arrows on the right-hand side of the item.


The Description box hidden
Note that this will not work for the 1st item on a Quote, only subsequent items.
You can use the checkboxes for Hide Line and Hide Price to change what is visible to the customer on the Quote.

- Hide Line means that the details of the item won’t appear as a line on the Quote.
- Hide Price means that the price won’t be shown for the line item, but it will still be counted in any subtotals or totals.
You can use this field to add customer-facing notes or comments, which will display on the web and PDF versions of the Quote.

This field can be used for any internal notes i.e. anything that is not customer-facing, as it will not display on the web and PDF versions of the Quote.

if you have added delivery instruction details to customer records, they will automatically flow through to Quotes.
You can also manually add details here and customise your PDF Templates so that they display. The field will not be visible on Web Quotes.

If you scroll to the bottom of the form in edit mode, you will find the Customer Signature field.
If customers can accept your Web Quotes online, they can add their signature online and this will be pulled through to the record to populate this field.
You can also have customers manually sign the record i.e. using a tablet device.


You will need to Save & Close the record before this information is visible in the saved version.
For each item, you will be able to see available stock at the Location you have chosen to sell from.

When you progress the Quote to a Sales Order, you’ll be able to take action to remedy any availability issues.
Save & Close any Quote, and it will go back into the “View” mode where you can preview it as either:
1. A Web Quote – just click on Preview As Customer and the online version will open in a new tab.

Following is an example of a web quote as the customer will see it. You can customise your Web Quote Templates with these instructions.

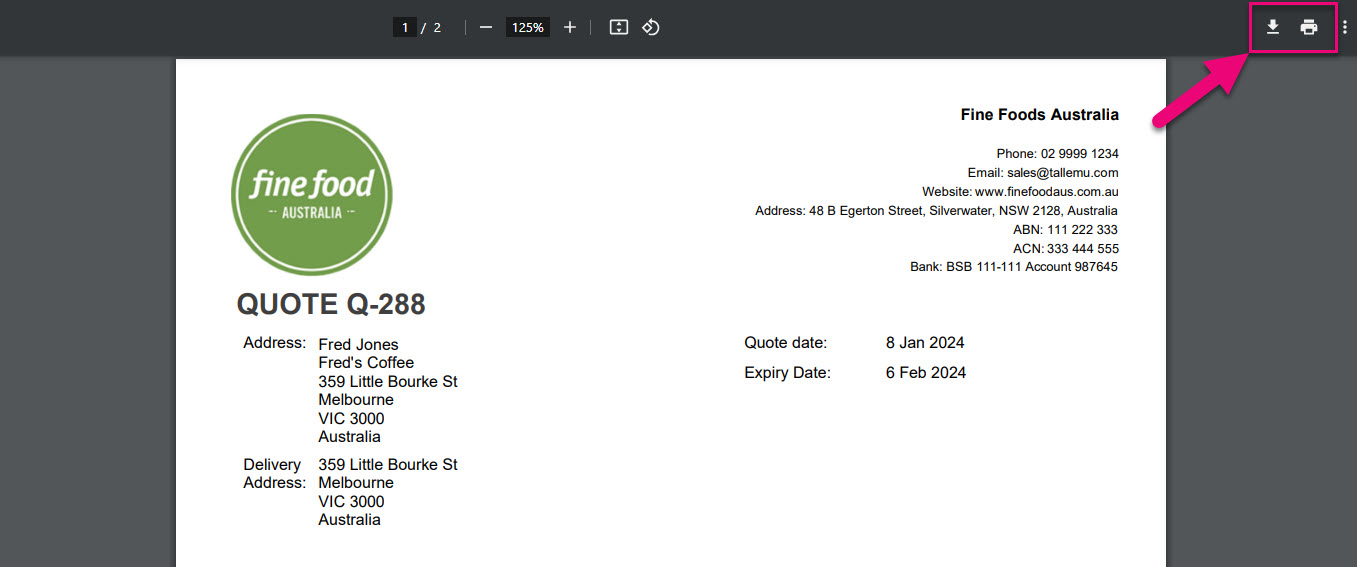
2. A PDF – just click on Preview > Quote and the PDF will open in a new tab. You can then download or print the PDF as desired.
Just note that the options you see here will differ depending on the browser you use and how you have it configured.
You can send Quotes to your customers via two methods – Email or SMS.

- Click on the Email button on the Activity Bar to bring up a new email.
- Select from available Email Templates in your system (optional), or just start typing a new email without a template.
- If you want to attach a PDF copy of the Quote, ensure the Attach Quote box is ticked.

If you want to send a link to the Web Quote, you can copy & paste the URL from the record into the email using the Copy URL button at the top of the record.

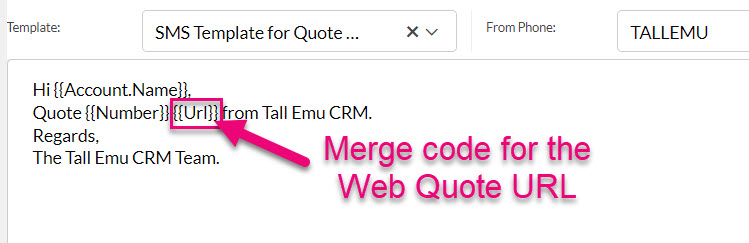
You can also set up an Email Template that has the merge code for the URL in it, which means that you don’t have to manually add it each time.

You can then edit the recipient and sender details, as required and add any additional attachments. When ready, press the Send button.
The email will then show as being queued to the right-hand side of the Timeline and when sent, it will be moved to the Timeline area.

Note that you can also set your default Email Template from your Web Quote Template (example follows).

SMS
- Click on the SMS button on the Activity Bar to bring up a new message.
- Select from available SMS Templates in your system (optional), or just start typing a new message without a template.

To send a link to the Web Quote, you can copy & paste the URL from the record into the message using the Copy URL button at the top of the record.
You can also set up an SMS Template that has the merge code for the URL in it, which means that you don’t have to manually add it each time.
You can then edit the recipient and sender details, as required. When ready, press the Send button.

The message will then show as being queued to the right-hand side of the Timeline and when sent, it will be moved to the Timeline area.
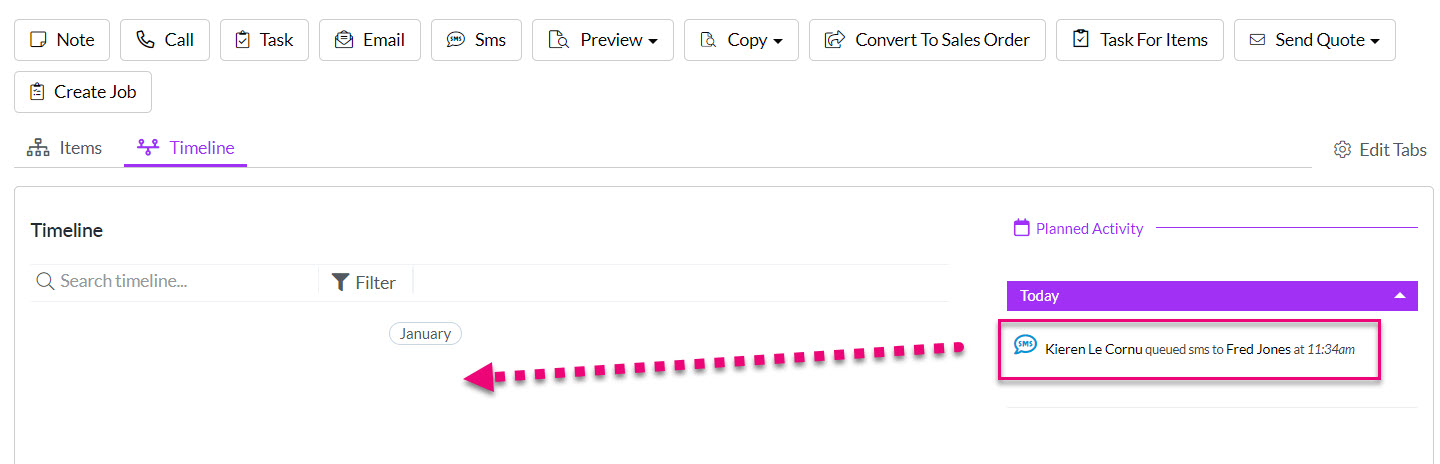
You can also quick-send an SMS using the Send Quote > By SMS button which will immediately send an SMS using your default SMS Template (you will not get to preview the message before it is sent).

You can set your default SMS Template from your Web Quote Template (example follows).

Setting a default SMS Template in a Web Quote Template
You can add multiple attachments to the record by dragging & dropping files into the Attachments section or clicking to add them from a selected folder.

If you have allowed Web Quotes to be accepted online (either per Quote or at a system level for all Quotes) your customers can open, accept and pay Quotes from you online.

The customer then fills in the online approval details:
This updates the Quote Status to ACCEPTED inside CRM.

The customer’s signature that was input online will now form part of the Quote record in CRM.

The Edit button will be gone, and the Quote will be locked against any further changes.

An automated email will be sent to the person the Quote is Assigned To, letting them know that it has been accepted.

You can choose what happens next in your system from your Quote Settings:
- Nothing: CRM will just mark the Quote Status off as Accepted, you can then manually convert the record to a Sales Order and then an Invoice.
- Sales progression: CRM can automatically convert the Quote to a Sales Order for you and then convert the order to an Invoice.
You can edit the Quote and manually change the value of the Status field to Accepted.

Editing a Quote
If applicable, you can scroll down further on the form and a customer signature can be added to the Quote record i.e. you might have the customer sign on a tablet.

You can then update the Status field.

Changing the Status to Accepted
The Edit button will be gone, and the Quote will be locked against any further changes.
An automated email will be sent to the person the Quote is Assigned To, letting them know that it has been accepted.
You can choose what happens next in your system from your Quote Settings:
- Nothing: CRM will just mark the Quote Status off as Accepted, you can then manually convert the record to a Sales Order and then an Invoice.
- Sales progression: CRM can automatically convert the Quote to a Sales Order for you and then convert the order to an Invoice.
You can use Tags to segment and sort your Quotes – see this guide for more information.
Tags added to customer records will cascade down to appear on Quotes.

There are a number of ways that you can work with all the quote data in your system:
1. Use different views such as Map or Kanban to visualise your data.

2. Use Dashboards and Reports to drill down into your data.

3. In List View, use Filters, Advanced Filters, Layouts etc. to segment and sort your data. See our section on Reporting for more information.
4. Use the Prior Items Quoted tab on Product and customer (Contact or Company) records to see all previously quoted items. If you can’t see these tabs, they may be hidden, and you need to edit the record tabs to make them visible.


You can select multiple records when you are in List View and then update field values for them in bulk.

For more information on how to do this, see our guide on bulk updating.
Customers submitting questions
If you send your customers a Web Quote, they can submit a question or a comment online that will go straight into CRM.

An example of a customer submitted question in a Web Quote
The customer’s question/comment then:
- Updates the Web Quote.

A submitted question/comment is added to the Web Quote
- Creates an entry on the record Timeline in CRM.

A Web Quote comment/question submission added to CRM
- Sends a notification email to the person the record is Assigned To.

Notification email to the person the Quote is Assigned To
- Updates the Status of the record to Customer Comment.
Replying to questions
- To reply to a question/comment, locate it on the Timeline, click to reveal it and then press the Reply button.

Replying to a question in CRM
- A new Note will open where you can add a reply and then click Save.

Adding a reply in CRM
- The record Timeline will be updated with the reply and the Status will remain as Customer Comment to indicate that the interaction is ongoing.

A reply on the record Timeline
- The online version will then be updated with the reply.

A reply added to a Web Quote from CRM
- The customer will also receive an email to let them know you’ve sent a reply, which will show on the record Timeline.
You can have as many back & forth questions and replies as you want.
You can turn a Quote into a Sales Order in a few ways; each way will move ALL information over to the order.
1. Use the Convert To Sales Order button on the record toolbar.

2. Have CRM automatically create the Sales Order for you when a customer accepts a Quote online. You can select this option via your system Quote Settings so that the following chain of events takes place:
- Convert the Quote to a Sales Order.
- Create an Invoice.
- If the Invoice is paid online, a Payment will also be created and linked to the Invoice, which will be marked as either Partially Paid or Paid.