- Companies
-
- Marketing
- Create Marketing Lists
- Send Email Campaigns
- Creating a simple Web Form
- Smart Lists
- reCAPTCHA for Web Forms
- Facebook Lead Ads
- About Web Forms
- Insta-Buy Web Forms
- Add or Remove Contacts/Companies from Lists
- Creating a Marketing List from Advanced Filters
- Editing existing List members
- Exporting Marketing Lists
- Filtering by Lists
Creating a simple Web Form
Creating a Web Form in the CRM is simple. You can use then to capture customer/prospect details easily and quickly.
Click here if you’d like to learn more about how Web Forms work and what you can use them for.
We also have a video that will take you through creating a ‘Contact Us’ form to add to your website:
Navigate to the Web Forms module by heading to Marketing > Web Forms.
- Here you’ll see any existing Web Forms that have been created in your system.
- To create a new one, click the New Web Form button in the top right.

Name
First, give the Web Form a name. Add as much detail as required, the name will help you easily identify the correct Web Form if you set up more than one.
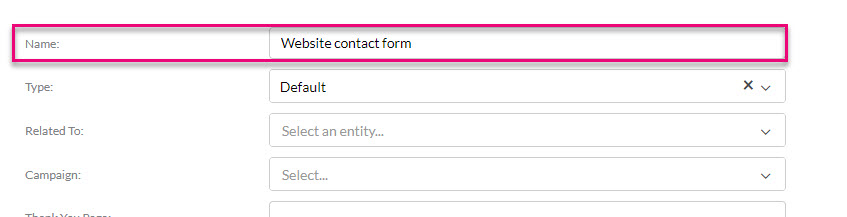
For this example, we’ll create a simple web form for acquiring customer details from a website – most businesses typically have some form of contact form on their site that this example can be used for.
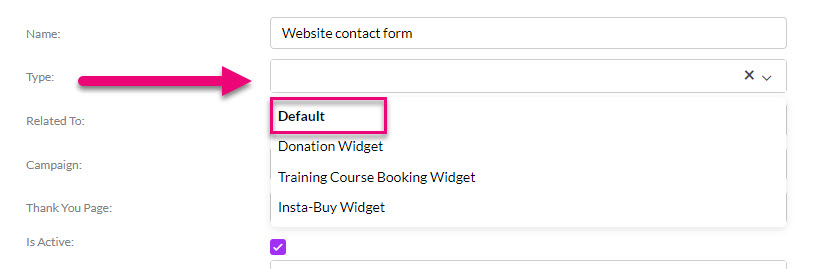
Form Type
In this case we’ll leave the type as Default. However, you also have the ability to create donation, booking or Insta-Buy Web Forms (widgets). You can learn more about how Web Forms work here.
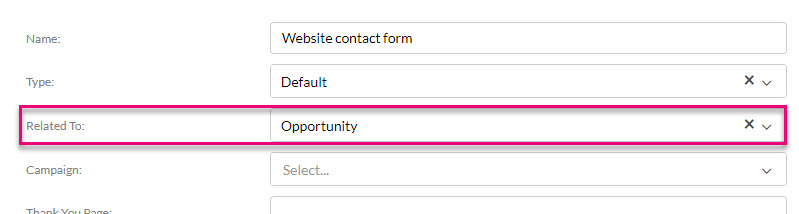
Related To
You’ll need to ensure the Web Form relates to the correct data type. If you save the form without a selection here or an incorrect selection, you cannot edit it and will need to start with a new form.
The dropdown list shows you the areas in CRM you can relate the form to. In this example, we’re going to choose Opportunity as we’re bringing in a contact enquiry from a website into the sales pipeline in CRM.
Depending on your selection here, different fields will be available for use within the form itself. The current choice means I’ll be able to access fields from Contact, Company and Opportunity to use on my form i.e. if I create an Opportunity it will be linked to either a Contact, Company, or both.
If I related my form to a Project instead, I would be able to access fields from Contact, Company and Project to use on my form; so, you can see how the data type you choose influences the fields that you have available to use on your form.
Campaign
If the form relates to a certain marketing campaign you are running, you’re able to link them using the Campaign field which will populate with records from Marketing > Campaigns. In this example, we’re going to leave the field blank.

Thank You Page
The Thank You Page is the webpage where the customer will be redirected once the form has been submitted. This will typically be a dedicated page on your site outlining that the form submission has been successful.
This field is not mandatory, but we do recommend that you add your own URL in here so that when someone submits the form on your site, they are redirected to a webpage of your choosing.

Active
To ensure the form can be used and functions as intended, make sure the box beside Is Active is checked. When a form is no longer in use, you’re able to deactivate it easily using this field.

There are 2 fields where you can select an existing Email Template to be used for an automated email to be sent:
- Employee Notification Email: an email is sent to the User in CRM being notified that a form has been submitted.
- Contact Notification Email: an email is sent to the person filling in the form i.e. the customer or lead.

To have your Email Templates available to select here, they must have a Source Name of Web Form Submitted.

See the section below on Notify people when a form is submitted on how to set up internal notifications.
Down below, in the field selector, you’ll be able to define the fields that are displayed on the form. If you don’t see the options you want, you may need to revisit the data type that your form is linked to – see the previous step for more details.
If there isn’t a field to capture the type of data you want, you can always make a Custom Field.
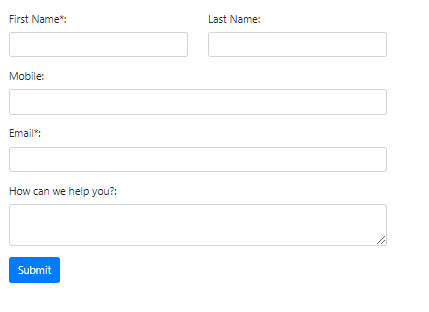
Click to expand each section and drag and drop the desired fields into the form. For this example, we’ll use First Name, Last Name, Mobile Phone, Email Address and Postcode – all related to the Contact.
You can also double-click on a field to add it to the form.

Once you’ve set the fields as required, click Save and Close at the top of the screen. You’ll be taken to the Web Form record.

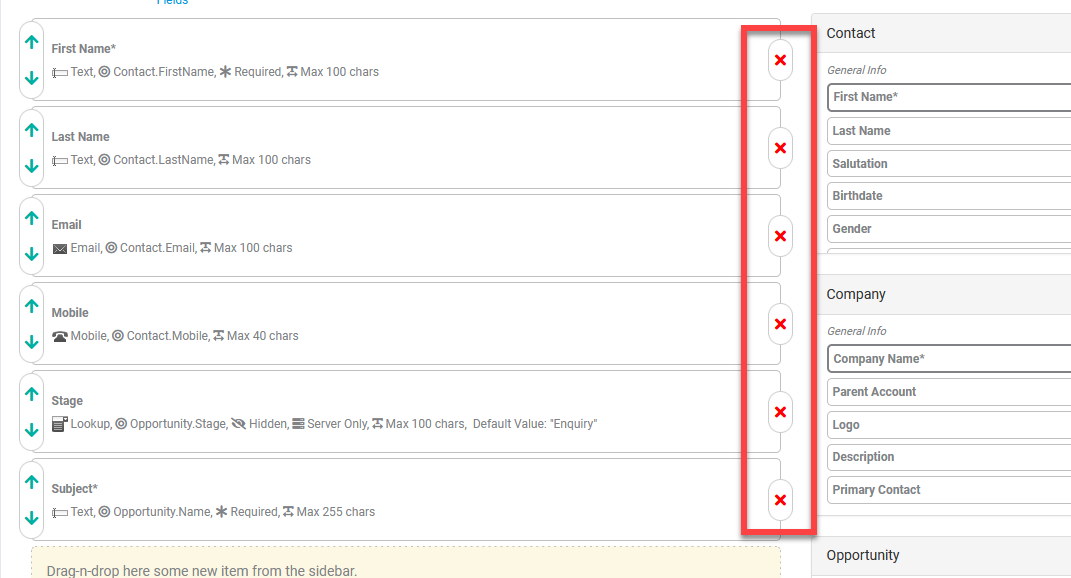
Note that when creating your form there are required fields you must add:
Fields shown with an asterisk (*) against them are required fields and must be added to the form. In the following example, you can see that the fields for Contact First Name, Company Name and Opportunity Subject all have an asterisk next to them – CRM cannot create a Contact without a First Name or a Company without a Company Name or an Opportunity without a Subject as this is key information required to create each type of record.
You need to ensure that you are giving CRM enough information to create the desired records and outcomes.

Required Fields
If I tried to create an Opportunity without having the Subject field on my form, I will receive an error message when I try to save the form, as per the following example.

The same would happen if I tried to create a Contact without having the First Name field on the form or create a Company without having the Company Name field on the form.
Once you have dragged and dropped a field onto your form, you can click on the field to reveal a pop-up box with further options.
In this example I want to rename the Contact field Email so it is called “Best Contact Email” instead. To do this, I type my desired value into the Display Name field to update the label this field will have on my site.
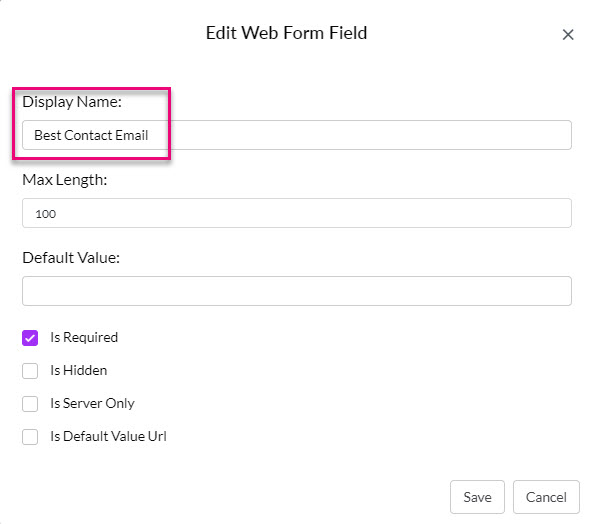
This is a handy feature that allows you to customise your field labels so that they use your terminology and make sense to the person filling in the form.
When the form is previewed in HTML you will be able to see that the new label has been applied.

Once you have dragged and dropped a field onto your form, you can click on the field to reveal a pop-up box with further options.
In this example I’m going to specify which fields MUST be filled in on my form – I want an email address to be added so I’ll click on the Email field and then check the Required box in the pop-up box and click Save.

The field will now show with an asterisk (*) meaning that it is a required field that MUST be filled in before the form can be submitted – if the field does not have a value, it cannot be submitted.

When the form is previewed in HTML you will be able to see that as asterisk now shows to signify the field is required.
If the end user tries to submit a form without adding an email address, an error will display.

Required fields are an excellent way of ensuring that you capture key data in your form submissions.
There may be instances where you want to fill in a field in CRM with certain information each time without end user input.
In the following example, I want CRM to make an Opportunity record, but this means I MUST have a Subject as this is a required field.
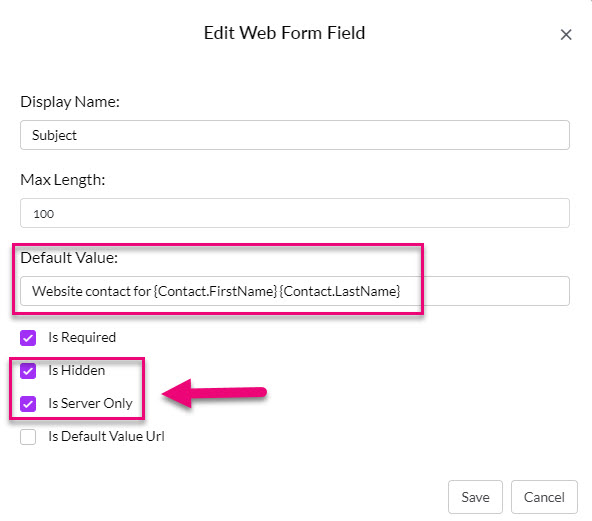
I don’t really want to ask the person filling in the form to put a value in this field if it’s not necessary, so what I’m going to do instead is hide the field and give it a pre-determined value:
- I add the Opportunity Subject field to the form and then click on it to reveal a pop-up window.
- I check the boxes next to Is Hidden and Server Only – these choices mean that the field will not be visible to the end user on my web form.
- I then add a new value to the Default Value field by typing in “Website contact for {Contact.FirstName} {Contact.LastName}” – this means that the Subject field of the Opportunity will be populated with the text “Website contact for” followed by the first and last name of the person submitting the form.
- This is a neat trick to use merge codes to fill data in CRM, lest I end up with 5,000 Opportunities, all called just “Website contact”!
- Click Save.
You’ll then see that the field shows on your form with the choices you have made.

When CRM creates the Opportunity, it will automatically fill in the Subject with the Default Value – all of this takes place in the background, without the field being visible to the end user.
This is a really easy way to pre-program CRM records with data that you may require, but do not necessarily need the end user to input.
Please see the following section on Adding default field values for more detail on how this works.
Following on from the previous section on how to Hide fields from the customer facing form, there may be times where you want to pre-program CRM records with data that you may require, but do not necessarily need the end user to input.
To apply a default value to a field, just click on it to reveal a pop-up box and then input the desired information into the Default Value field.
There are a couple of very important points to note when using this feature:
Depending on the type of field you are adding a Default Value for, you may need to make sure the value first exists in CRM. For example:
- If we have text fields or boxes in CRM we can type in any value we want (subject to the maximum number of characters allowed).
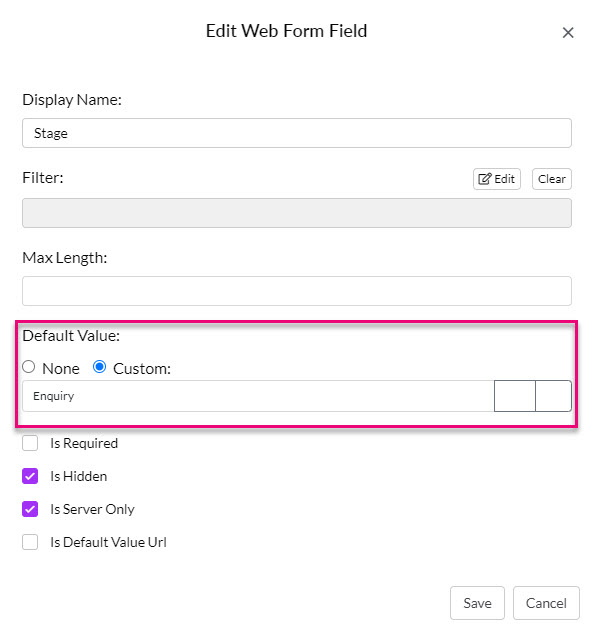
- If you have lookup or drop-down fields where a choice must be made, you need to select from an existing value and cannot choose a value that doesn’t exist yet.
The same applies if we are giving a field a Default Value – if the field is a lookup or dropdown type, the value you are applying needs to exist first. If it does not, the form will not submit, and you will see error messages on the Completed Forms tab in saved mode because CRM can’t find the value you are trying to input.
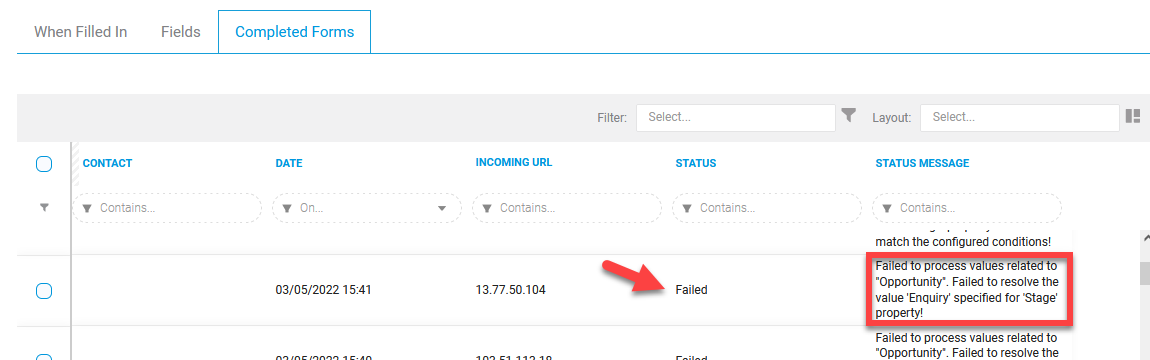
If you receive this type of error, you need to go and check the field settings and make sure the drop-down option you are trying to apply exists for use.
In the error above, the problem is that I am trying to apply a Default Value for the field Opportunity Stage and that value doesn’t exist in CRM. To resolve this, I go to Admin > Settings > Sales Pipeline and add the value I want to apply so that my form will work correctly.

To remove a field from a form, just click on the red cross icon at the right hand end of the field.
Before you deploy your form, you should run a test submission on to check that the form is working correctly.
To do this, click on HTML > View which opens the form in a new tab.

You can check the form to see that the layout matches your expectations i.e. hidden fields, field labels etc. You can then enter test data into the form and submit it.
If the form submits without issue, you can go into Opportunities in CRM and see the record you have created, then check the Contact and make sure you are happy with how all the data has come through.
If your form fails to submit, you should return to the Web Form in CRM and go to the Completed Forms tab which will show you a history of form submissions and in the event of failure, a reason why. You can then go back into the form configuration to resolve the issue.

Get code to embed the form on your website
By clicking the Embed Code heading you’ll be able to view the required code for adding the webform to your site. Simply click the Copy to Clipboard button and paste the code into your website – the form will be available to use right away.

Generate a HTML file or get the form URL
If you’d like to view or save the form as a HTML file, click the HTML button and then either:
- View: this opens the form in a new tab so you can grab the URL and also preview and test your form.
- Save: saves the form as a HTML file – the download will automatically start in your browser; if it doesn’t it may be being blocked.

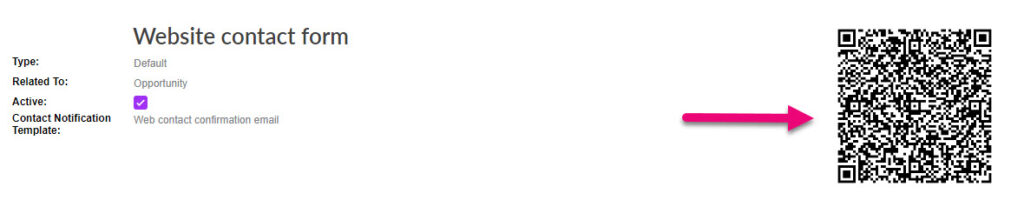
Get a QR code
CRM will automatically generate a code for you when you save the form – just copy it.
You can also use a Web Form to bring in Facebook Lead Ads.
We use various popular CSS and JavaScript libraries to provide a high-quality and convenient interface for our web forms, such as Bootstrap, jQuery, VueJS and others. However, sometimes there can be a conflict between the libraries that we load automatically when rendering the web form and those that are already included on the website hosting our web form. This can result in incorrect styling or JavaScript code on the website.
To avoid such problems, we introduced using of the “skipCSS” and “skipJS” options in a query string part of a URL link used to render a web form. These options allow you to disable the rendering of links to automatically load third-party libraries that our web form depends on and leave it up to you to ensure that all required styles and libraries are loaded as part of the hosted website page.
Here is an example code for embedding a web form on a page:
<div id=”tallemu-crm-web-form-b03b2eb5-9d0d-4ade-9cc2-3a0787a71c0c”>Loading…</div>
<script
defer
type=”text/javascript”
src=”https://tewebmarketing.azurewebsites.net/api/webform/loader?dbKey=763a9a5f-24ba-4985-9afd-3482d919b995&formKey=b03b2eb5-9d0d-4ade-9cc2-3a0787a71c0c&skipCSS=true&skipJS=true“
></script>
Notice the “skipCSS” and “skipJS” parameters added to the end of the web form URL query string. This allows the user to control the versions and loading order of libraries, and avoid duplicating or redefining code.
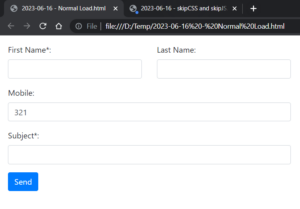
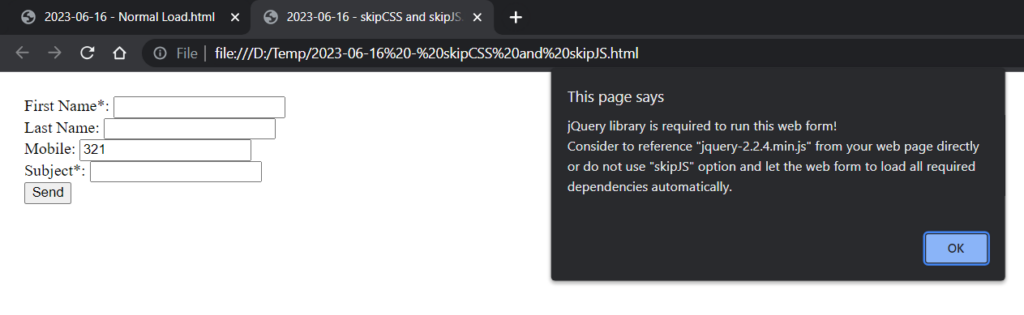
Take a look at the screenshots below to understand the key differences between rendering a web form by default or with the “skipCSS” and “skipJS” options enabled.
This one is rendered with the Bootstrap library loaded automatically:
And this one informs the user of the issue that the jQuery library is missing and should be referenced from the hosted website page directly:
The When Filled In tab lets you define basic workflows that occur after the form has been completed.
If you’d like the respondent to be added to a specific Marketing List after form completion, click Add beside the correct list in the sectioned outlined below and then click Update.
In the example below, I will have people who submitted the form automatically added to my newsletter list.

If you have integrated CRM with either Mailchimp or Campaign Monitor, your Marketing Lists will be automatically synced between systems.
Further down you’ll see a notification section. If you’d like to notify a member of staff when a form is filled in, select their user from the left-hand list, then click Add, then click Update. They’ll then receive an email every time the form is completed.

You can use reCAPTCHA v3 on your Web Forms – click here to learn how to enable this feature in CRM.
Once the feature has been enabled in your CRM, reCAPTCHA will automatically be applied to all new Web Forms that you create after that point. You can also apply it to any existing forms you have.