- Companies
-
- Admin
- Account Options
- Pricing settings
- PDF and Email Template system preferences
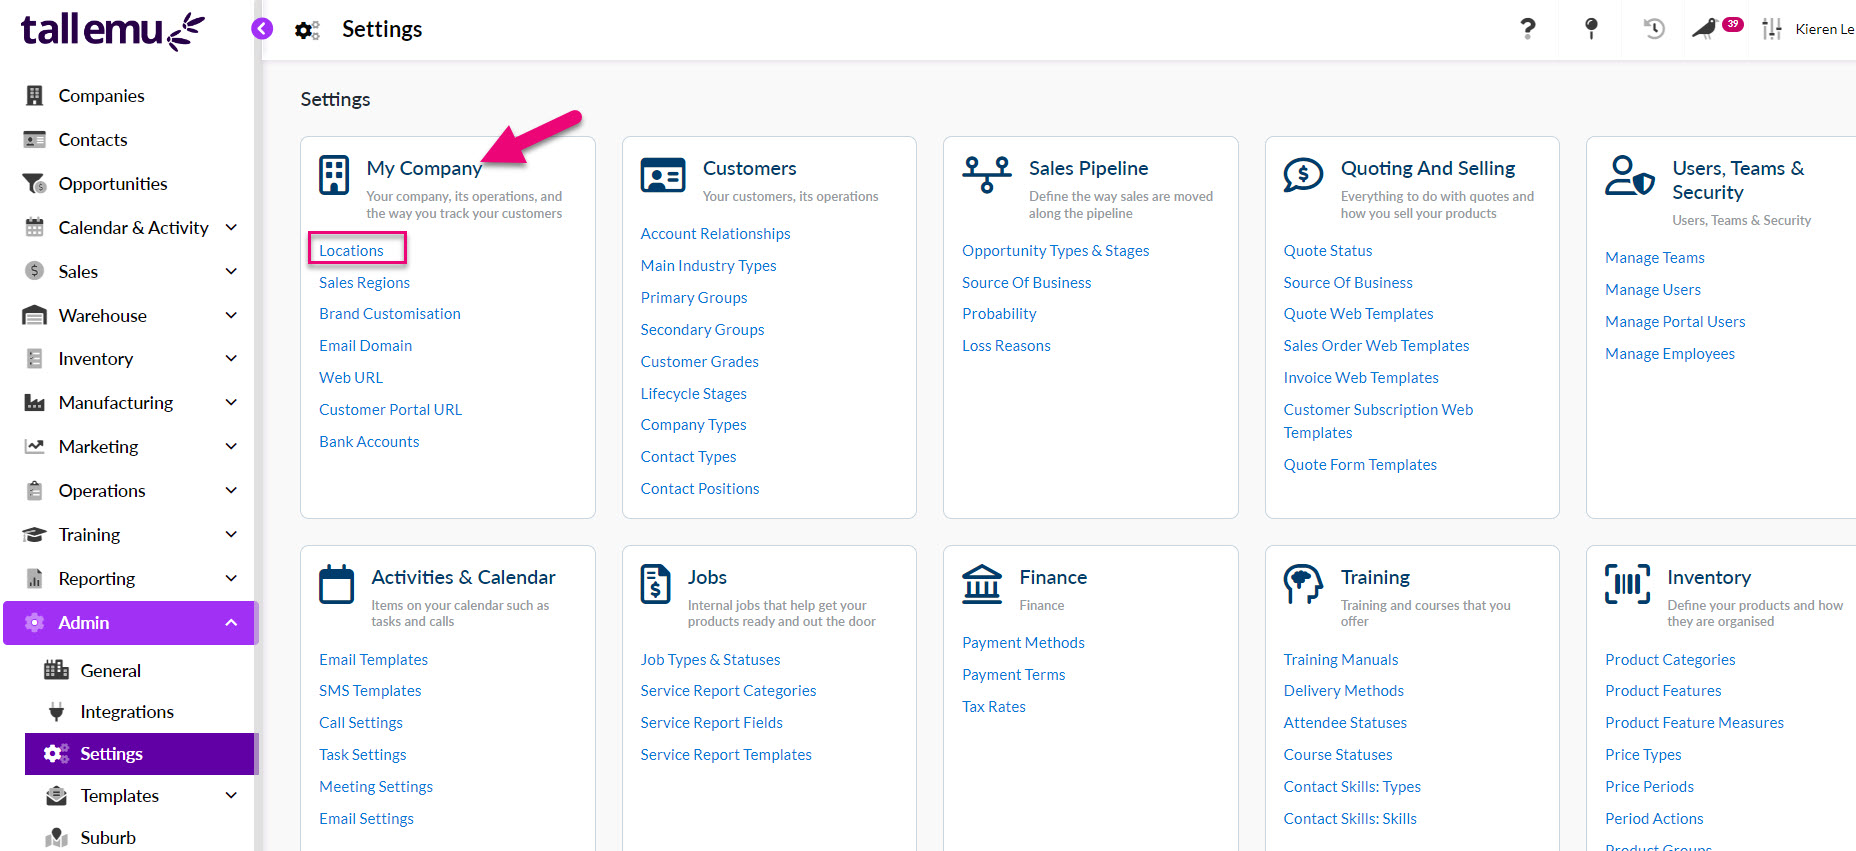
- Locations
- Brand Customisation
- Product Categories
- Product Groups
- Enable Time Billing
- Customising Assets
- Custom Fields
- Delivery Resources
- Delivery Options
- Reporting Preferences
- Sales & purchase settings
- Calendar Settings
- Messaging settings
- Repeated Invoice frequency
- Company Settings
- Credit Settings
- Sales Regions
- Asset Settings
- Ticket settings
- Relationships
- Proposal-based Quotes
- Customising Training
- Prefix/Sequences settings (Record Numbering)
- Creating SMS Templates
- Invoice Settings
- Creating Email Templates
- Creating Letter Templates
- Using Letter Templates
- Using SMS Templates
- Using Email Templates
- Setting up Teams
- System security
- Users
- Activate a new User account
- Log into a User account
- Managing Connections
- Calculating Landed Costs
- Resources
- Payment Methods
- Payment Terms
- Couriers
- PDF Templates
- Service Reports
- Quote Form Templates
- System Quote Preferences
- Credit Control
- Setting up Teams
- Regional Settings
Locations
Locations can be applied to various areas in your CRM e.g. locations for your stock, production locations for your Work Orders, ‘sell from’ locations for your Sales Orders or receipt locations for Purchase Orders.
See also:
How do I set them up?
If your accounting system supports multiple stock locations, these will be automatically imported into CRM when you connect it.
Note that you will not be able to create new Locations in CRM and must create these in your accounting system and import them into CRM.
If you create new locations in your accounting system in future, you can import these into CRM from your accounting integration settings in CRM, as per the following example screenshot.

If your accounting system does not support multiple locations, you can create them in CRM.
Locations are accessed from the Admin> Settings> My Company > Locations.
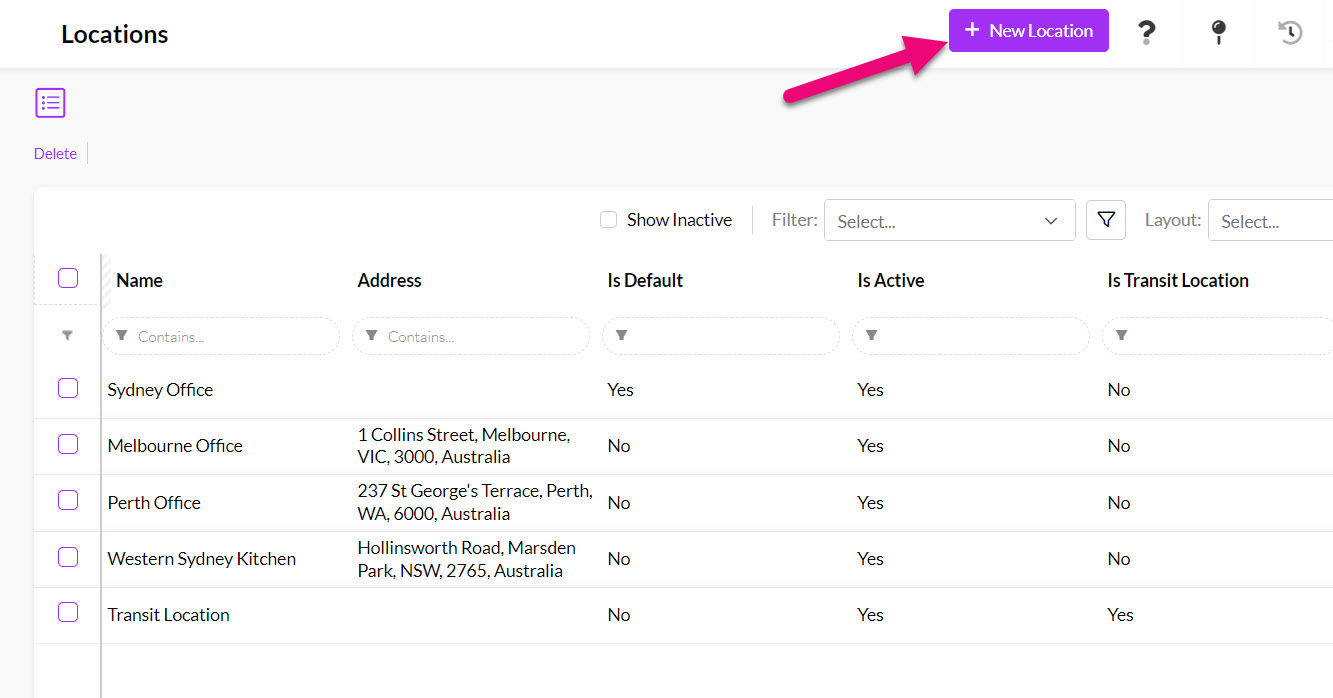
You can add multiple Locations to your CRM that correspond to a range of types:
- Physical – these can be offices, worksites or branch locations. You can mark your primary physical location as the default location.
- Delivery – these can be places where goods are delivered, or services are provided.
- General – these can be any other types of addresses that do not fit into one of the existing type classifications.
- Legal – typically these would be registered addresses, which may differ from physical addresses and therefore need to be recorded separately.
- Postal – these could be addresses like post office boxes or locked bags.
From Admin> Settings> My Company > Locations click on the New Location button.
The following form will display for you to enter some basic details into:

Add the following details to the form:
- Give the location a Name.
- Make sure the Is Active box is ticked so that the location will be visible throughout the system.
- If you want to set this Location as your system default, ensure the Is Default box is ticked.
- Add the Address Type by choosing from the dropdown list.
- Add the location details by filling in the address fields.
- Click Save to create the new Location.
See the next section on how to set up order notifications for a Location.
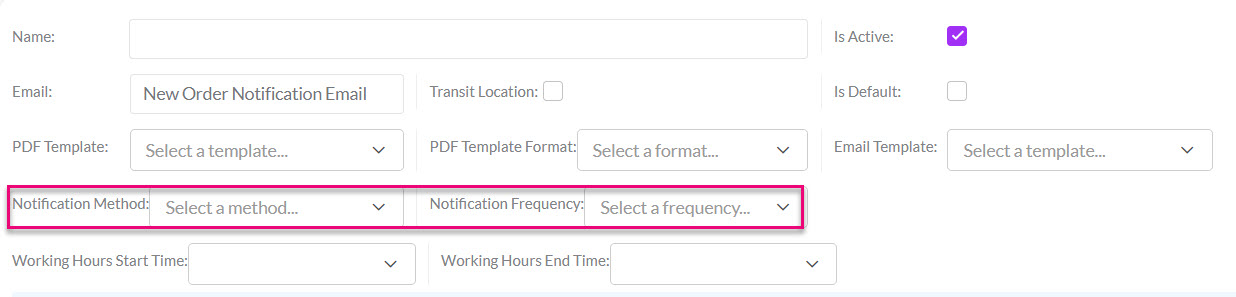
On the Location form you can fill in the following boxes to generate email notifications when Sales Orders are created at that Location.

Here’s how it works:
- Fill in the Email address to receive notifications.
- Select the PDF Template that the notification will arrive in – this is essentially the layout of the information.
- Select the PDF Template Format (pdf, xls or csv) which is the format the data will arrive in via email.
- Select the Email Template that will be used to send the data.
- Select the Notification Method – individual or batch i.e. do you want a notification per order or for a batch of orders?
- Select the Notification Frequency – Manual, Scheduled or Realtime. When you select scheduled, you can specify a frequency.
These are used for Stock Transfer Shipments. For example, I need to move stock between my Perth and Melbourne warehouses, so I’ll use a Stock Transfer in CRM and provide the to and from locations, as well as details about the items I’m moving and their quantities.
I then create a Stock Transfer Shipment to tell CRM that the items are being moved. Once I mark the outgoing shipment as Shipped, it’s not in Perth anymore (so it’s been taken out of stock there), but it hasn’t reached Melbourne yet to be receipted into stock.
At this point, CRM places the goods in a Transit Location.
![]()
Then once the transfer is marked as Received when it reaches Melbourne, CRM takes the goods out of the Transit Location and puts them into stock in Melbourne.
![]()
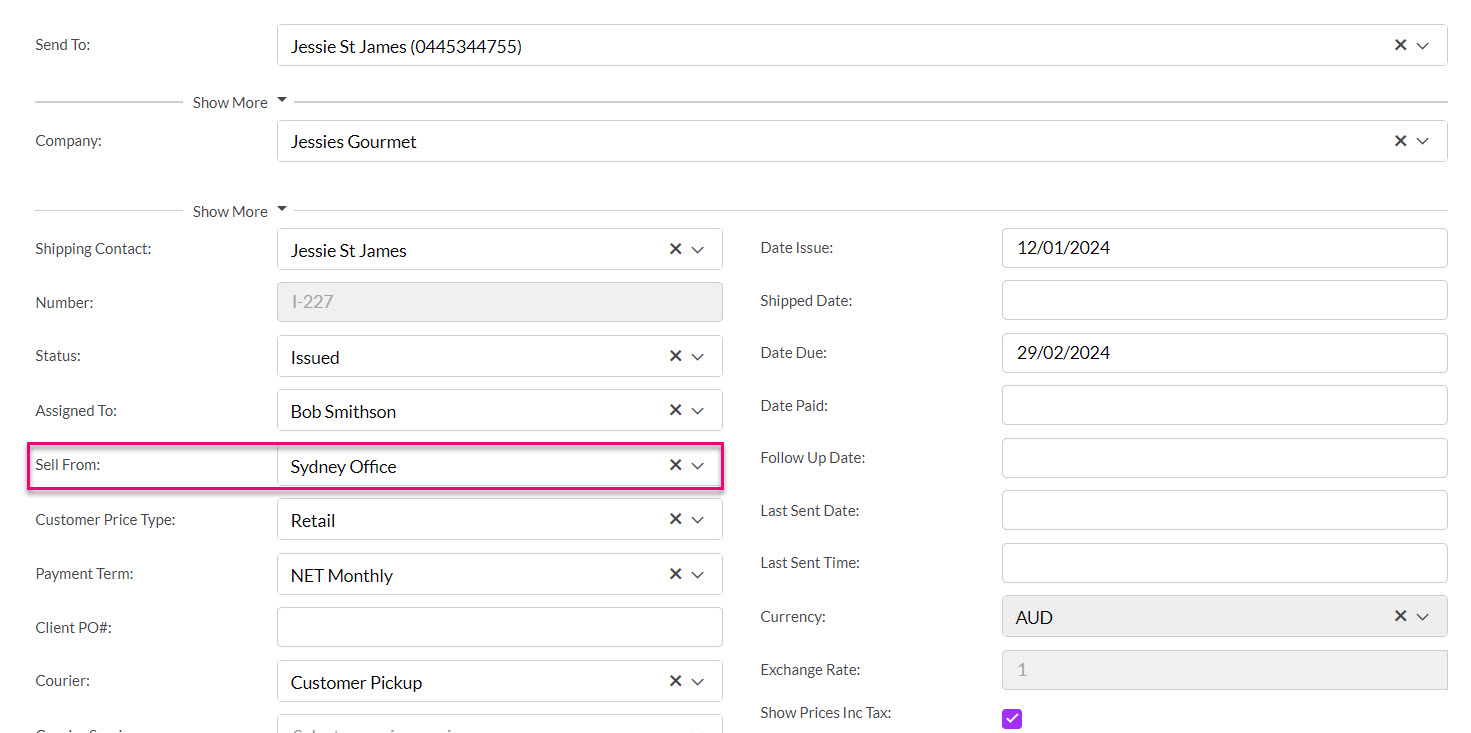
If you have ticked the Is Default box, the Location will automatically be selected wherever a dropdown list is related to Locations e.g. the ‘Sell From’ dropdown field on a Sales Order.
The following example shows the ‘Sell From’ dropdown field on an Invoice, which is populated with Locations. The default location will automatically be selected, but you can change this by clicking to expand the dropdown to select another location from the list.
To edit the details for an existing Location record, click on the desired record and the information will display for you to edit – ensure you click Save when you are done making changes.

Open the desired Location record and ensure that the Is Active box is not ticked – click on Save to apply the change.
When a Location is not set as active, it will not appear on any related dropdown lists throughout the system.

Note that you cannot delete a Location if there is existing data linked to it – a warning will display if this is the case e.g. you have Sales Orders where the Location is currently being used in the ‘Sell From’ field.
Your choices are then to either:
- Set the Location to inactive instead of deleting it.
- Disassociate the linked records and proceed with deletion of the Location. To disassociate any linked records, you would need to change the value of any location dropdown fields to something else e.g. on Sales Orders you would need to select another location in the ‘Sell From’ field.

To delete a Location record, select it from the list and click on the Delete button.
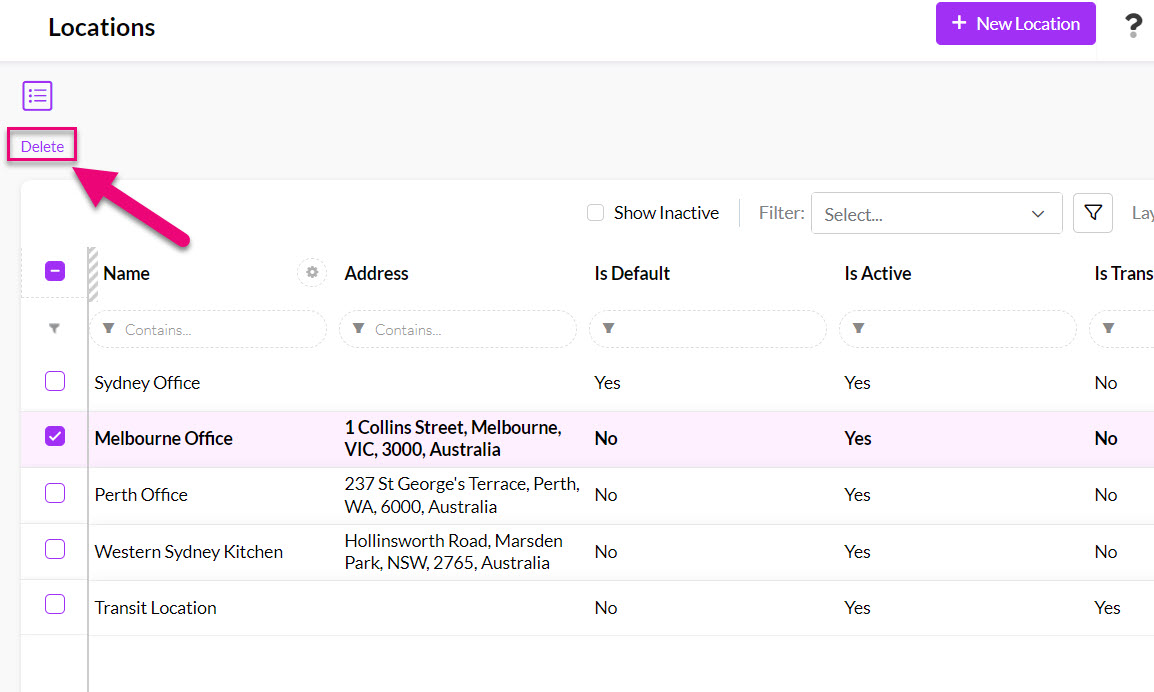
You’ll then need to confirm the choice.

Note that if the Location is synced with your accounting system, you will not be able to delete it from CRM, even if there are no linked records associated with it.