Creating Jobs
If your business completes servicing or on-site/in-field jobs, our Jobs module lets you cut down on manual processes and manage your jobs with ease.
There are several ways to create a new Job:
- Directly from the Jobs module.
- From an Asset record. You can also create Scheduled Jobs here that will recur on a set basis.
- From a Sales Order.
- From a Ticket.
To create a Job, head to the Operations > Jobs. Here you’ll see a list of the jobs your business has completed or has scheduled.
Click the New Job button in the top right-hand corner.
To create a Job, head to the Operations > Assets and open any Asset record – click the Add Job button.
A new Job will be created which will be visible on the Jobs tab below and you’ll be able to open the job sheet and edit it as required.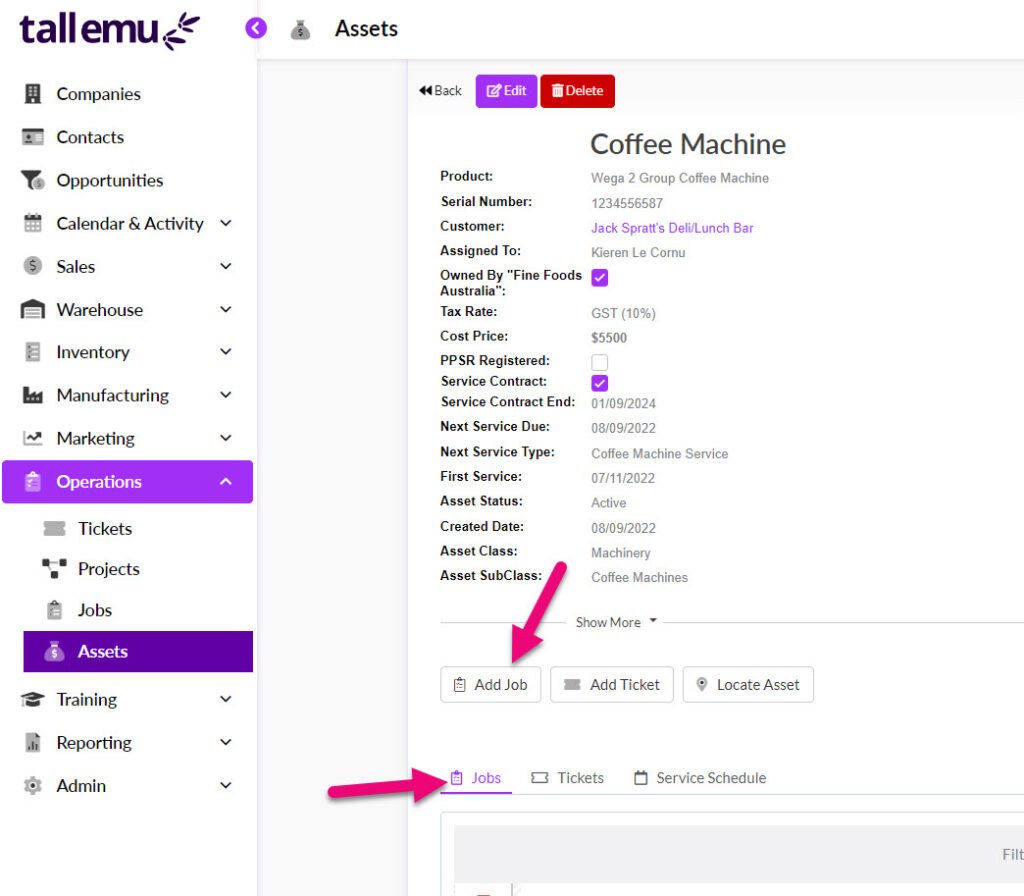
From Sales > Sales Orders, open a Sales Order and choose Generate > Job from the activity toolbar.
Note that this option will only be visible if you have Products on your order that are set to Auto-create Asset when sold.
You will then have the option as to what style of Job you want to create. In this example I can select from:
- New: this gives me a blank job with the customer details populated and links it to the Asset that I am selling the customer.
- Not linked to asset: this gives me a blank job with only the customer details populated.
- Coffee Machine Service: because I have my Service Products set up, CRM knows that this is a service offered for the Asset I am selling the customer, so can create a Job that is pre-filled with the customer and Asset details, as well as having the relevant Service Product loaded.

On the Sales Order, you will then see a link at the top to the Job record.

On the Job record you will see a Sales tab – click here to view the associated Sales Order and click on the record to open it.

To create a Job, head to the Operations > Tickets and open any record – click the Add Job button.

Our Job creation screen works in a similar way as our quote, sales order and invoice screens. You’ll see a familiar layout, with general job information at the top, and an itemised list further down the page.
However, Jobs differ in that instead of adding items you’re selling to a customer, you add items that would be used/involved in the completion of the job. These may include service parts, business assets and time (labour).
To save you from needing to add the same parts every time you perform a Job, you can set these up in your inventory as Service Products that can be quickly added. You can also add Time Products in for things like labour and travel time.
The job number field will populate automatically when you save the record, otherwise, you’re able to override this by entering a custom job number if desired.

Beneath the area where items are added, you can click on the arrow on the Add Asset button to reveal the option to add different types of items to the record.

Select the Company and/or Contact.

If you’re completing Jobs in-field, you’re able to create a Company or Contact inline if they don’t already exist in your system – just type in the name you are searching for and if there is no match, click on the option to create a new record.

A blue New icon will display at the end of the field, indicating that CRM will create a new record for you when the Job is saved.

Go to Admin > Settings > Jobs and click on Job Types & Statuses to open a pop-up window to edit the fields.

Types have a relationship with the Status field e.g. you can associate different Types with Statuses so that the selection made in the Status field populates your Type field with relevant options.
What are Types for?
You can have as many different Types as you want and how you set these up is up to you; the primary reason for use is so that you can segment your jobs into different categories for reporting and workflow purposes e.g. installation, scheduled service, emergency call-out etc.
Another reason for the Type field is that it allows you to have different processes (Statuses) for each, in the event that it’s not a single process for all jobs.
Setting up your Types
- To edit your Types, just click on Edit Job Types.
- To see what Types are currently available, just click on the dropdown list to show all the options.

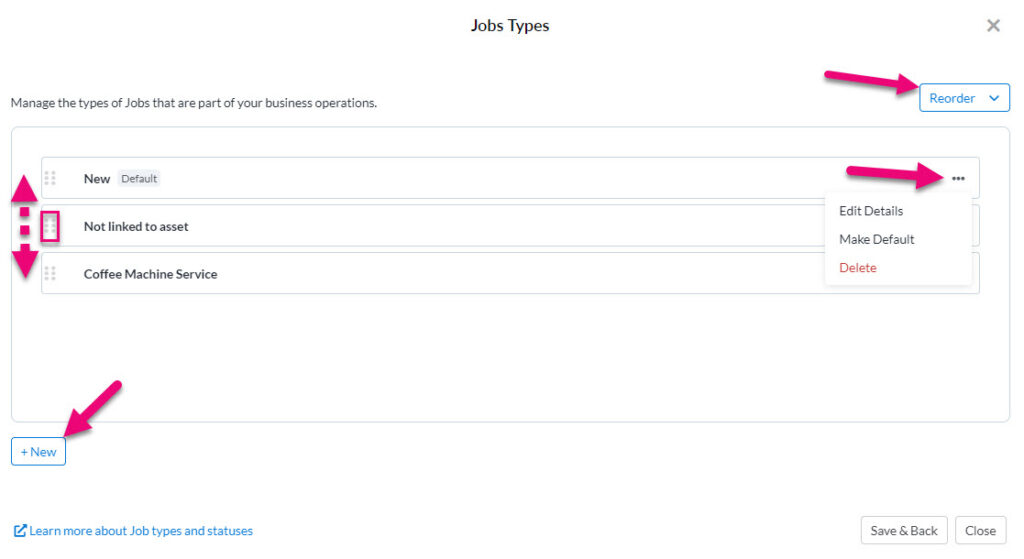
You will be taken to a new window where you are able to:
- Create new options using the New button.
- Reorder the options on the list by either clicking on the dots on the left-hand side of an option and dragging it up or down on the list or sorting the options automatically using the Reorder button.
- Edit an option or make it the default option by clicking on the dots on the right-hand side of the option.
When adding or editing a Type, you can choose whether or not it is Related To Asset i.e. if this box is selected, the option will only be available for selection on the dropdown list if the Job is linked to an Asset, if it is not selected, the option will show on all Jobs.

What are Statuses for?
Stages are the process or phases that jobs go through from inception to completion. These steps may not be the same for all the jobs you deal work on, so you’re able to specify different phases for different types of jobs – this is the relationship between the Type and Status field.
Setting up Statuses
The Status field is populated based on which Type field is chosen, so when working with Statuses, you need first choose the Type that they are applicable to.

When creating a new Status option, the following fields will display:
- Name: this is the label of the option that will show on the dropdown list.
- Active: if this box is selected, the option will be available for selection on the dropdown list, if it is not selected, the option will be hidden from the list.

To edit the details for a specific Status, click on the 3 dots on the right-hand side of the record to reveal options or edit or delete.

To reorder how the Statuses will appear on the dropdown list:
- Click on Reorder to sort alphabetically.
- Grab and hold the dots on the left-hand side of the option to drag it up or down on the list.

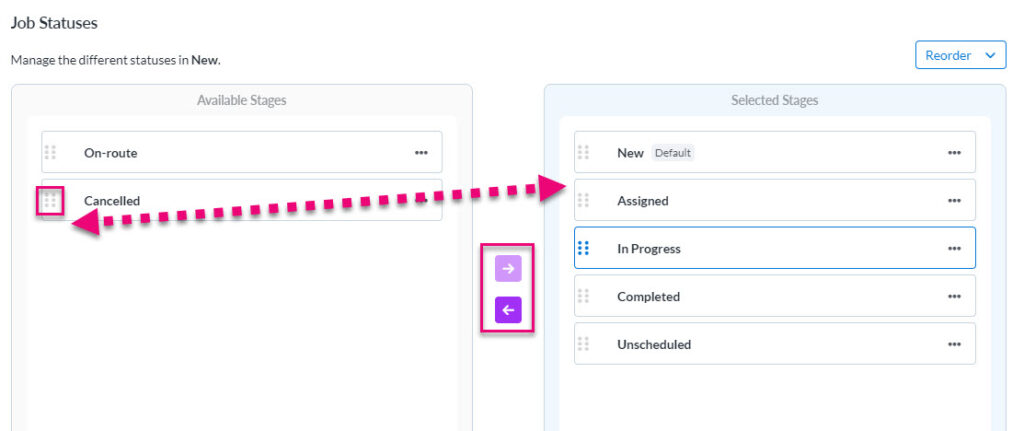
To change which Statuses are available for selection on the dropdown list you can:
- Grab and hold the dots on the left-hand side of the option to drag it from Available Statuses to Selected Statuses, or vice versa.
- Use the arrows in the middle to move options between sides.
The Job Type and Status fields let you provide additional detail to describe the jobs you complete (these dropdown lists can be edited by heading to the Admin > Settings > Jobs).
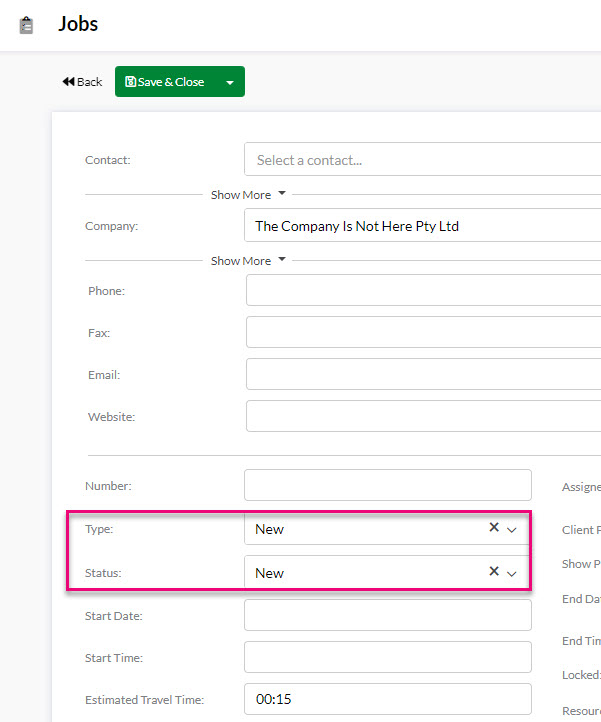
If you are filling in the Status field, you’ll quickly be able to see all your Jobs in Kanban View, arranged by their Status.

Further down we’ll see several date fields:
- Start Date & Start Time: when the job starts.
- End Date & End Time: when the job ends.
- Estimated Travel Time: this lets you add ‘padding’ time to a job to allow for travel.
- ETA Date & ETA Time: before a job has been formally scheduled, you can use these fields to approximate when it could be booked.
- Due Date: can be used for jobs that may be scheduled but have not yet been completed or can be used as a traditional due date to show when the job must be completed.

The key purpose for these fields is tracking and scheduling of your pipeline. A very useful way of working with the start & end information for scheduling is to use Calendar View.

Attendees can be added (in addition to the person the job is Assigned To) to keep track of any employees that were present/involved in the job. You can have multiple Attendees.
The Sales Region can be assigned to ensure the job is grouped in the correct category – helpful for reporting and sorting.

When you add Attendees to a record (along with the required date & time information) the Job will show in calendar view in the calendar for each Attendee, as well as the person the job is Assigned To.
Below this we’ll see the location fields. These let you define the job location if it’s off-site.
You’ll notice the address fields will auto-populate based on the customer/contact the job is related to, however, you’re able to override this information if the address differs from the one stored in CRM.

Once you have location information for your jobs, you can utilise Map View visualise your records.

This is where you add items that are to be consumed during the job. You’ll notice that Time is there by default.
This refers to any labour or travel time that was required to complete the job – you can set up items in your inventory called Time Products for this purpose.
We’ll enter the appropriate labour item (taken from your product list), input the start and end time and CRM will calculate the cost of the time taken, based on the price I have set on the item in my inventory (Time Product) and the amount of time that has elapsed between the Start and End times.

Then we’ll enter any description required for the labour into the text box below the item name.

To expand the comments box to show more options, just click on the green square to the right of the box.

This opens the comment box with a formatting toolbar. When done, click on the green cross to close the box.

Adding other types of items
Beneath the area where items are added, you can click on the arrow on the Add Asset button to reveal the option to add different types of items to the record.

A Comment line item
Once you have saved a Job, you’ll be able to add a range of attachments in the centre of the record.

You can also add Notes and Calls to the record so that will appear on the Timeline.

From the record toolbar, click on Preview > Job and a PDF summary of the job will open in a new tab.

See this guide for more information on how to set up and use Service Report Templates; these are a pre-requisite requirement, along with having an Asset and Service Product on the Job.
When you are ready to generate a report, from the record toolbar, click on Preview > Service Report and a PDF will open in a new tab.

You can use the bulk update tool to update a number of fields for a number of records at once.
Just select the records you want to modify and then click on Update on the toolbar – you can then select the fields you want to update.

You have 4 different view options in Jobs, and you can switch between the views by using the selector icons above the activity toolbar, as per the following examples.

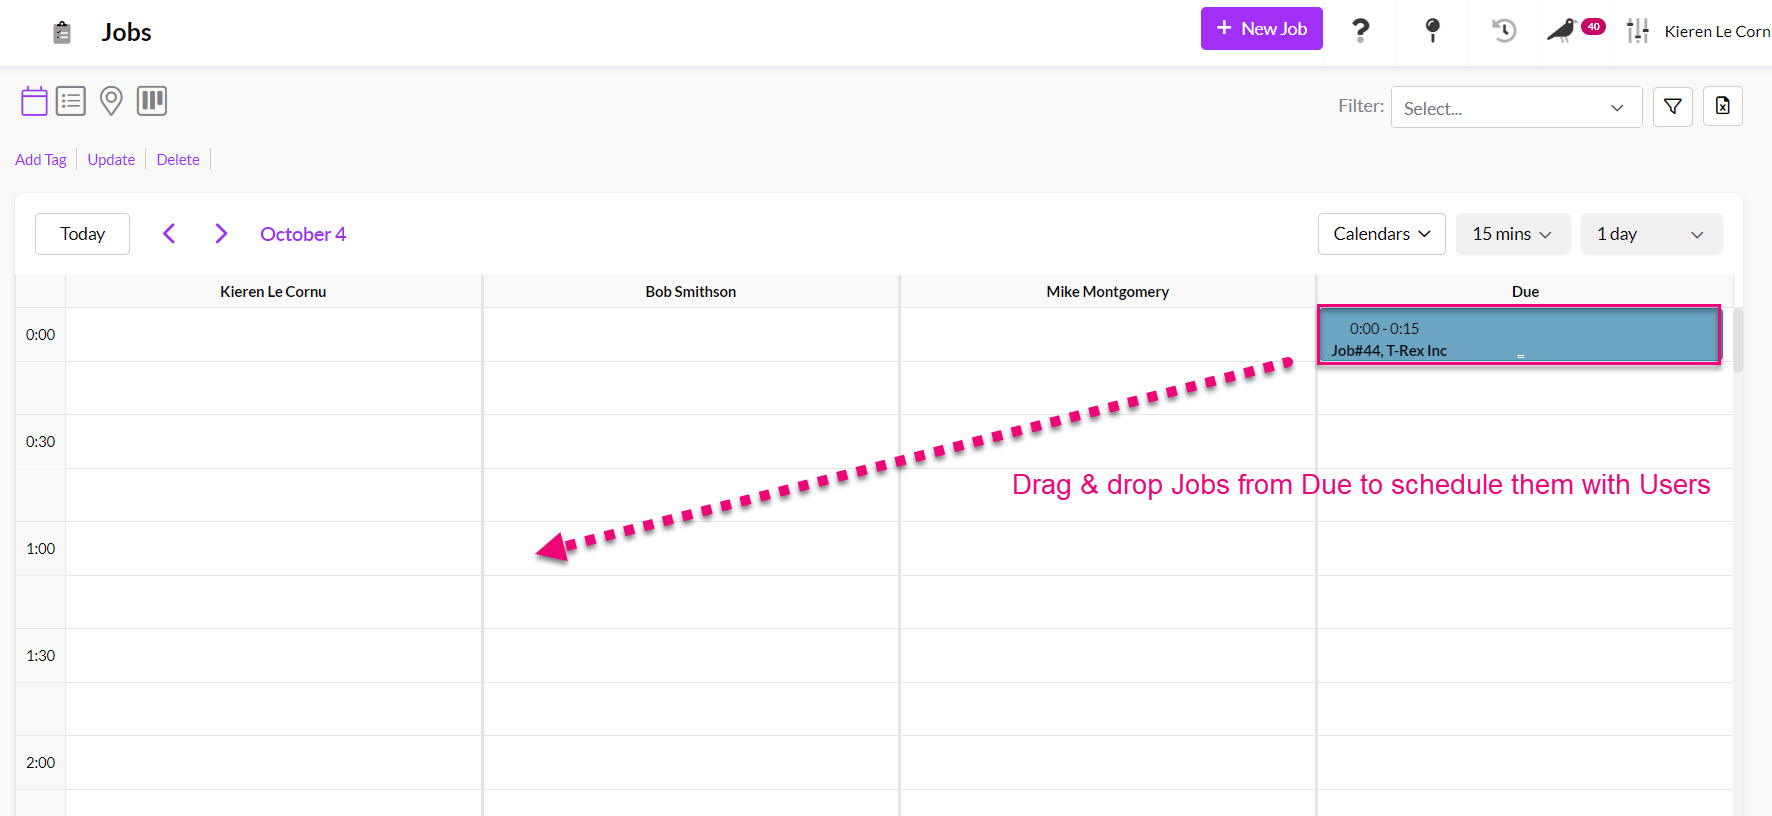
- 1. Calendar view – where records have start and end dates and times, you can use the calendar to visualise them on the calendar.

- Before a Job is Assigned To anyone, it will show on the Due Calendar – from here you can drag & drop Jobs onto User calendars to assign them and/or change the date/time they are scheduled for.
- 2. List view – displays a list of records you can search and sort. Setting up Filters and Layouts here will make it easy to track and manage your workflow in future.

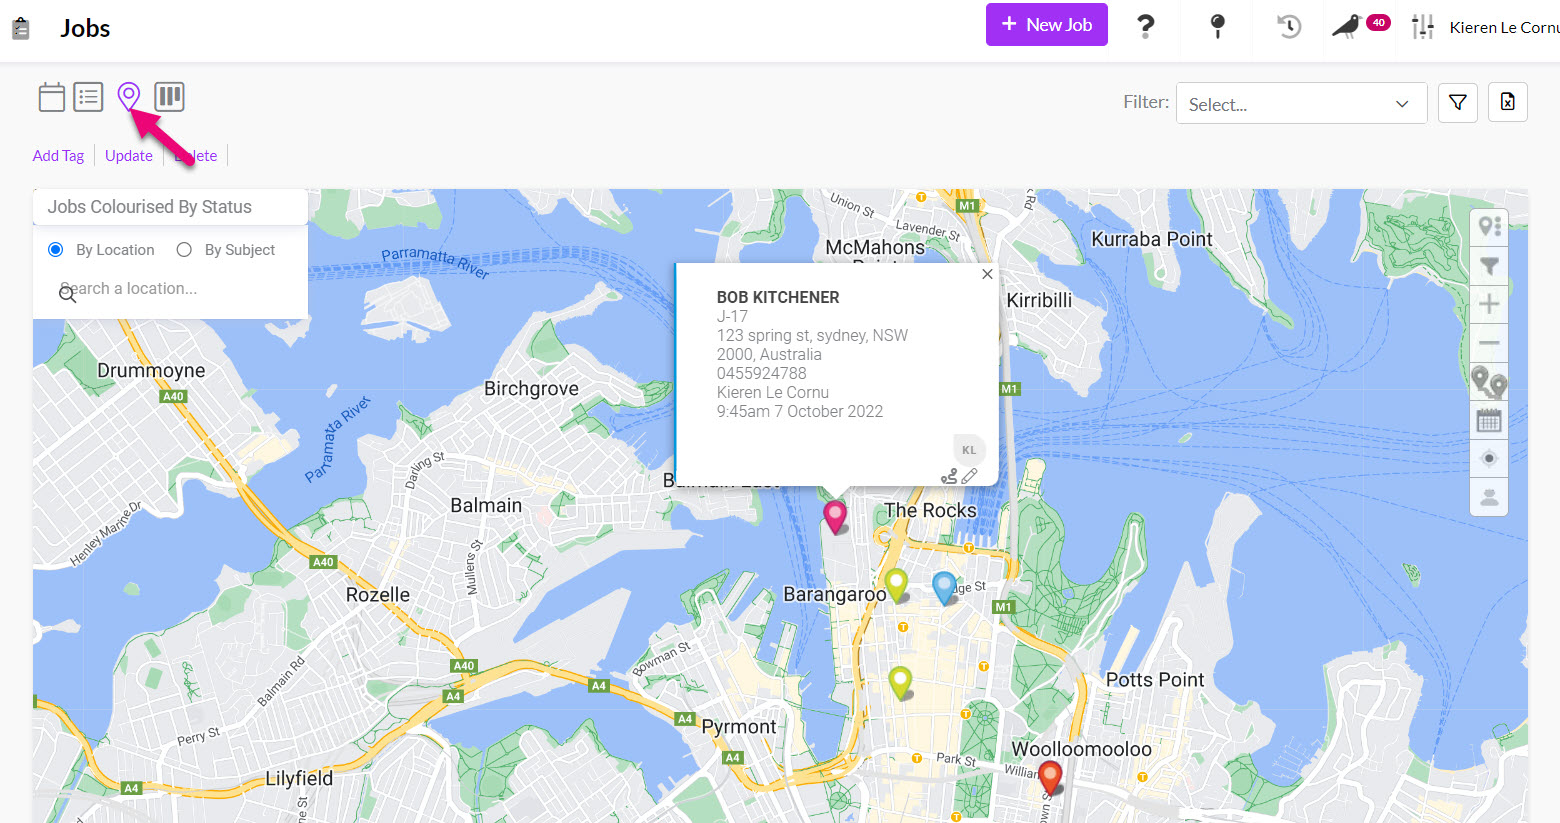
- 3. Map view – if you have added address information to your records, each Project will display as a pin on the map.
- You can also choose to display Job Routes on the map – click the route button on the toolbar and then select a date to display the route information for.
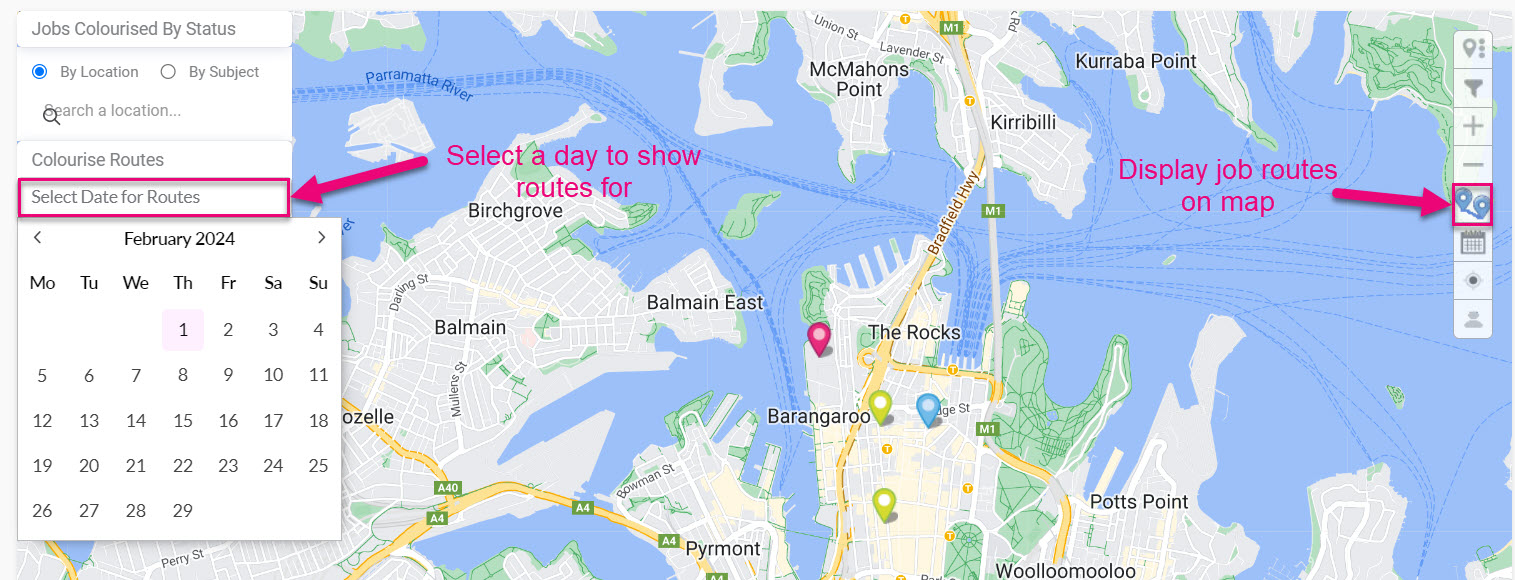
The routes will then display on the map with a different colour for each User and the Jobs numbered in order of the route.

Note that for route mapping to work, Users must have a Work Location set as CRM will use this as the starting point for the route mapping i.e. the address in the Job is the destination, but in order to calculate how to get there, the system must have a starting address.

Work Location field on a User record
- 4. Kanban view – this will display your records according to their Status, or you can click on the gear icon to change the view so that it is sorted by who the records are Assigned To.

You also have
- From Reporting > Dashboards you can open the Jobs By Day dashboard.

- You can also export your Job data to Excel to create your own custom reports. Note that this will only export the ‘top-level’ of data i.e. none of the items on the record will be exported, just the core record information.

Learn more with our guide on how to search, sort and report in CRM.