- Companies
-
- Marketing
- Create Marketing Lists
- Send Email Campaigns
- Creating a simple Web Form
- Smart Lists
- reCAPTCHA for Web Forms
- Facebook Lead Ads
- About Web Forms
- Insta-Buy Web Forms
- Add or Remove Contacts/Companies from Lists
- Creating a Marketing List from Advanced Filters
- Editing existing List members
- Exporting Marketing Lists
- Filtering by Lists
Insta-Buy Web Forms
What are they?
Your database automatically comes with a Web Form that allows customers to buy a product from you by either clicking a link or scanning a QR code.
If you have a payment gateway connected to CRM, customers can also pay for their purchase at the same time.
You are able to customise the default system form and/or create your own.
Also see:
How do they work?
On every product in your inventory in CRM, there are 2 buttons:
1. Insta-Buy Link – click the button and CRM will display different ways you can generate a link:
-
- View: open the Insta-Buy Form in a new tab (great if you want to quickly preview it).
- Copy Link: copies the link to your clipboard.
- Save Embed Code: downloads a .html file with the code (make sure your browser isn’t blocking the file download).
- Copy Embed Code: copies the code to your clipboard.
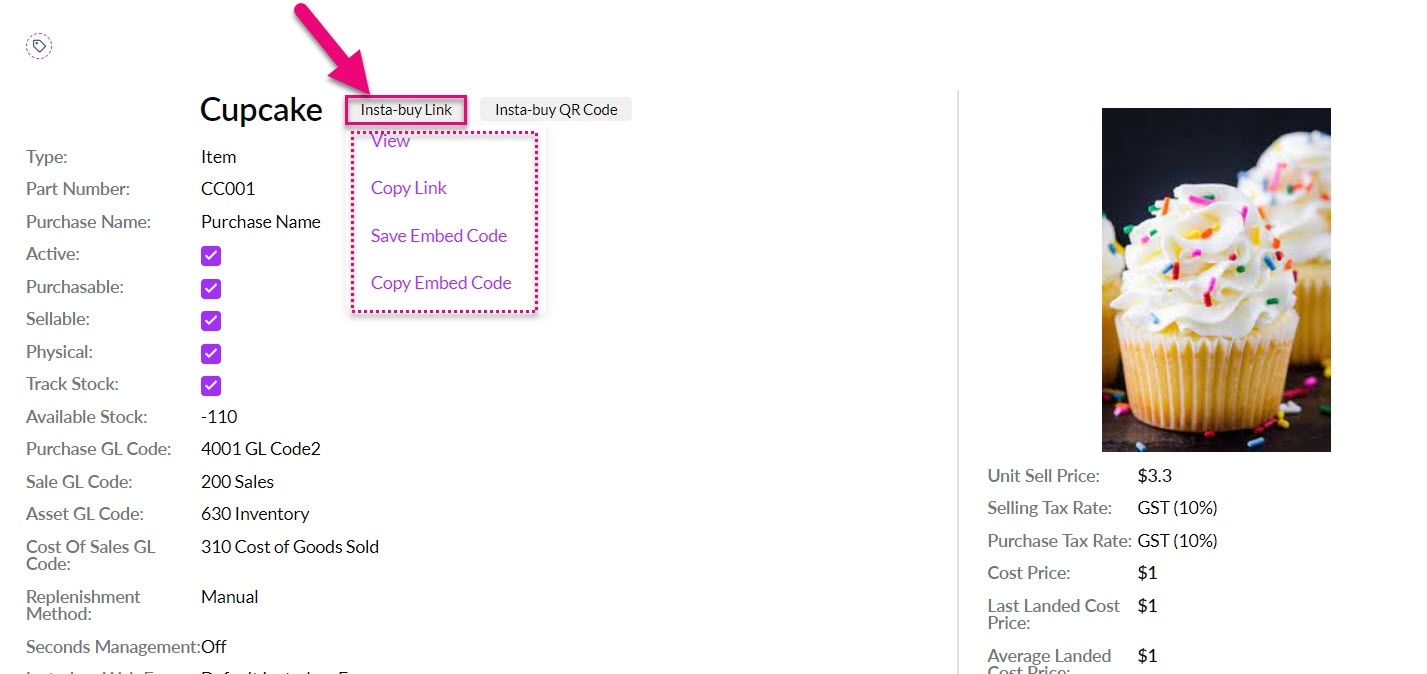
2. Insta-Buy QR Code – click the button and CRM will display a QR code at the top of the product record. You can then distribute this code for customers to buy the product online.

No matter which method a customer uses (e.g. QR code, link in an email, embedded link etc.), all roads lead to the same place and the default system Insta-Buy Web Form will open, as per the following example.
- The customer will select the quantity of the item they want to buy and fill in their details.
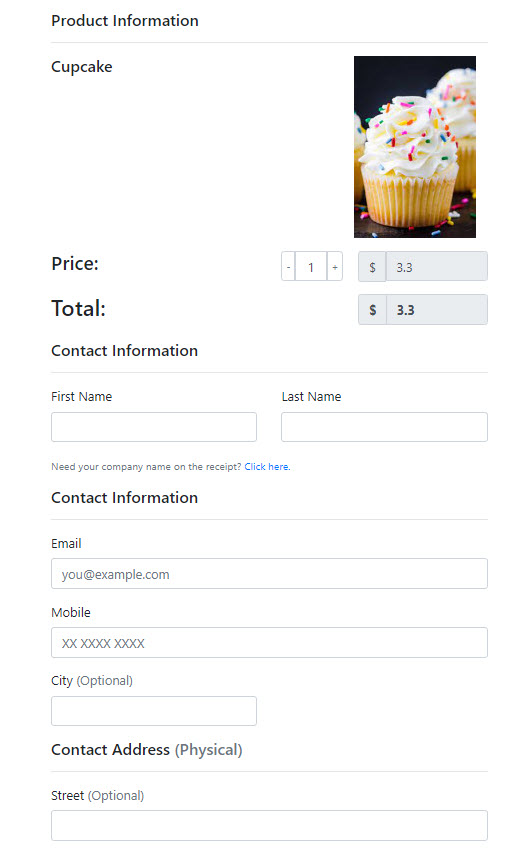
- If a company name needs to be added to the invoice, just click the option to reveal the field for it.


- If you have a payment gateway connected to CRM, they can also enter their card details to pay for the purchase or request an invoice.
Note that the Invoice Me option doesn’t automatically send the Invoice, this needs to be sent manually from CRM.

- Once the Buy Now button is pressed, the order will come straight into CRM as a new Sales Order.

You can modify the system Web Form to suit your requirements.
- Go to Marketing > Web Forms and open the form called Default Insta-Buy Web Form.

- Then click on the Edit button to reveal the options you can modify.

- Remember to click Save & Close when you are finished editing this section.

Price Type
You can select the Price Type that will be applied to the item i.e. what price it will be sold for via the online form.

If you need customers to have specific pricing applied to the items they buy, you will want to consider using Customer Portal.
Payment options
You can choose which payment options are available in the online form.

The following example shows both options on a form.
Send automated notification emails
There are 2 fields where you can select an existing Email Template to be used for an automated email to be sent:
- Employee Notification Email: an email is sent to the User in CRM being notified that a form has been submitted.
- Contact Notification Email: an email is sent to the person filling in the form i.e. the customer or lead.

To have your Email Templates available to select here, they must have a Source Name of Web Form Submitted.

Automatically add responders to a Marketing List
The When Filled In tab lets you define basic workflows that occur after the form has been completed.
If you’d like the respondent to be added to a specific Marketing List after form completion, click Add beside the correct list in the sectioned outlined below and then click Update.
In the example below, I will have people who submitted the form automatically added to my newsletter list.

Notify people when a form is submitted
Further down you’ll see a notification section. If you’d like to notify a member of staff when a form is filled in, select their user from the left-hand list, then click Add, then click Update. They’ll then receive an email every time the form is submitted.

Change the data captured via the form
If you want to add or remove fields that capture data on the form (screenshot example follows of contact details), you can do so by editing the form.

- Edit the form and then scroll to the Fields section where you will be able to add and remove fields, as required. For more information on how this works, see our guide to creating a Web Form.

You can create new Web Forms to suit your requirements.
- Go to Marketing > Web Forms and click on New Web Form.

- Give the form a Name, then in the Type field you MUST select Insta Buy Widget.

You can then configure the form to suit your requirements, as per the step above on customising forms. For more information on how this works, see our guide to creating a Web Form.
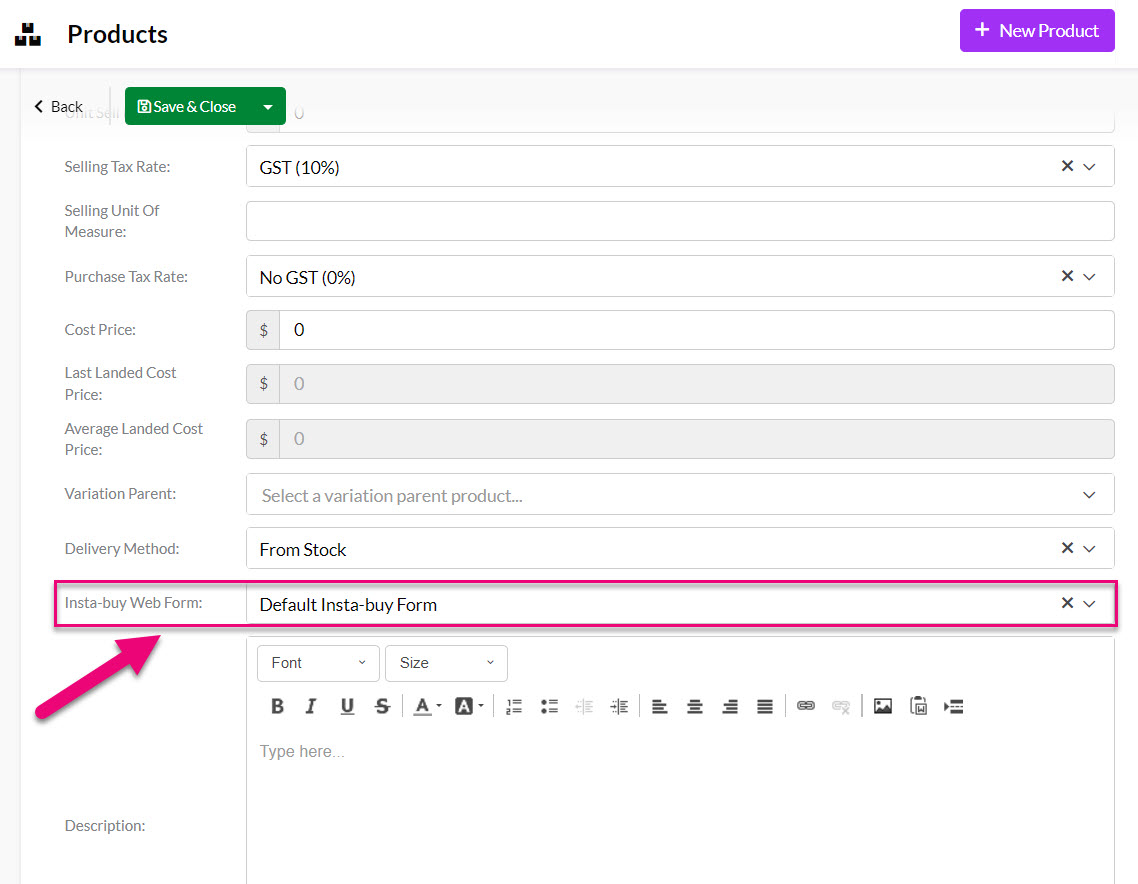
For each Product in your inventory, you can specify which Insta-Buy Web Form you’d like to use – just select one from the dropdown field.