- Companies
-
- Inventory
- Multi-currency for Purchasing
- Backorders
- Bay Locations
- Features
- Stock Tracking
- System Products
- Accounting details for Products
- Deactivating Products
- Products in Portal
- Suppliers
- Supplier Pricing
- Suppliers & Products
- Products
- Stock Transfers
- Barcodes
- Product Inventory Details
- Importing & exporting Product data
- Virtual Products
- Stock Adjustments
- Purchase Orders
- Enable or disable Stock-Tracking
- Training Products
- Units of Measure (UoM)
- Freight Products
- Working with Landed Costs
- Configuring Product Settings
- Stock Locations
- Stocktakes
- Product Batches
- Serial Numbers
- Different Price Types
- Purchase Orders
- Managing Stock
- Configurable Products
- Variable Products
- Time Billing
- Manufacturers and Suppliers
- FROM Location-based pricing
- TO Location-based pricing
- Requests For Quote
- Time Products
- Quantity-Based Price Breaks
- RFQ Web Templates
- PO Web Templates
- Location-based Price Breaks
- Customer-Specific Pricing
- Deleting Special Prices
Different Price Types
CRM lets you define unlimited price levels which you are able to assign to customers for easy selling – anything you quote that client will be priced correctly automatically.
You can use this functionality to sell products at unique prices to different clients with ease.
See also:
- Quantity-based price breaks
- Location-based price breaks
- Customer specific pricing
- Supplier pricing
- Time Billing
- You must ensure that the “Disable selling price lookup” field in Admin > General > Pricing is NOT enabled for price types to work correctly. See this help file for further details.
- Price Types in CRM are mapped with Price Levels in MYOB. See this file for more help with MYOB and the help page for Matching your prices with MYOB.
- To edit the price types, head to Admin > Settings > Inventory > Price Types.
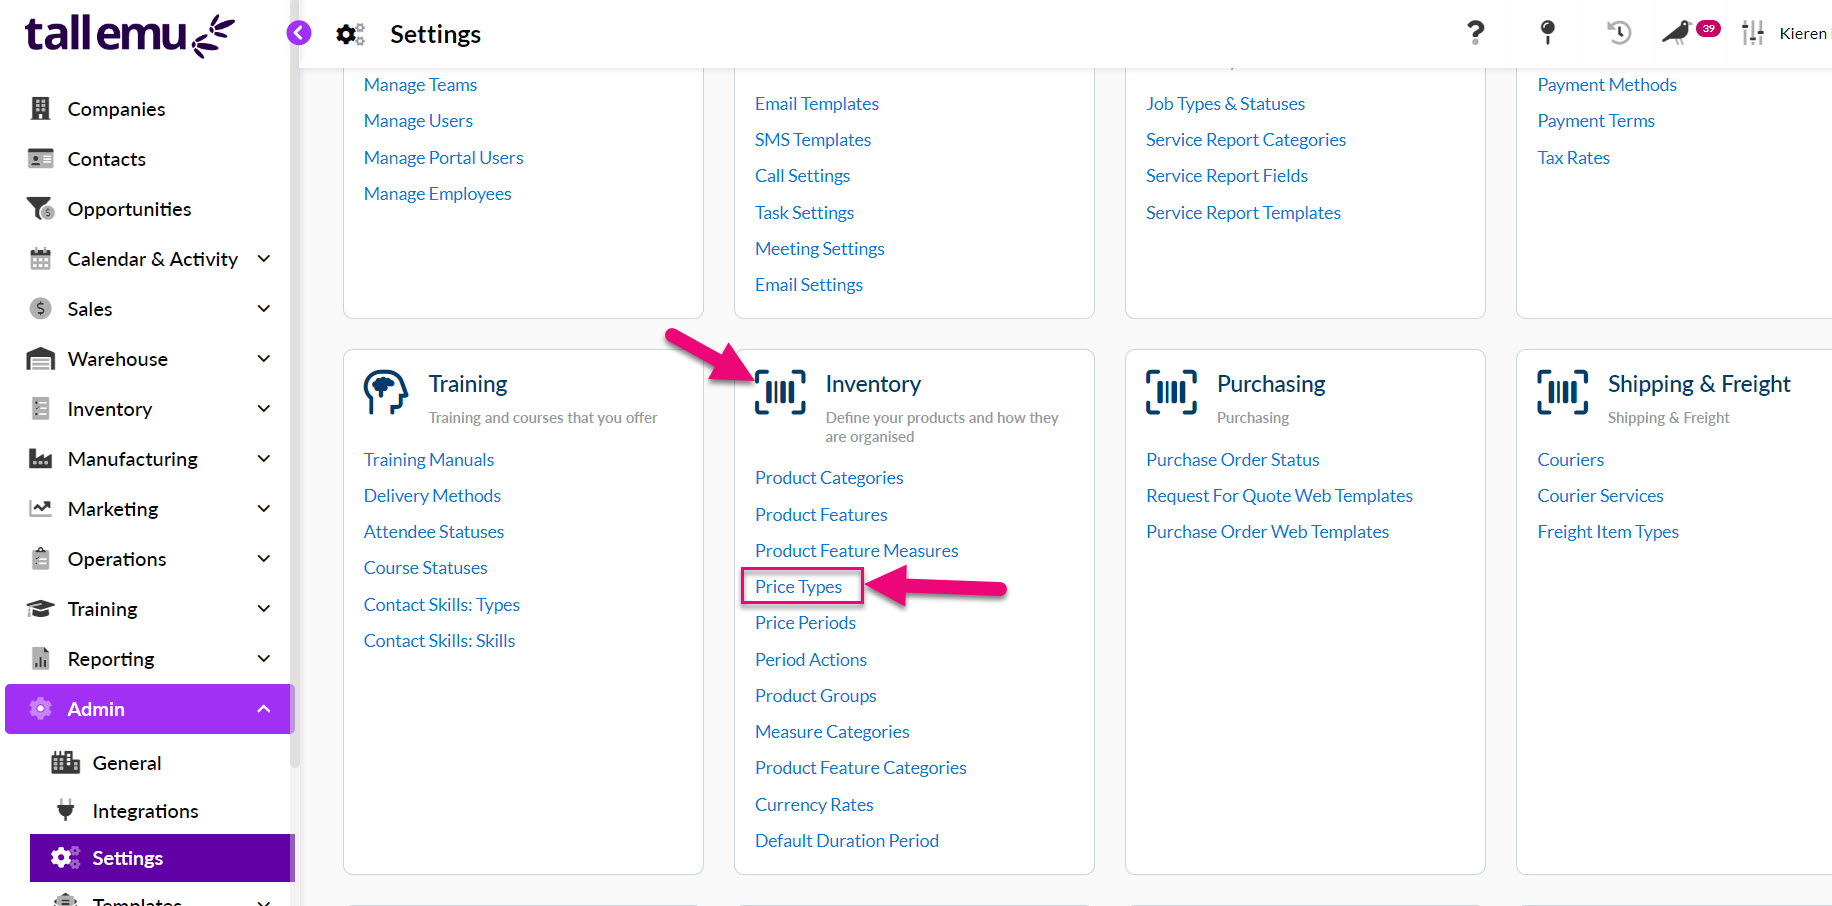
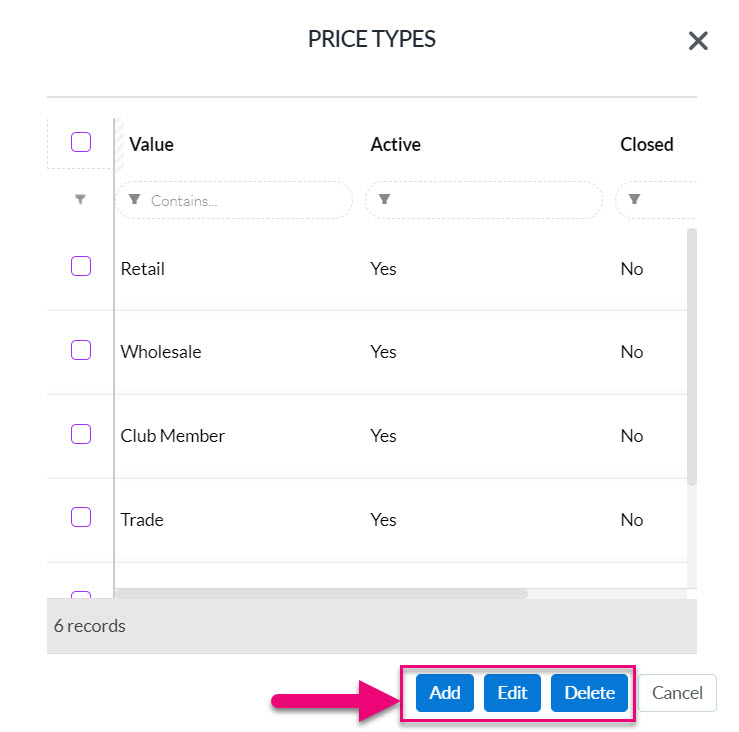
- A box will open to allow you to Add, Edit or Delete price types.
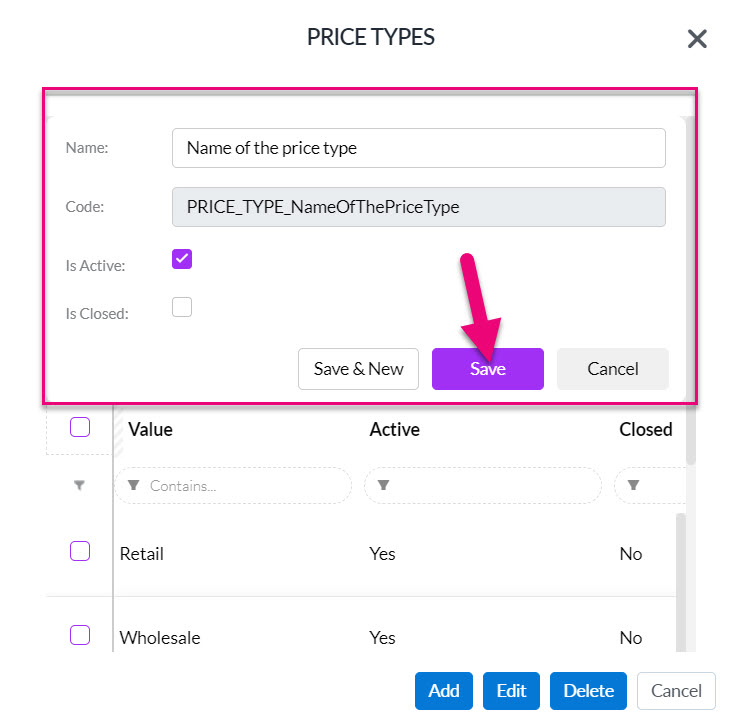
- To add a new type, define a name for the new price level and ensure you check the box beside Is Active to make the price type available.
- Click on Save when you are done.
From a customer record
- To change the customer price type, open the relevant customer record (Contact or Company) record and click Edit.
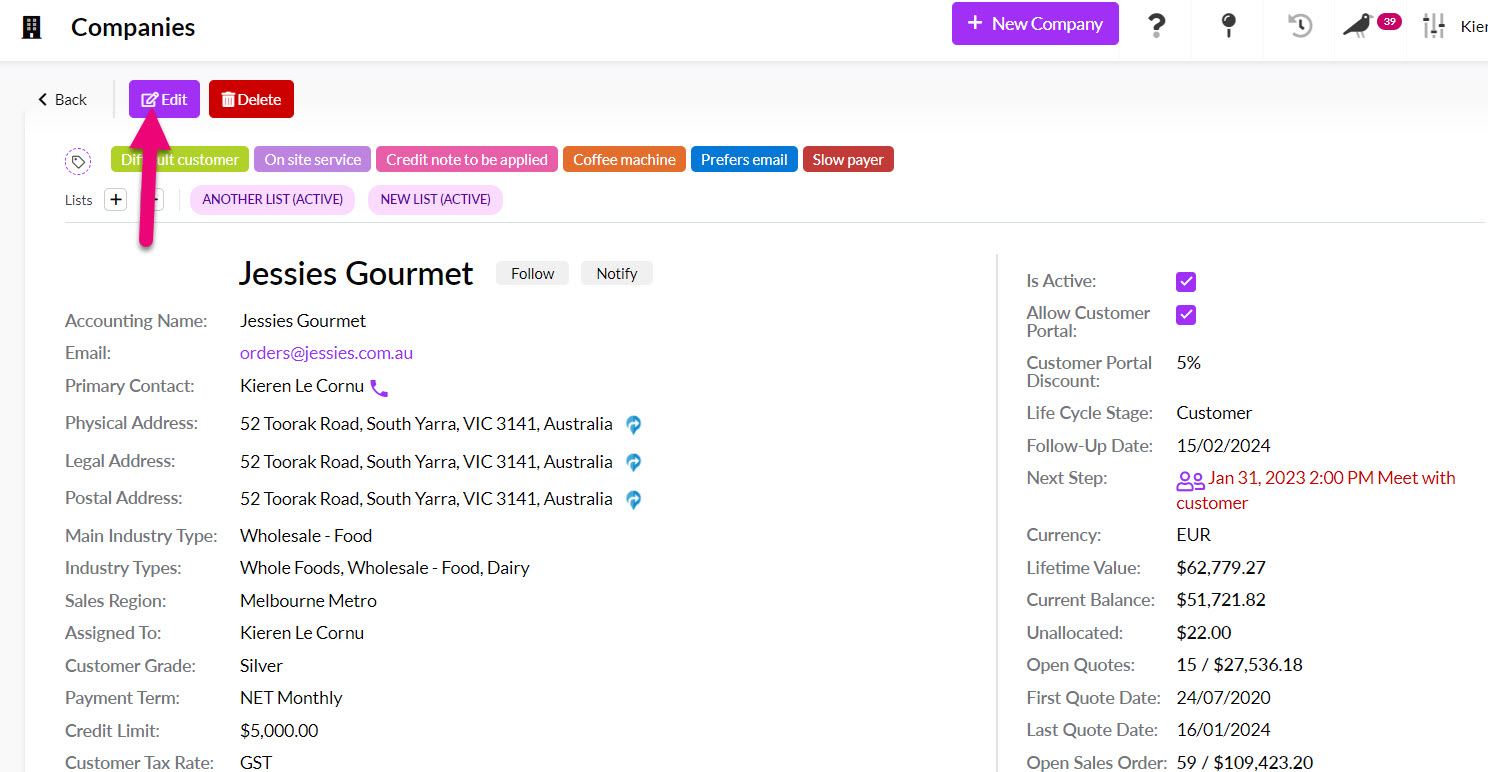
Ensure the box beside I Sell to This Customer is checked. Then select the desired Price Type from the dropdown menu.

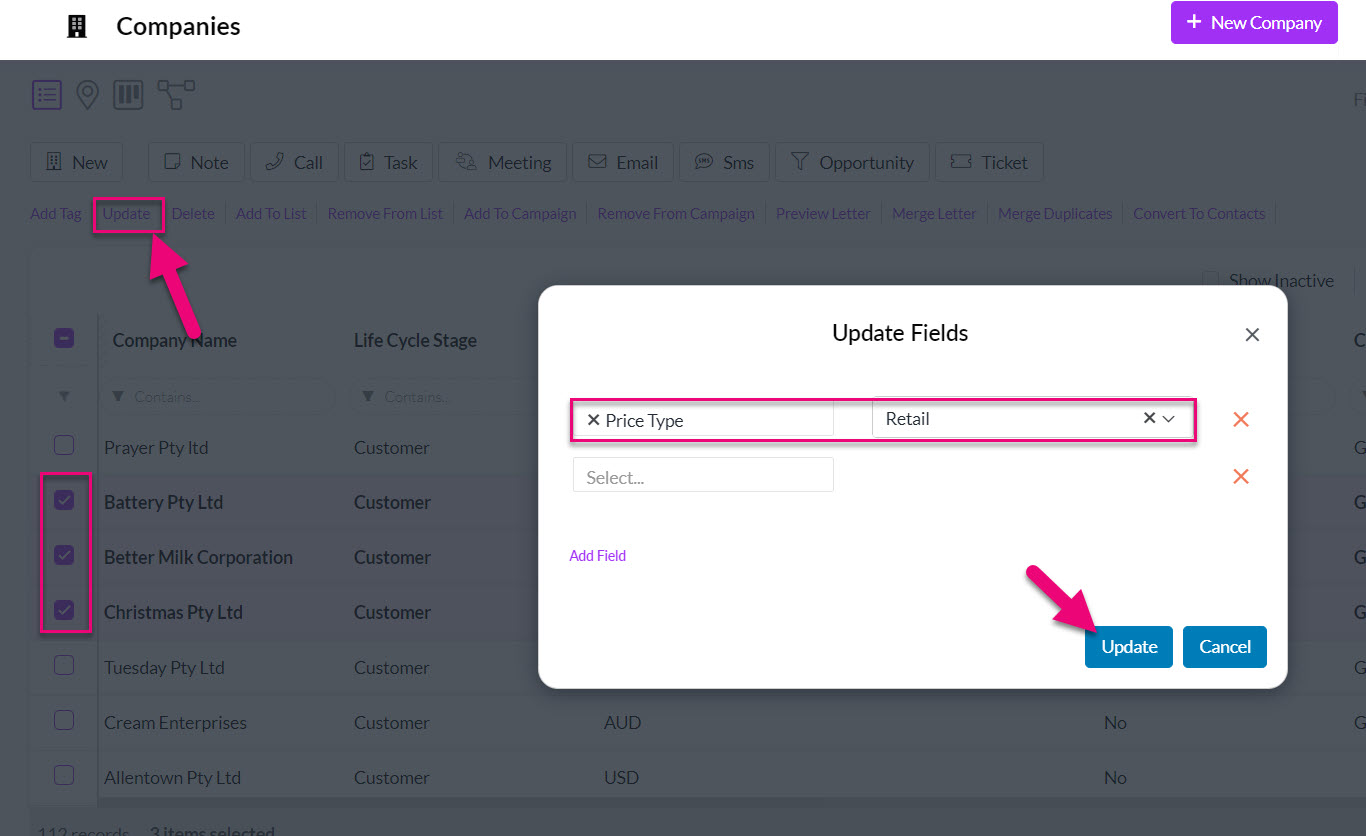
In bulk for multiple customers
If you need to do this for a small batch of records, you can do it using bulk update from the grid in Products:
- Select the records you would like to deactivate.
- Click on the Update button on the toolbar.
- Select the Price Type field from the pop-up window and select the desired value.
- Click on Update to apply the change to the records.
If you have a large batch of records, exporting the data to Excel, then updating the value and importing it back into CRM to update the records is a good option.
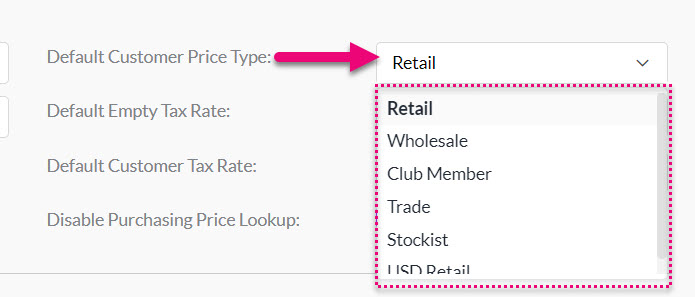
- To modify the default Price Type, head to Admin > General > Pricing.

- Change the Default Customer Price Type field to select a new option.
- Then scroll to the top of the page and click Save to apply the changes.
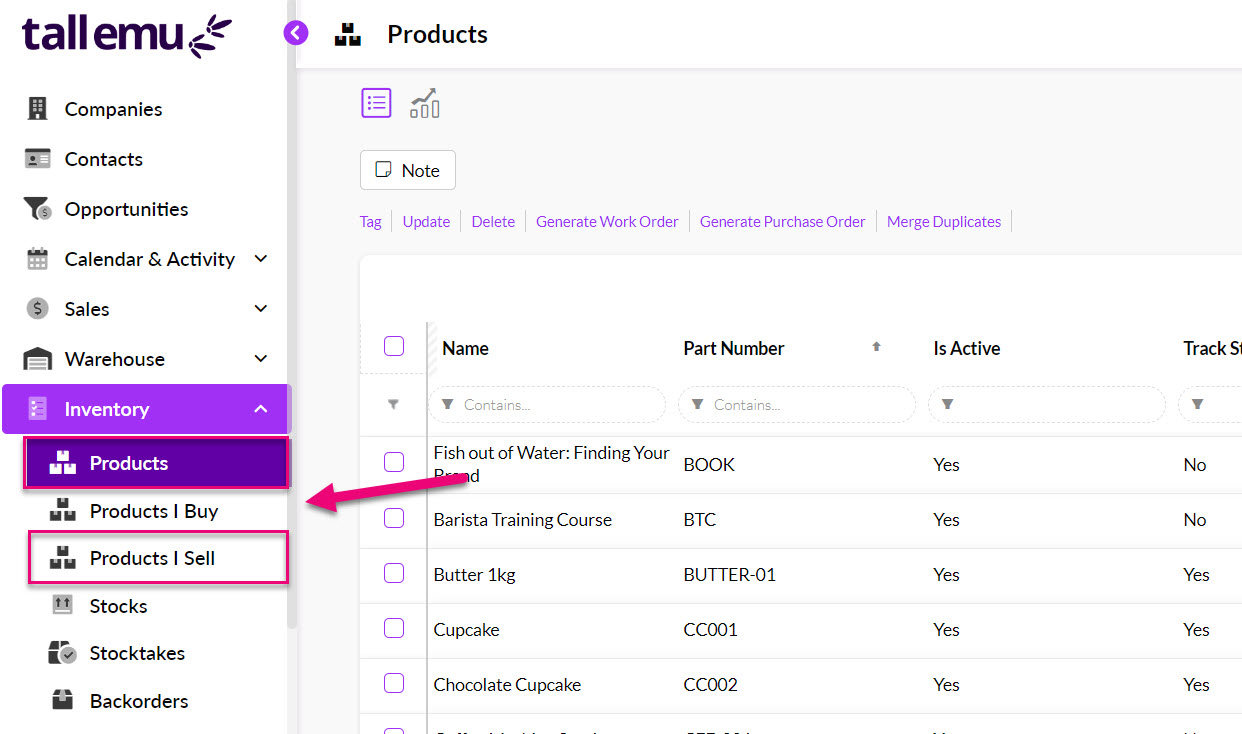
- To edit the pricing policy at each price level, head to Inventory > Products or Products I Sell.
- Open the desired product record and locate the Price Breaks tab where you will see there is a row for each Price Type that exists in your system.
If you cannot see this tab, it may be hidden, and you need to edit the record tabs to make it visible.
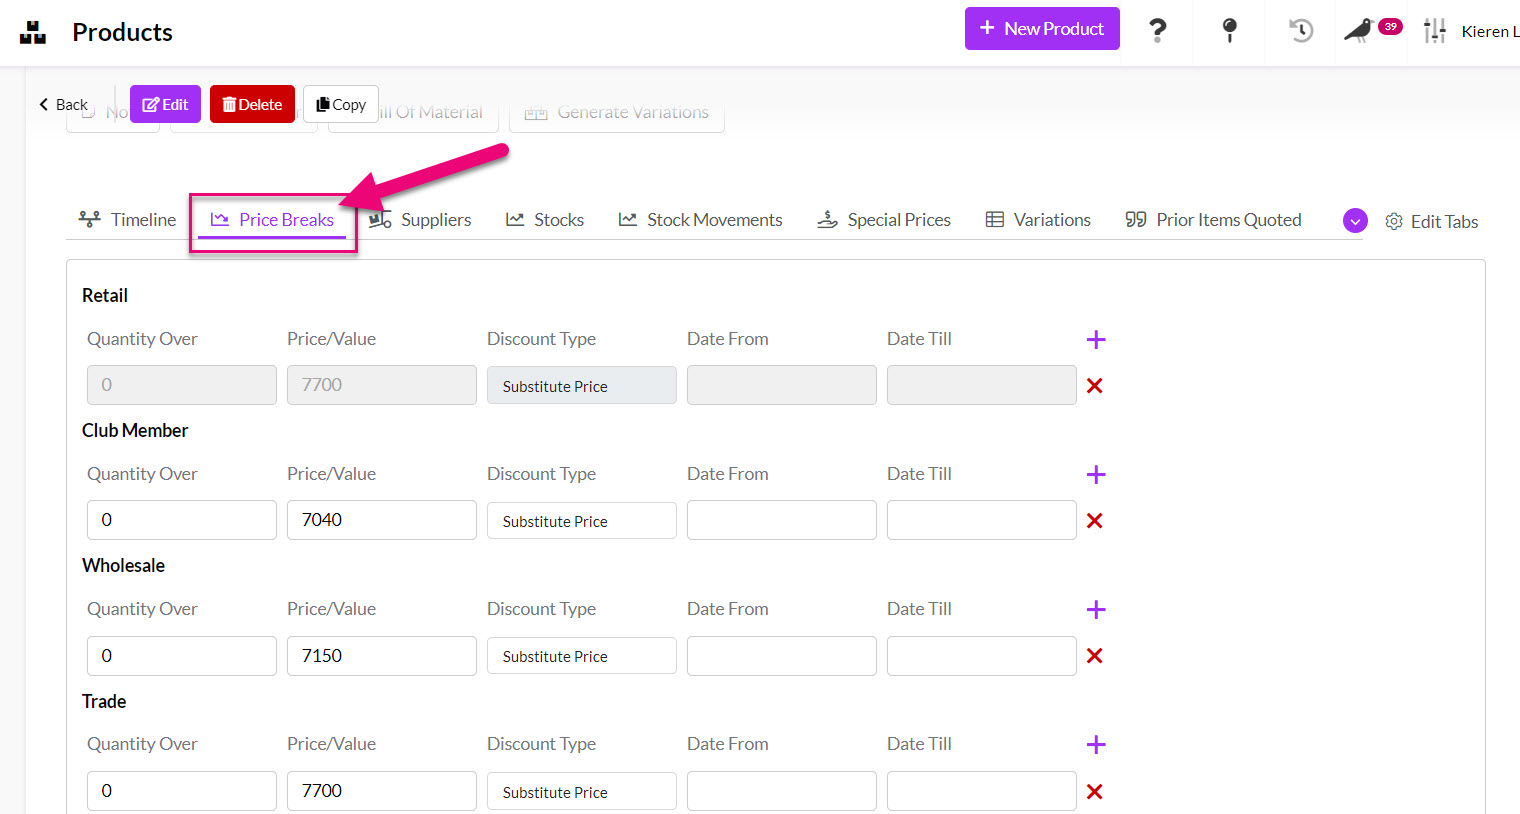
When entering in prices, the Discount Type field needs to be populated with a choice from the following options:
-
- Dollars $ – the system will automatically add or subtract a dollar amount from the base price.
- Percent % – the system will automatically add or subtract a percentage amount from the base price.
- Substitute – manually enter in a discounted price in dollars $.

- Simply enter the desired price for each respective row in the Price/Value field.

- When finished, click on Save Changes.
The order in which the Price Types show on the Price Breaks tab corresponds to the order of the types in Admin > Settings > Inventory > Price Breaks.
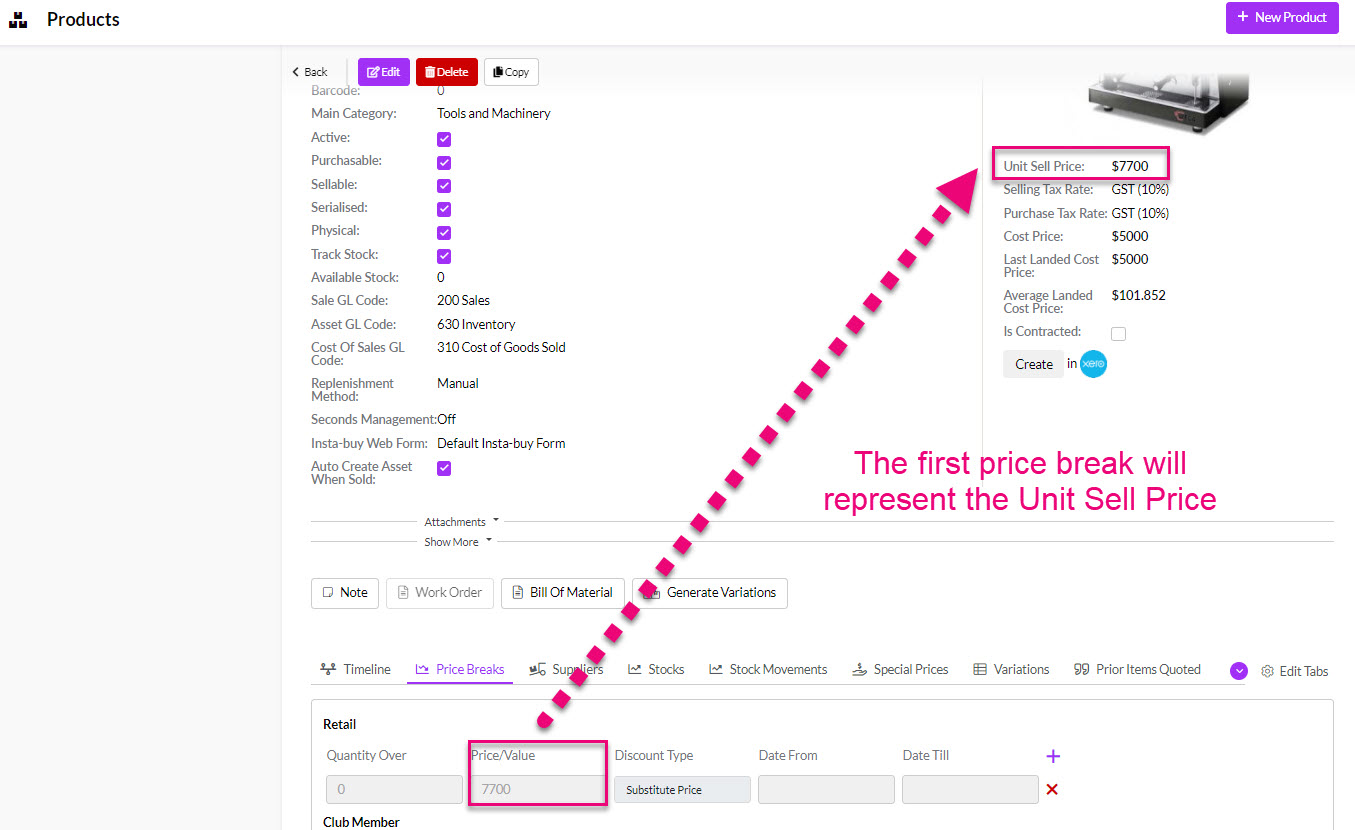
- By default, the 1st type on the list will be your default sell price, which will correspond to the Unit Sell Price field on Products.

- From the Product record, you can see that the 1st Price Break for “Retail” is greyed out and cannot be altered – the price has been pre-filled by the Unit Sell Price.
You can download and fill in the import template with your pricing information and make sure that you have set your Price Breaks up in CRM first.
- Quantity breaks.
- Discounts that are based on either:
- Dollars $ – add or subtract a dollar amount from the base price.
- Percent % – add or subtract a percentage amount from the base price.
- Substitute – manually enter in a discounted price in dollars $.
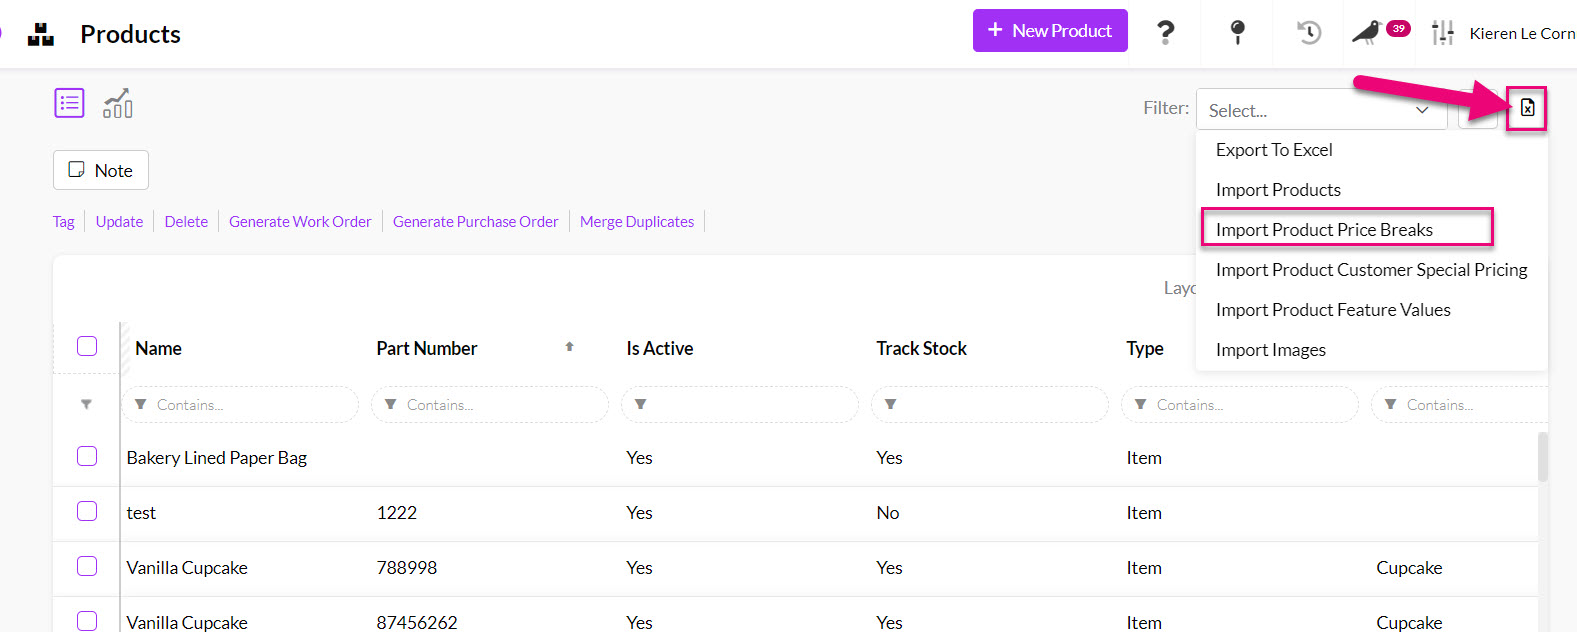
- Go to Inventory > Products and click on the Excel icon in the top right corner, then select Import Product Price Breaks.
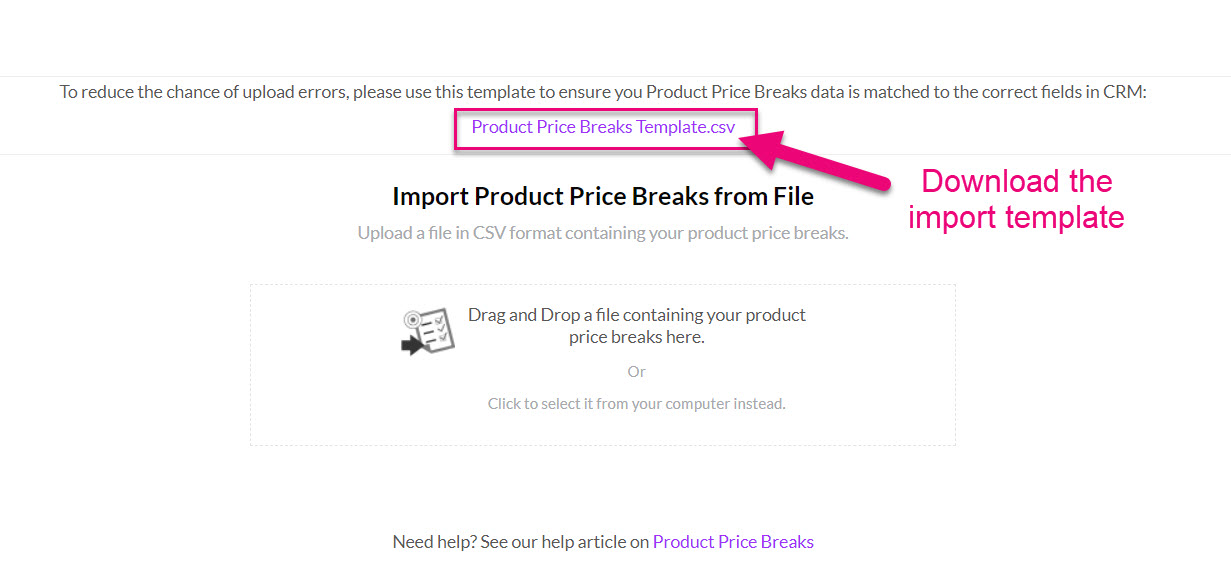
- This will bring up the importer screen and allow you to download the import template.
- Following is an example of how the import template should be filled in, you can also download a sample file by clicking here.

- When you are ready to import your data, go to Inventory > Products and click on the Excel icon in the top right corner, then select Import Product Price Breaks.
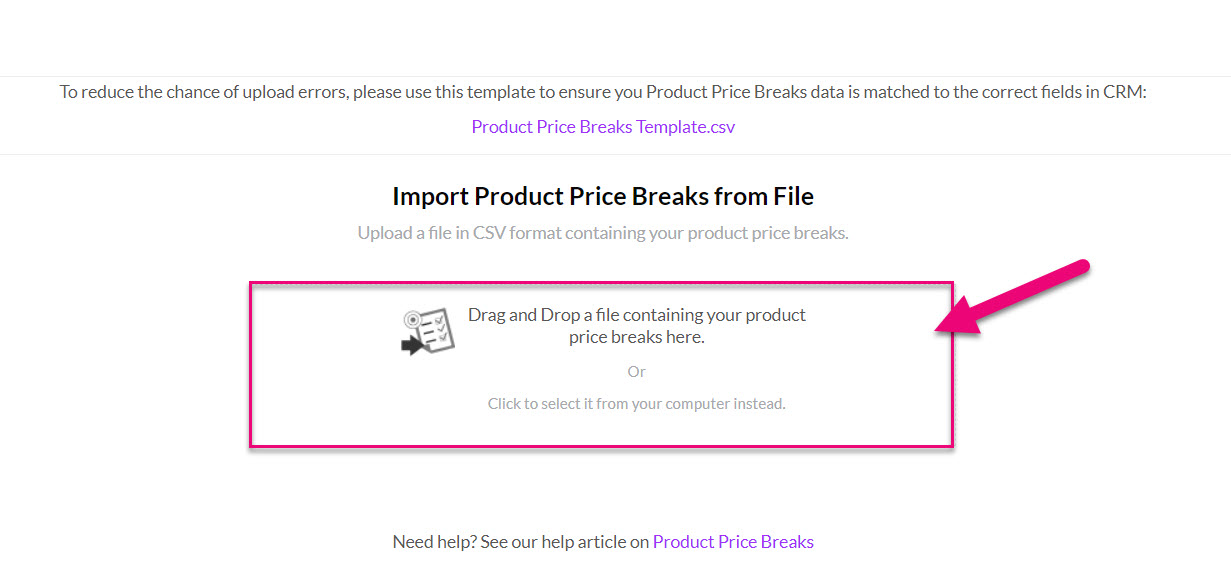
- You can then drag & drop or click to select your data file.
- When you are ready to start the import, click on Upload.
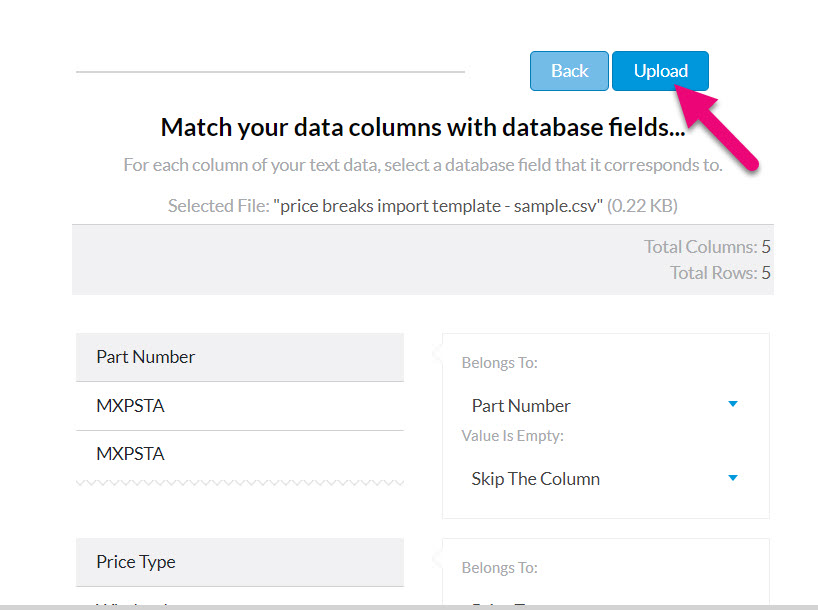
- When the import is finished, a completion message will show, and you can click Done to exit.

Once you have configured your prices on Products, your pricing will be updated automatically when creating Quotes, Invoices and Sales Orders, based on the Price Type assigned to the customer.
If a Price Type has not been assigned for a customer, you can make a selection in the Customer Price Type field when you are working with Quotes, Sales Orders and Invoices.

You can also pre-fill Quotes using a Quote Form Template.