-
Companies
- Companies
- Parent-Child and Third-Party Relationships
- Add a Note to a Company
- Add a Task to a Company
- Find New Leads
- Merge Duplicates View
- Mandatory Purchase Order Numbers
- Record visibility
- Customising Company & Contact fields
- Customers & Suppliers
- Converting Companies & Contacts
- Creating Contacts and Companies inline
- Contacts
- Opportunities
- Calendar & Activities
-
Sales
- Sales
- Multi-currency for Sales
- Invoicing items that aren’t in stock
- Drop shipping workaround
- Managing your Quote pipeline
- Direct Debits
- Sending Statements
- Backorder Invoices
- Progressive revenue
- Subscriptions
- Bulk send Invoices
- Credit Notes
- Taking a Deposit
- Creating Invoices
- Create Freight Quotes
- Getting Started with Web Quotes
- Sales Orders
- Card Payments
- Payments
- Repeating Invoice Placeholders
- Creating Repeating Invoices
- Online Invoice Templates
- Online Sales Order Templates
- Set Up Web Quote Templates
- Quotes
- Quotes
- Warehouse
-
Inventory
- Inventory
- Multi-currency for Purchasing
- Backorders
- Bay Locations
- Features
- Stock Tracking
- System Products
- Accounting details for Products
- Deactivating Products
- Products in Portal
- Suppliers
- Supplier Pricing
- Suppliers & Products
- Products
- Stock Transfers
- Barcodes
- Product Inventory Details
- Importing & exporting Product data
- Virtual Products
- Stock Adjustments
- Purchase Orders
- Enable or disable Stock-Tracking
- Training Products
- Units of Measure (UoM)
- Freight Products
- Working with Landed Costs
- Configuring Product Settings
- Stock Locations
- Stocktakes
- Product Batches
- Serial Numbers
- Different Price Types
- Purchase Orders
- Managing Stock
- Configurable Products
- Variable Products
- Time Billing
- Manufacturers and Suppliers
- FROM Location-based pricing
- TO Location-based pricing
- Requests For Quote
- Time Products
- Quantity-Based Price Breaks
- RFQ Web Templates
- PO Web Templates
- Location-based Price Breaks
- Customer-Specific Pricing
- Deleting Special Prices
- Manufacturing
-
Marketing
- Marketing
- Create Marketing Lists
- Send Email Campaigns
- Creating a simple Web Form
- Smart Lists
- reCAPTCHA for Web Forms
- Facebook Lead Ads
- About Web Forms
- Insta-Buy Web Forms
- Add or Remove Contacts/Companies from Lists
- Creating a Marketing List from Advanced Filters
- Editing existing List members
- Exporting Marketing Lists
- Filtering by Lists
- Operations
- Training
- Reporting
-
Admin
- Admin
- Account Options
- Pricing settings
- PDF and Email Template system preferences
- Locations
- Brand Customisation
- Product Categories
- Product Groups
- Enable Time Billing
- Customising Assets
- Custom Fields
- Delivery Resources
- Delivery Options
- Reporting Preferences
- Sales & purchase settings
- Calendar Settings
- Messaging settings
- Repeated Invoice frequency
- Company Settings
- Credit Settings
- Sales Regions
- Asset Settings
- Ticket settings
- Relationships
- Proposal-based Quotes
- Customising Training
- Prefix/Sequences settings (Record Numbering)
- Creating SMS Templates
- Invoice Settings
- Creating Email Templates
- Creating Letter Templates
- Using Letter Templates
- Using SMS Templates
- Using Email Templates
- Setting up Teams
- System security
- Users
- Activate a new User account
- Log into a User account
- Managing Connections
- Calculating Landed Costs
- Resources
- Payment Methods
- Payment Terms
- Couriers
- PDF Templates
- Service Reports
- Quote Form Templates
- System Quote Preferences
- Credit Control
- Setting up Teams
- Regional Settings
Scheduled Reports
In Reporting > Reports there are a range of reports you can run on an ad-hoc basis, but you can also schedule reports to be automatically emailed.
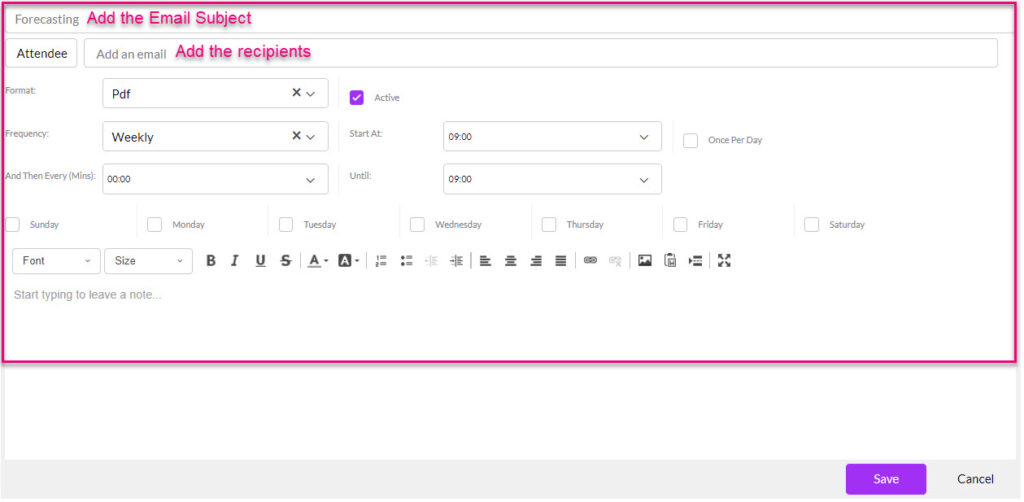
What does this do? Sends an email to the recipients you specify with a copy of a report attached, in the format you have chosen (i.e. PDF, xls or CSV) with any optional email text you want to add.
When does it do it? You can specify the exact frequency that the email is sent – daily, weekly, monthly, even multiple times a day.
How do I do it? open any report and click on the Create Schedule button, then input the specifics.

Disable or adjust the schedule: in Reporting > Scheduled Reports you can see anything you have scheduled previously – just click on a record to open it and adjust the details, or de-select the Active box to disable the workflow.
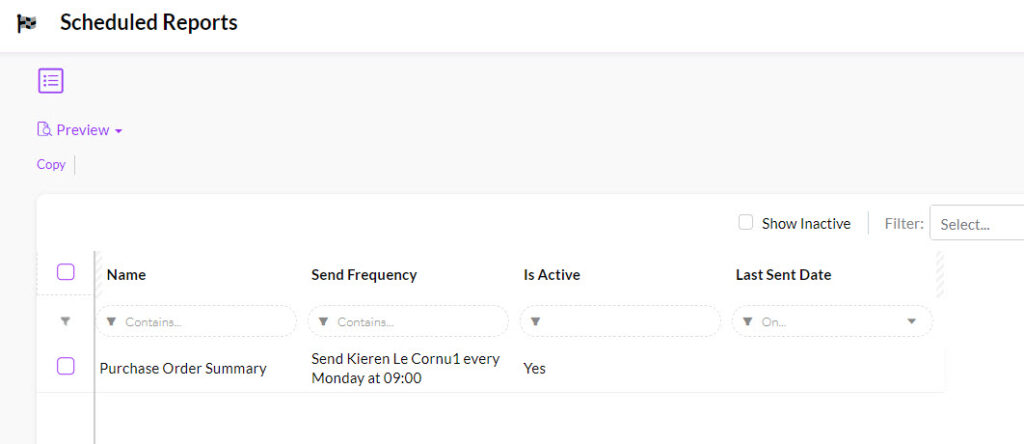

Pro Tip: if you have a lot of reports scheduled and can’t remember exactly what they are, select one in the Scheduled area and use the preview button to quickly view it.
