- Companies
-
- Inventory
- Multi-currency for Purchasing
- Backorders
- Bay Locations
- Features
- Stock Tracking
- System Products
- Accounting details for Products
- Deactivating Products
- Products in Portal
- Suppliers
- Supplier Pricing
- Suppliers & Products
- Products
- Stock Transfers
- Barcodes
- Product Inventory Details
- Importing & exporting Product data
- Virtual Products
- Stock Adjustments
- Purchase Orders
- Enable or disable Stock-Tracking
- Training Products
- Units of Measure (UoM)
- Freight Products
- Working with Landed Costs
- Configuring Product Settings
- Stock Locations
- Stocktakes
- Product Batches
- Serial Numbers
- Different Price Types
- Purchase Orders
- Managing Stock
- Configurable Products
- Variable Products
- Time Billing
- Manufacturers and Suppliers
- FROM Location-based pricing
- TO Location-based pricing
- Requests For Quote
- Time Products
- Quantity-Based Price Breaks
- RFQ Web Templates
- PO Web Templates
- Location-based Price Breaks
- Customer-Specific Pricing
- Deleting Special Prices
Working with Landed Costs
This page will provide you with a step-by-step example that demonstrates how you work with Landed Costs in CRM.
If you haven’t yet configured your CRM to work with Landed Costs, you can learn how to do this here.
See also:
There are several ways that you can calculate landed costs:
- Estimated costs – you have an idea of what the associated costs are going to be and want to estimate what your final landed cost will potentially be. This step is optional.
- Actual costs – you’ve received all the bills and invoices from suppliers and want to calculate the final landed cost for the goods you’ve purchased.
Note: you don’t have to use the estimate function, you can skip straight to the actual calculation if you want; it just means that you won’t be able to calculate a variance i.e. there must be more than 1 set of figures to calculate a variance with.
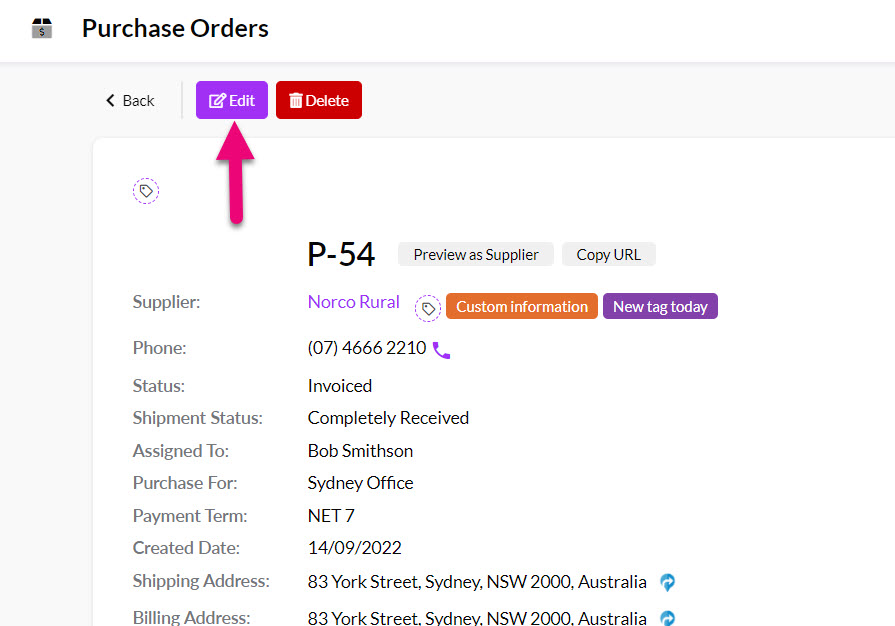
1 – Create a Purchase Order
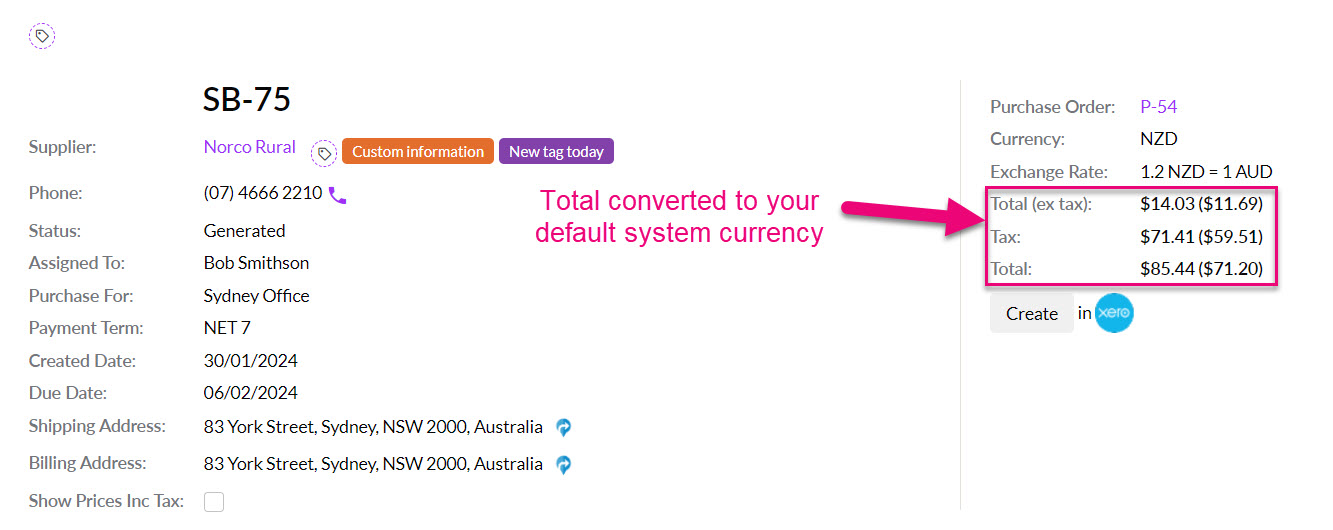
Create a Purchase Order and make sure you have the right supplier, foreign currency and exchange rate involved in the transaction.
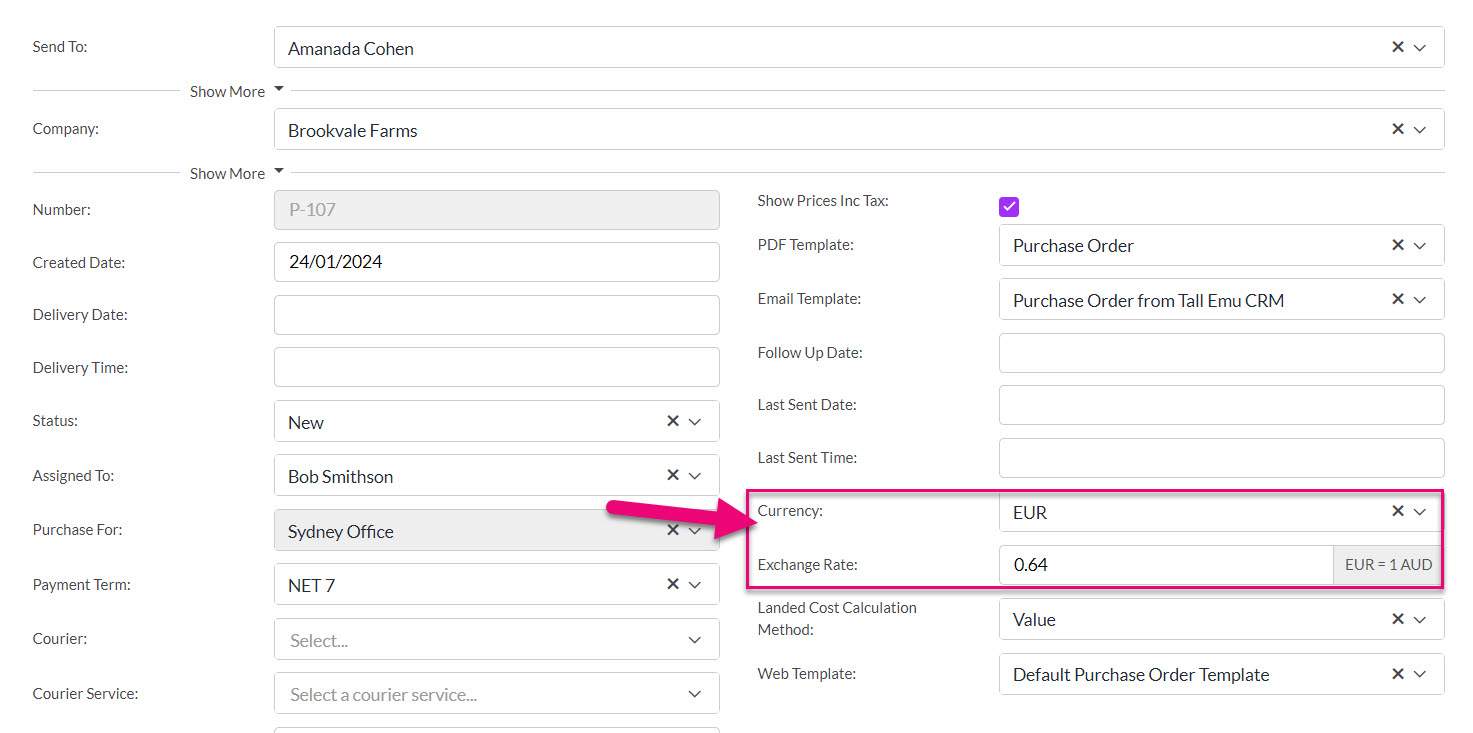
Currency fields on a Purchase Order in Edit Mode
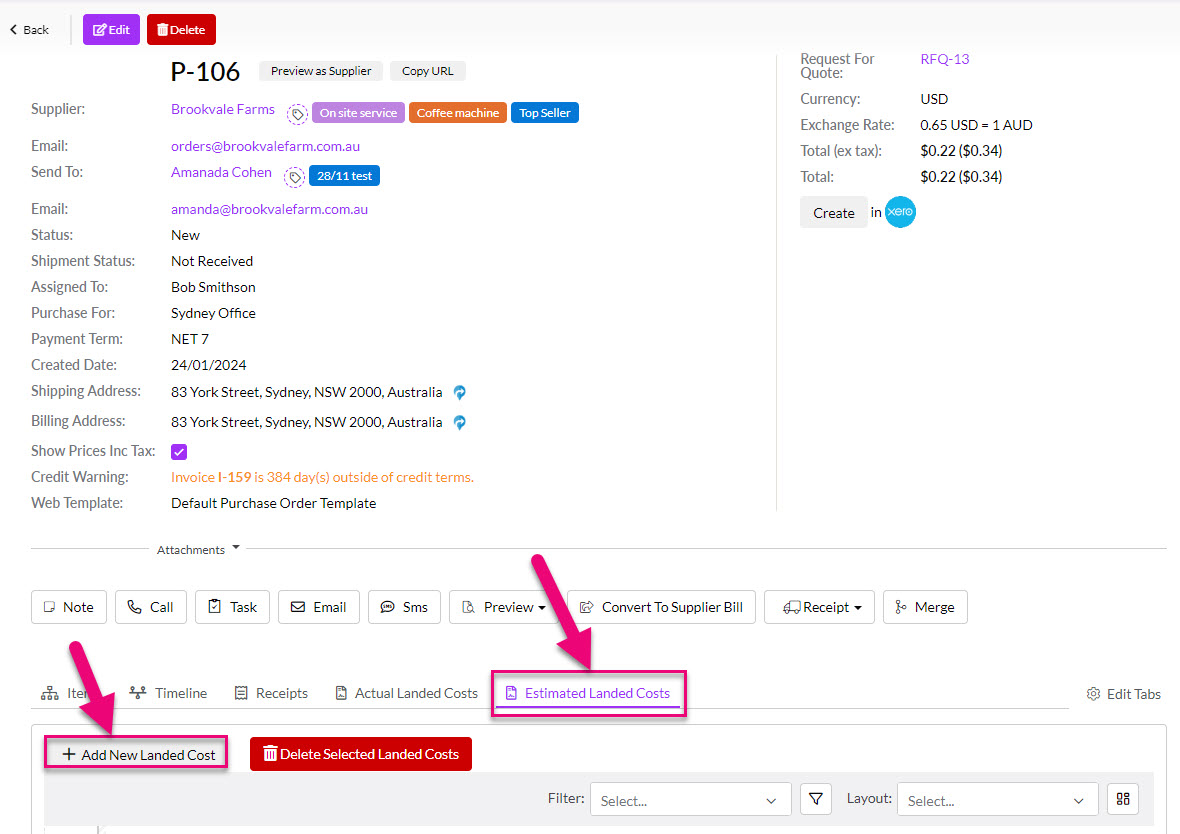
2 – Add estimated landed costs
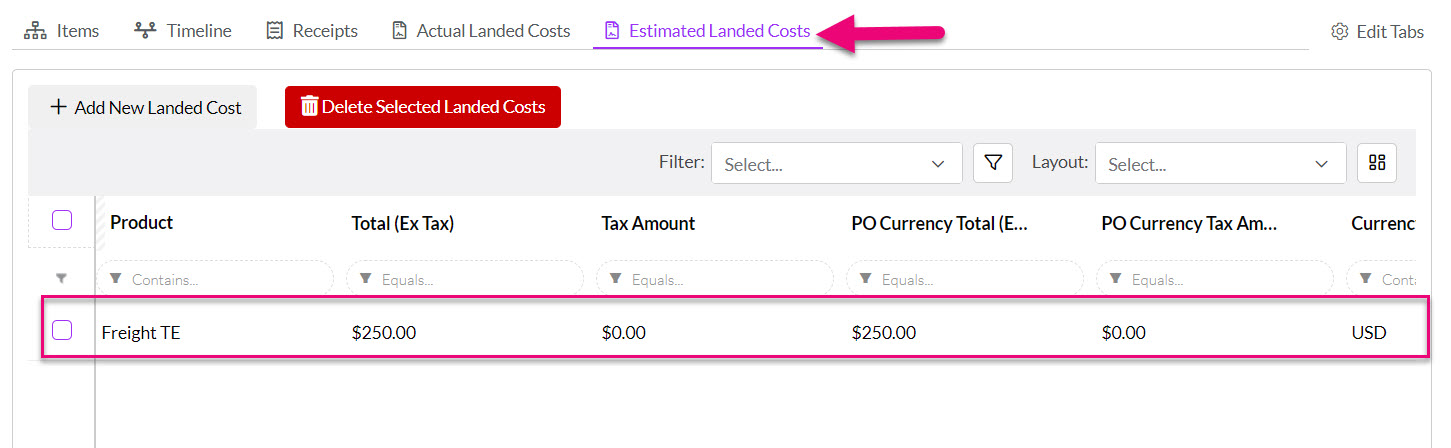
In the Purchase Order, select the Estimated Landed Costs tab and click on Add New Landed Cost.
Select the appropriate options in the fields for Product, Tax Rate, Price, Currency and Supplier. If the currency is different to the one chose in the Purchase Order, it is important to check that the exchange rate shown here is accurate.
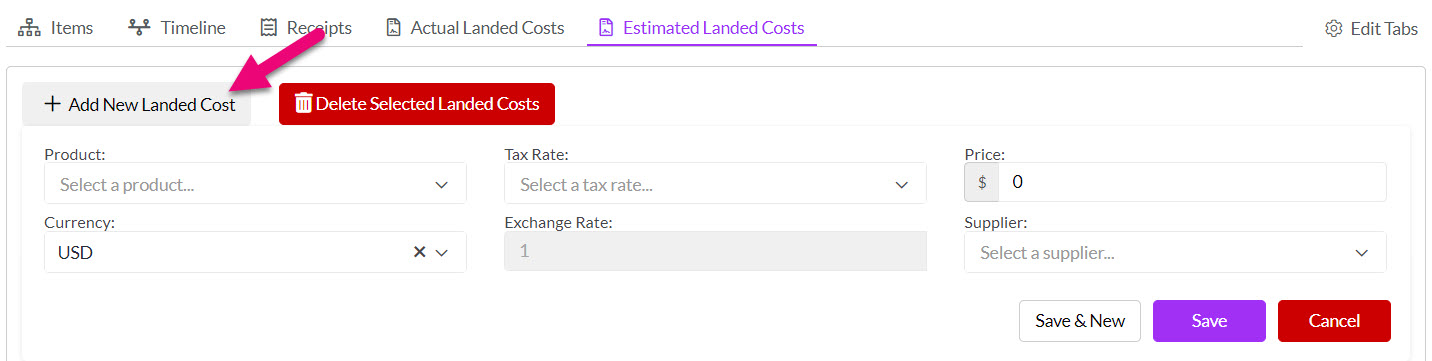
Click on Save when you are finished and the item you have created will now be visible in the Estimated Landed Costs tab, as per the following example.
3 – Select the calculation basis
The Landed Cost Calculation Method field on Purchase Orders will default to the option you have nominated in your Landed Cost Configuration.

If required, you can manually change the method on a Purchase Order.

4 – Receipt goods into stock
You can receipt goods into stock all at once or have multiple Inbound Shipment records.
Receive Shipment (allows multiple shipments)
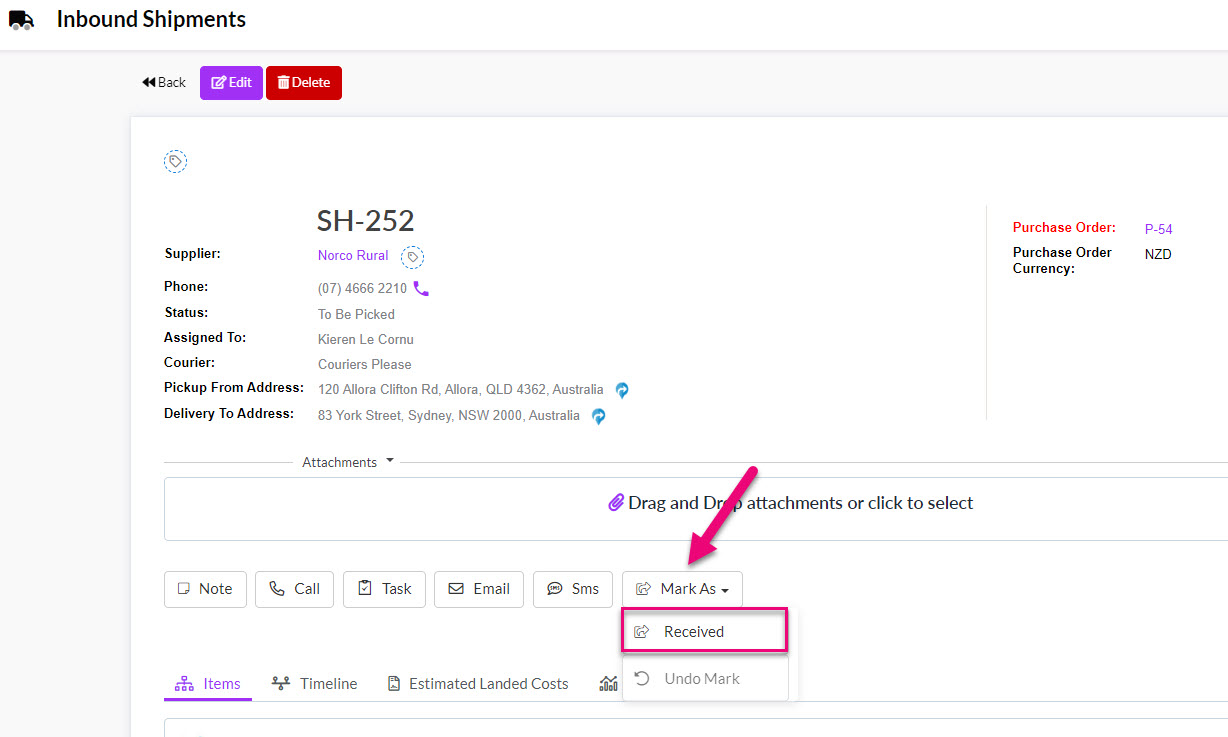
- On the record toolbar, click on the Receipt button and select Receive Shipment.
- This action will generate an Inbound Shipment record, which will open automatically.

- On the Inbound Shipment record you can remove items or adjust the quantity of items being received.
- When you are ready, click on Mark As > Received – this will immediately put the items on the shipment record into stock in CRM.
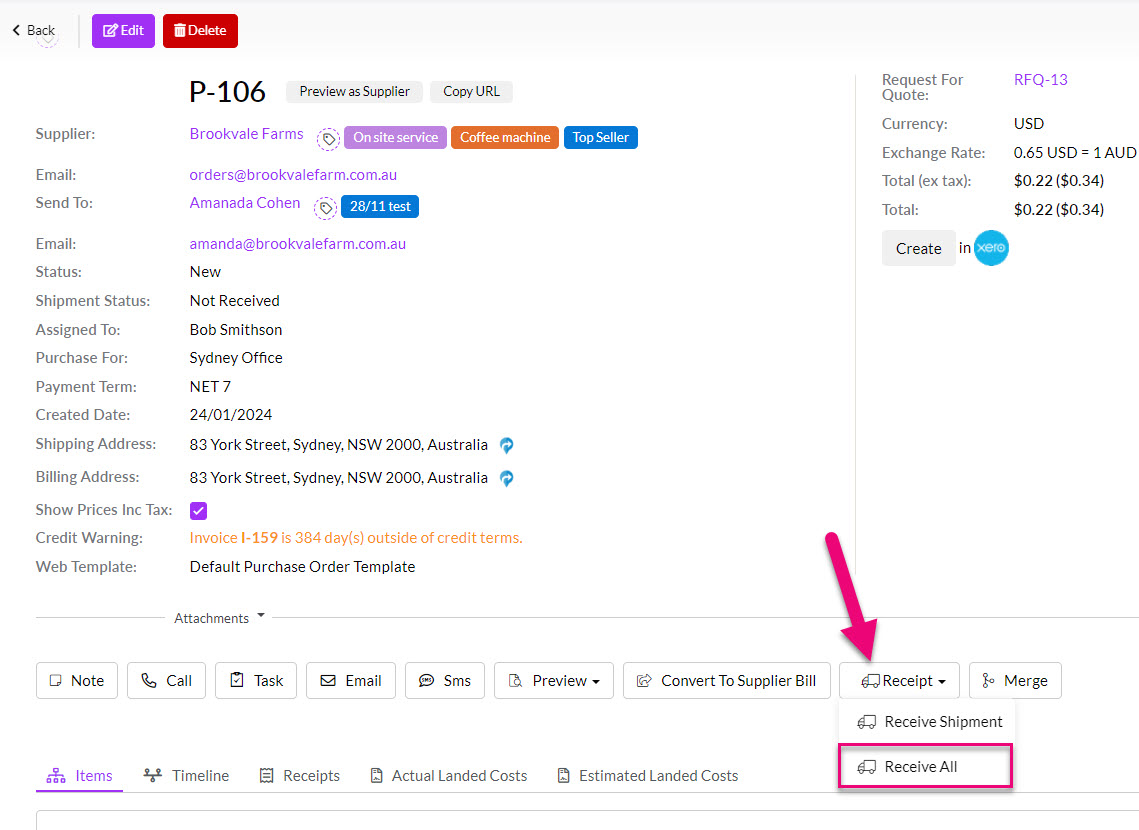
Receive All (1 shipment)
- On the record toolbar, click on the Receipt button and select Receive All.
- This will immediately put the items on the shipment record into stock in CRM.
See our guide on Inbound Shipments for more information.
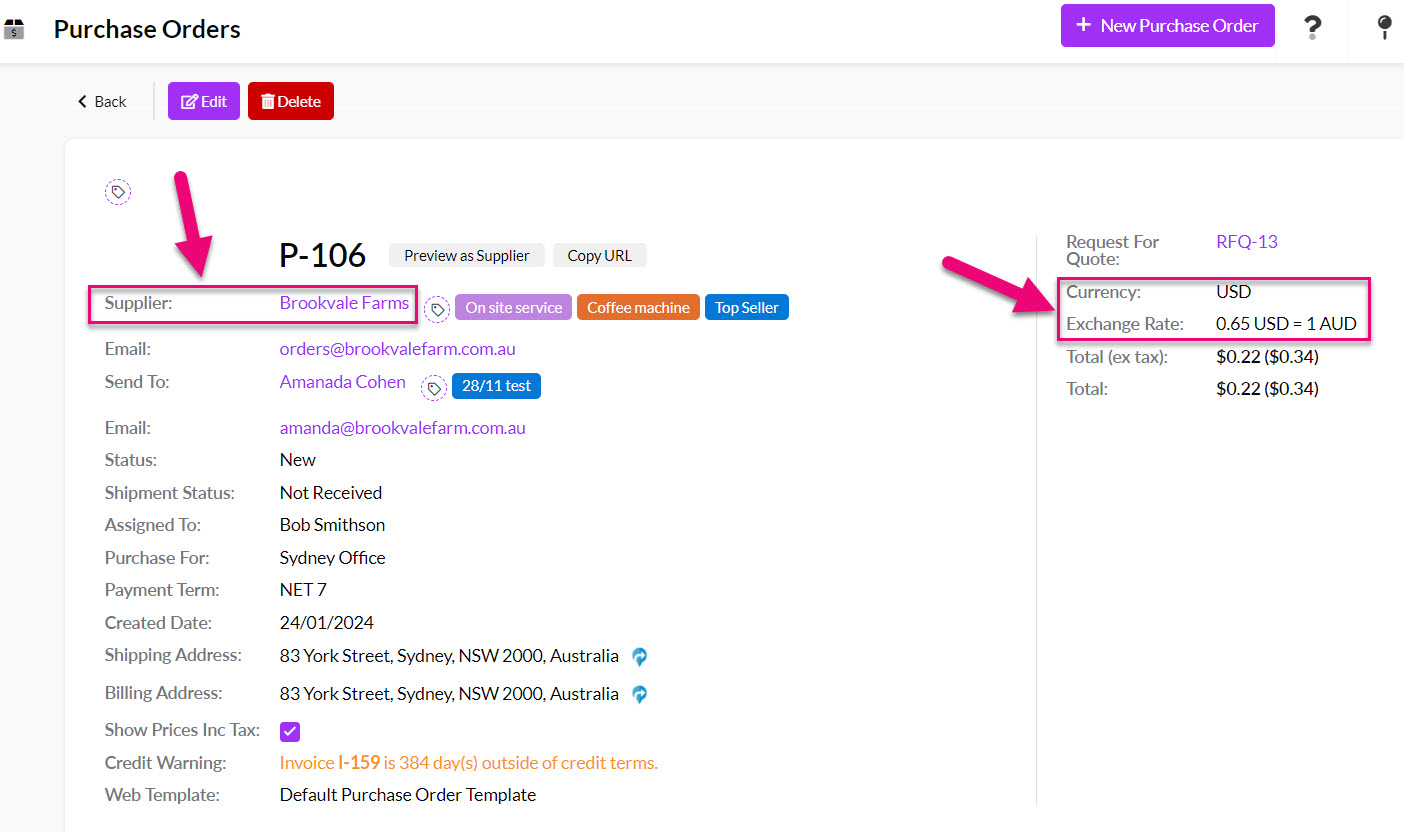
5 – Check the Products in your Purchase Order
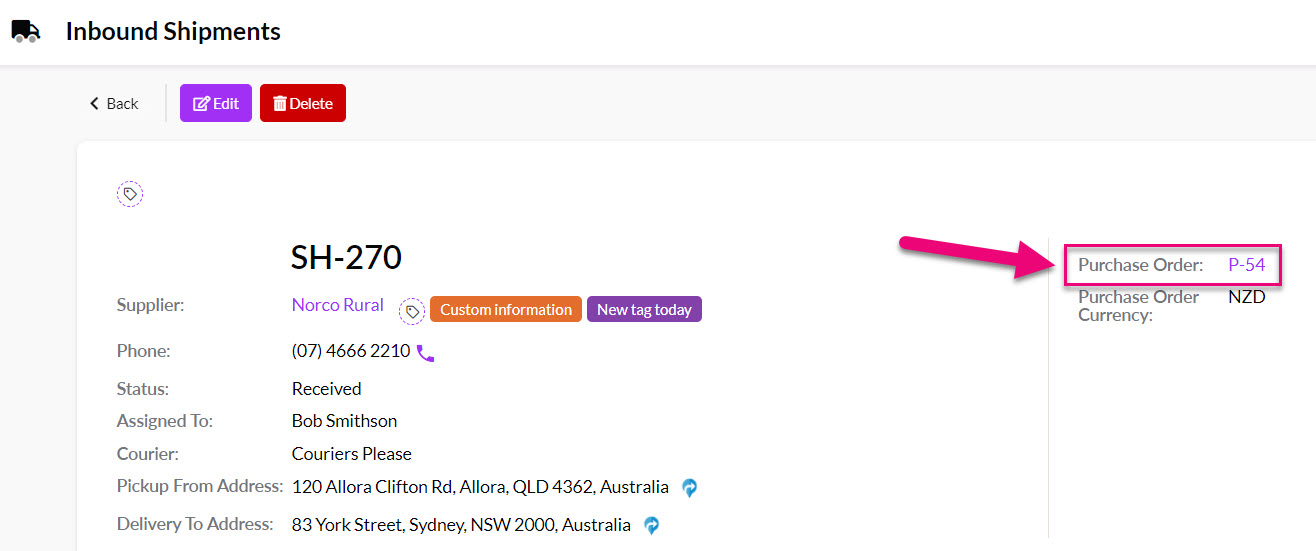
Go to your original Purchase Order record – you can do this by clicking on the link in the top right-hand corner of the Inbound Shipment record.
When the Purchase Order opens, click on Edit at the top of the record.
You will then be able to see the Landed Cost detail for your items in the order.
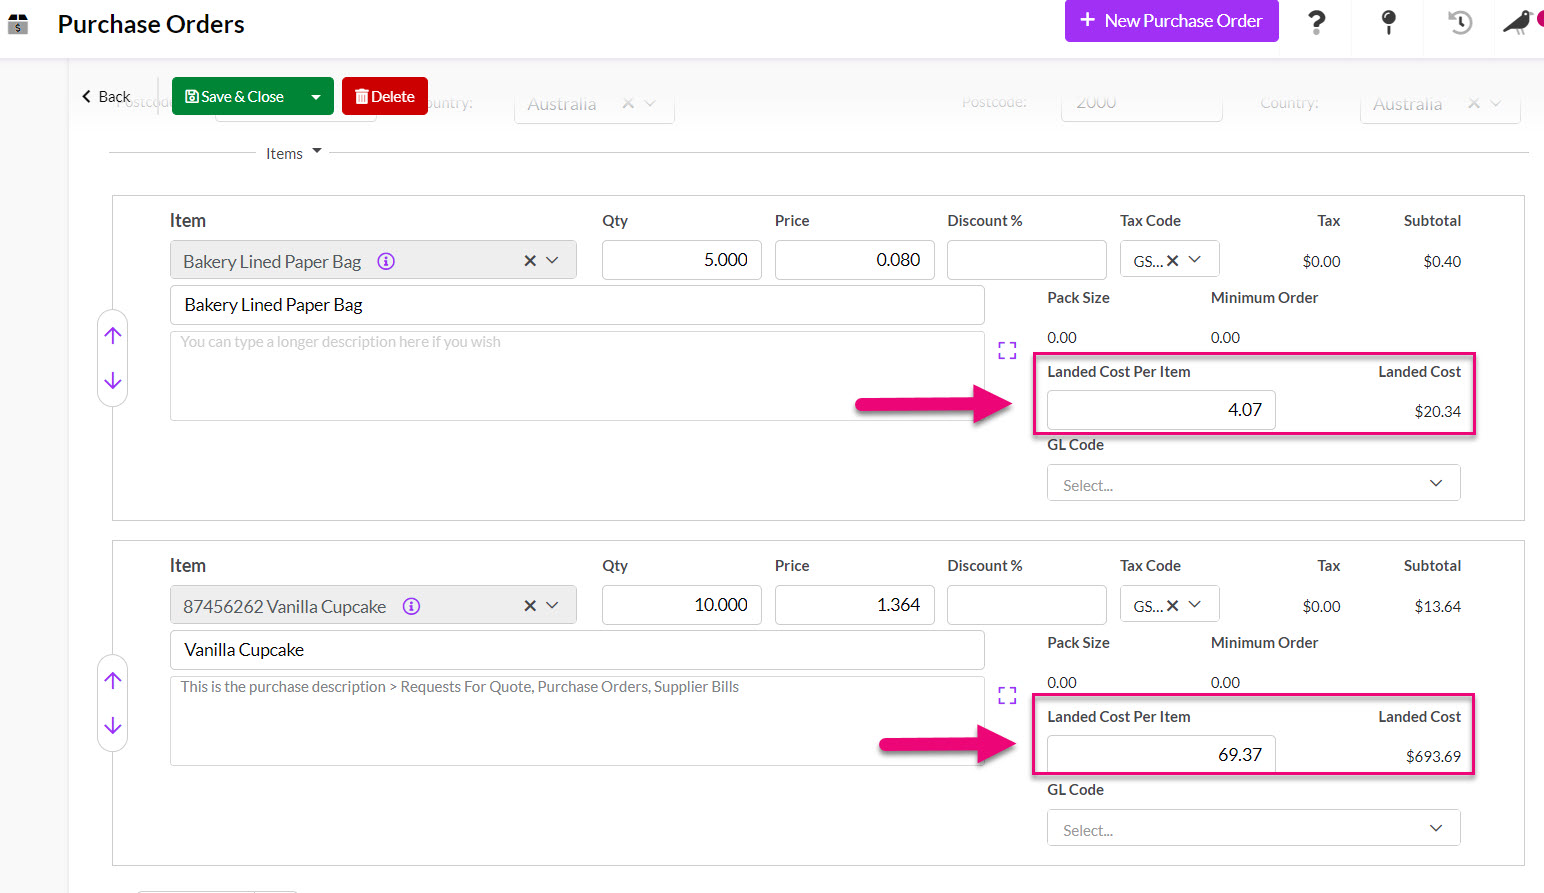
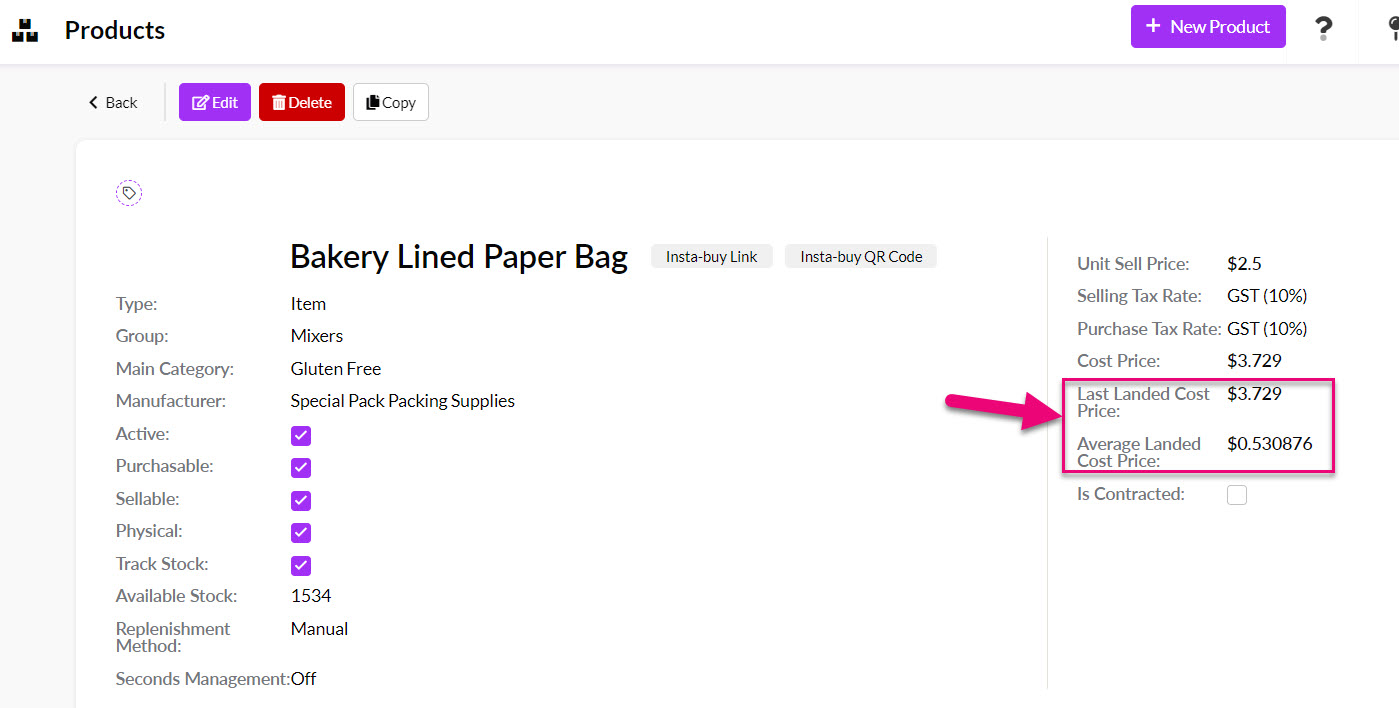
You can also have a look at the Product record/s and check the landed costs, when doing this, mind the exchange rates as the figures shown here will be in your default system currency i.e. AUD or NZD.
6 – Generate the Supplier Bill
In your Purchase Order you can generate the Supplier Bill for the items you purchased; just hit the button Convert to Supplier Bill on the toolbar:

You will now see that the landed costs have been subtracted from the full amount:
- You will also be able to see the bill details in your local currency from the top right-hand corner of the record.
1 – Create a Purchase Order
Create a Purchase Order and make sure you have the right supplier, foreign currency and exchange rate involved in the transaction.
Currency fields on a Purchase Order in Edit Mode
2 – Add your actual landed costs to the Purchase Order
Go to your Purchase Order and add your Actual Landed Costs, there a specific tab for this:
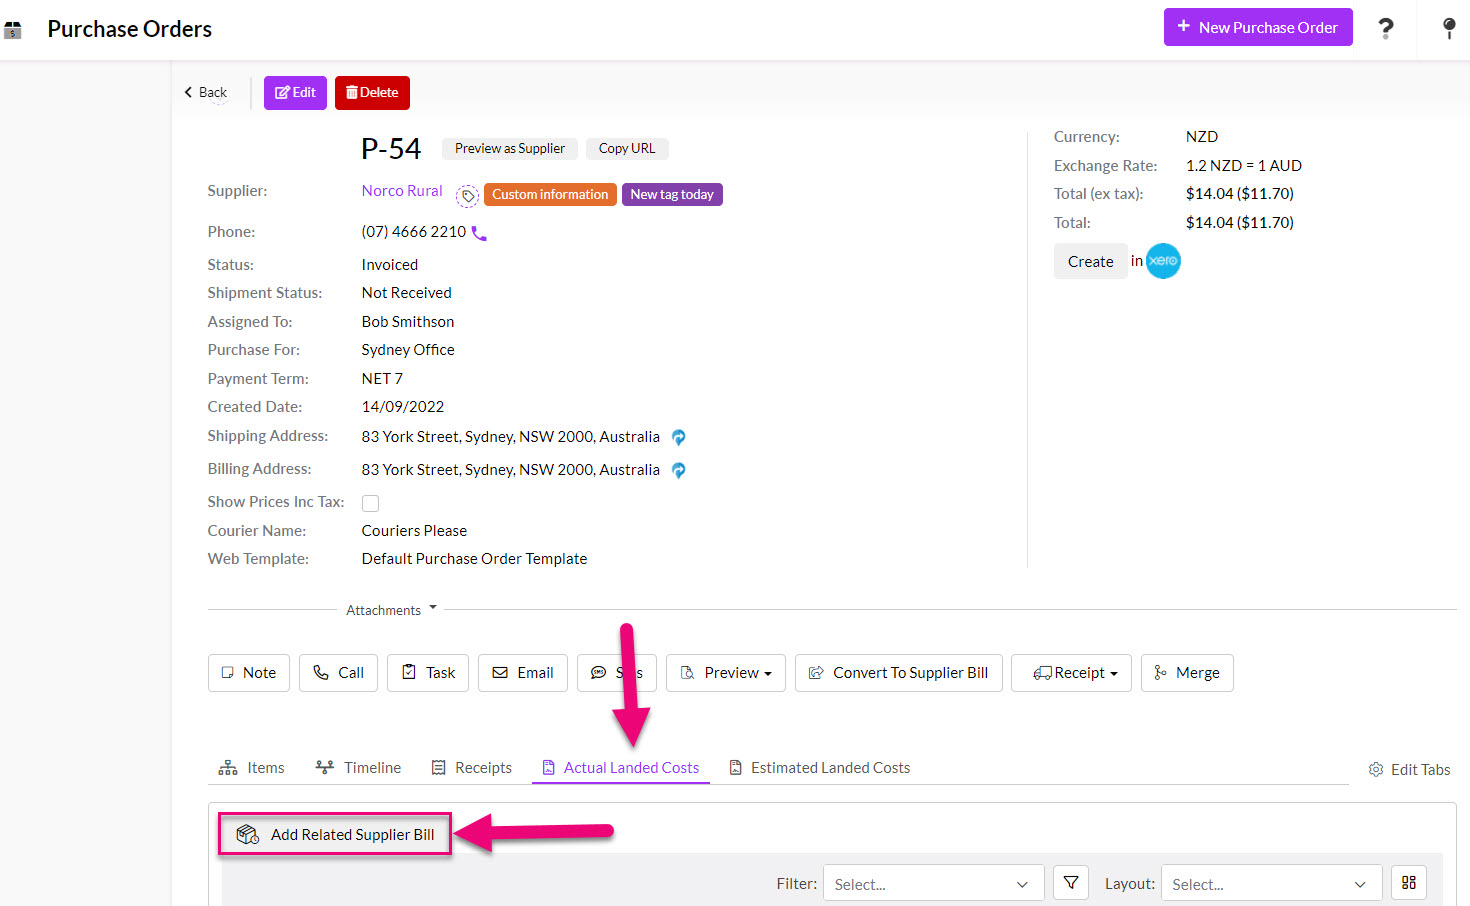
This is about the specification of Supplier Bills all the landed costs involved, make sure that you associate the right suppliers and landed cost items, otherwise the variances will not be calculated.
3 – Select the calculation basis
The Landed Cost Calculation Method field on Purchase Orders will default to the option you have nominated in your Landed Cost Configuration.
If required, you can manually change the method on a Purchase Order.
4 – Receipt goods into stock
You can receipt goods into stock all at once or have multiple Inbound Shipment records.
Receive Shipment (allows multiple shipments)
- On the record toolbar, click on the Receipt button and select Receive Shipment.
- This action will generate an Inbound Shipment record, which will open automatically.
- On the Inbound Shipment record you can remove items or adjust the quantity of items being received.
- When you are ready, click on Mark As > Received – this will immediately put the items on the shipment record into stock in CRM.
Receive All (1 shipment)
- On the record toolbar, click on the Receipt button and select Receive All.
- This will immediately put the items on the shipment record into stock in CRM.
See our guide on Inbound Shipments for more information.
6 – Generate the Supplier Bill
In your Purchase Order you can generate the Supplier Bill for the items you purchased; just hit the button Convert to Supplier Bill on the toolbar:
7 – Calculate your landed cost
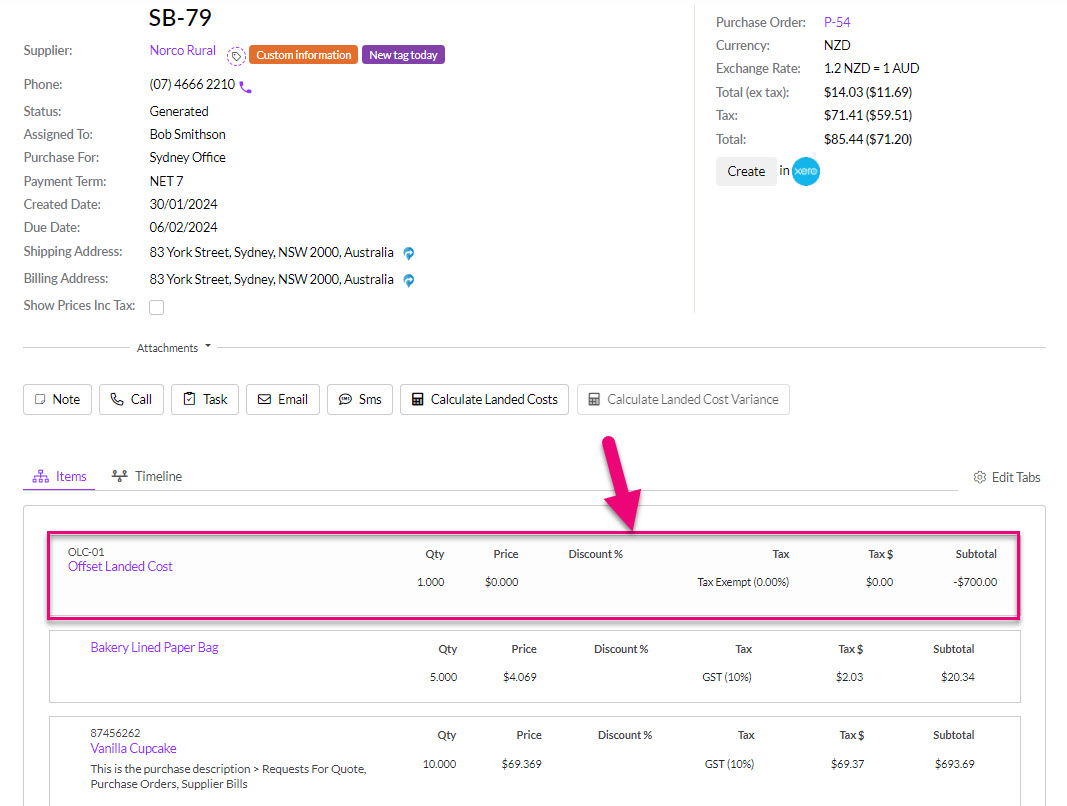
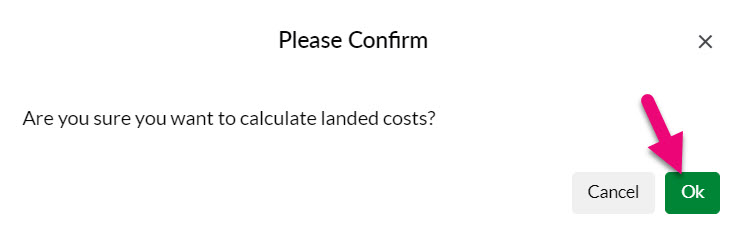
- Calculate the landed cost by clicking on Calculate Landed Cost button on the toolbar of your landed cost related Supplier Bill.

- You’ll be prompted to confirm you want to proceed with the calculation.
- Refresh CRM by typing in your keyboard F5 or just clicking on the refresh button in your browser, which generally looks like this:
![]()
- The bill will now have a line item for the landed cost offset amount.
- In the top right-hand corner of the record, you’ll also be able to see the local total (using your system default currency).
- You can also go to any related Product records and see that the landed cost fields have now been updated.