- Companies
-
- Admin
- Account Options
- Pricing settings
- PDF and Email Template system preferences
- Locations
- Brand Customisation
- Product Categories
- Product Groups
- Enable Time Billing
- Customising Assets
- Custom Fields
- Delivery Resources
- Delivery Options
- Reporting Preferences
- Sales & purchase settings
- Calendar Settings
- Messaging settings
- Repeated Invoice frequency
- Company Settings
- Credit Settings
- Sales Regions
- Asset Settings
- Ticket settings
- Relationships
- Proposal-based Quotes
- Customising Training
- Prefix/Sequences settings (Record Numbering)
- Creating SMS Templates
- Invoice Settings
- Creating Email Templates
- Creating Letter Templates
- Using Letter Templates
- Using SMS Templates
- Using Email Templates
- Setting up Teams
- System security
- Users
- Activate a new User account
- Log into a User account
- Managing Connections
- Calculating Landed Costs
- Resources
- Payment Methods
- Payment Terms
- Couriers
- PDF Templates
- Service Reports
- Quote Form Templates
- System Quote Preferences
- Credit Control
- Setting up Teams
- Regional Settings
Invoice Settings
There are a number of specific options that can be configured to apply to your Invoices at a system level – these are found in Admin > General > Invoice Settings.

When working with these settings, make sure you click on Save at the top of the page to apply your changes.
Following is a guide to the fields in this section.
The details you input into the ABN, ACN, Bank Details and Tax ID fields will all be specific to your business.
![]()
These details will appear on Invoices that you generate for customers.
This field value currently defaults to From Stock – the other options available in the dropdown are reserved for future use (they don’t currently perform any function), so you should leave this set to From Stock.

When creating an invoice, you’re able to select a schedule to which repeating invoices will be generated in the future – your choice here will determine the format of the Invoice number.

For more information, see our pages on:
If you tick this box, the relevant GL Code (determined using data from your accounting system for each Product in your system) will be visible when you are adding items to Invoices so that you can confirm or amend the default choice.


Ticking this box means that if all items are not available to ship at the time you create an Invoice, items on backorder will also be shown as line items on the Invoice. If this box is not ticked, backorder items won’t show on the Invoice.
![]()
You can learn more about backorders and Invoices with this guide.
Note that this option will only show if your database is connected to an accounting system i.e. MYOB or Xero.
If you tick Use Third Party Billing you will have new fields appear on the Company form that allows you to send invoices to a related Company.

When you create a new Invoice, a prompt will alert you if a third-party applies for billing purposes. For further information, see our page on Parent-Child and Third-Party Relationships.
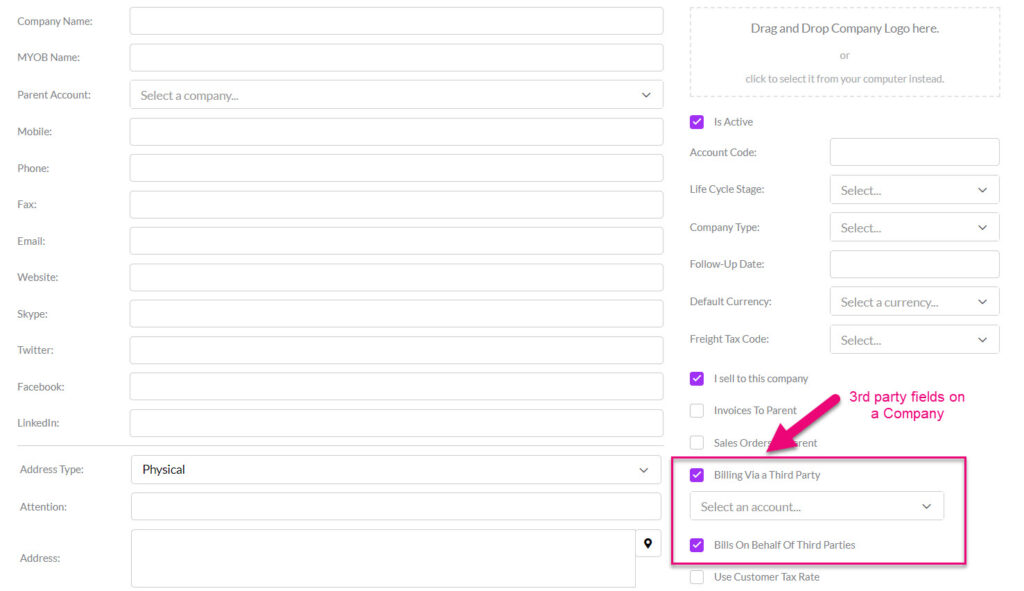
Third-Party fields on a Company form

Third-Party billing warning on an Invoice
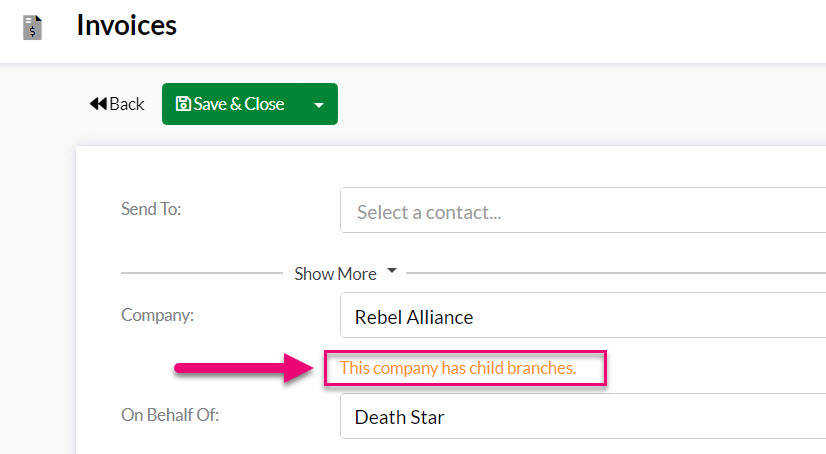
If you tick Use Parent Child Accounts you will have a new field appear on the Company form that allows you to send invoices to a parent Company.
![]()
When you generate an Invoice from a Sales Order, a prompt will alert you that there are branch Companies present for the parent Company. For further information, see our page on Parent-Child and Third-Party Relationships.

When you create and send an Invoice, it is sent to the Contact selected in the Send To field by default.
![]()
If you tick the Email Recipient – Company box, the Invoice will be sent to the primary email address stored in the Company record instead.

Contact & Company fields on an Invoice
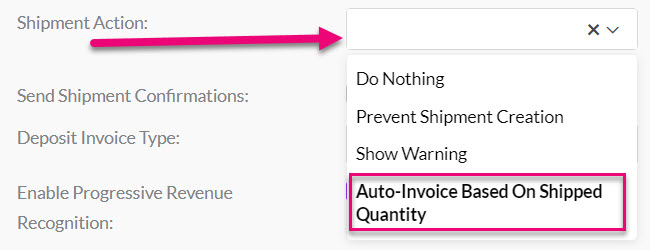
You can choose from the following actions when a shipment is generated from a Sales Order:
- Do Nothing – does exactly that; you will not be prevented or prompted.
- Prevent Shipment Creation – when you generate a shipment from a Sales Order that hasn’t been invoiced yet, a pop-up warning will display and warn you that an invoice needs to be created before a shipment can be generated. You will not be able to proceed with creating a shipment until the order has been invoiced.
- Show Warning – when you generate a shipment from a Sales Order that hasn’t been invoiced yet, a pop-up warning will display, and you can choose to proceed with the shipment or cancel to go back and invoice the order and then generate the shipment.
- Auto-Invoice Based on Shipped Quantity – when a shipment is generated from a Sales Order, an Invoice will automatically be created for the shipped quantity. See the section lower down called Automatically Email Invoices which allows you to disable or enable an auto-send feature.

If this setting is enabled, you will be able to create an Invoice for items you don’t currently have in stock.

When a shipment is generated, a confirmation email will automatically be sent to the recipient.
![]()
The recipient of the email will depend on if you have set up a person with a Contact Role of Shipment Contact OR have nominated a Shipping Contact on a Sales Order.

Once you have ticked this box, the Shipment Confirmation Email Template field will become visible, and you can select an Email Template to use for this purpose.
You can select whether deposit amounts should be % or $ amount.


$ amount deposit

% amount deposit
You can also specify a deposit amount here that you want to apply automatically to all orders e.g. 10% or $1,000.
The value in this box depends on the Deposit Invoice Type that you have selected i.e. whether that is set to a $ or %.
![]()
You can enable this option to recognise your revenue only when you make shipments of goods to your clients. You can also have this option enabled by default on all your sales.
![]()
This allows correct revenue recognition in line with product delivery which is great if your product delivery is staggered or has long lead times.
See this page for more details.
If you have set the Shipment Action field setting (see named section above) to Auto-Invoice Based on Shipped Quantity, you can choose whether an Invoice email is automatically sent or not.
You can enable or disable this function by de-selecting the Automatically Email Invoices box, which determines what happens when a Sales Order has been set to “Mark as Shipped“.

There are a few key factors to be aware of when automatically sending Invoices:
- For emails to be automatically sent, you need to have your customer records set up so that they meet conditions for bulk sending emails.
- You also need to have the Invoice Preference field on the Company record set to “Email”.

- You can also nominate people to be the Invoice Contact so they will always be the recipient.