Setting up your inventory in CRM
This guide will take you through how to set up and manage your inventory in CRM.
If you have integrated CRM with your accounting system, there are a few important things to note:
- CRM should be your primary system for inventory management – you need to perform all your sales, purchases, stocktakes and stock adjustments here.
- We then sync relevant information back to your accounting system to keep it up to date with what’s happening in CRM.
See also:
1 – Import or create Products
WHY?
In order to use CRM for sales and/or purchasing, you need to have your inventory in the system.
HOW?
- If you have an accounting system, your existing inventory information (along with your current stock levels) will be pulled into CRM automatically when you connect MYOB or Xero.
- If you have an online cart with Woo Commerce, you can import your inventory into CRM and keep it synced with your cart.
- If you don’t have inventory in your accounting system, you can import your data into CRM from a CSV file and then sync that information out to your accounting system.
- You can manually create new Products in CRM.
- You can perform any combination of the options above.
It’s important to note that in CRM, there are different kinds of Products you can create:
- Items
- Services
- Time
- Subscriptions
- Freight
- Variable
- Virtual
- Configurable
- Manufactured
- Batch or Serial tracked
The types you’ll need to set up will depend on how your business operates.
See also:
- CRM Product Guide
- Connect MYOB
- Connect Xero
- Connect Woo Commerce
- Import data into CRM
- Creating Products
- Service Products
- Time Products
- Subscription Products
- Virtual Products
- Variable Products
- Configurable Products
- Batch-tracked Products
- Serialised Products
- Manufactured Products
2 – Get your starting stock levels into CRM
If you don’t have any physical products or you don’t have stock-tracking enabled, you can skip this step.
WHY?
Before you start using CRM as your primary system, you’ll need to have your starting stock levels up to date. This is especially important if you have connected CRM to your accounting system as we want both systems to have your initial stock levels in sync.
When you start using CRM, your stock levels will be automatically updated at various points:
- To use CRM for sales, you’ll need to have available stock of items in your inventory – this stock then gets reduced when you Invoice items.
- When you receipt items into stock from your Purchase Orders, this increases your stock level.
- You can also manufacture items in CRM – this will reduce stock of the items you are using for production and increase stock or the item/s you are making.
- Existing stock can be adjusted by either doing a Stocktake or Stock Adjustment.
See also:
HOW?
- If you have an accounting system, your existing stock levels will be pulled into CRM automatically when you connect MYOB or Xero.
- If you don’t have stock levels in your accounting system, you can perform a Stocktake in CRM and then sync this information back to your accounting system. This information can then be exported back to your accounting system.
- You can also create Stock Adjustments in CRM to fine tune your stock levels. This information can then be exported back to your accounting system.
- You can also perform any combination of the options above.
See also:
3 – Customise your Product fields
WHY?
When it comes to managing inventory, every business has their own process and terminology. Getting your unique configuration details into CRM is an important first step, for many reasons:
- This allows you to get your existing terminology into CRM, making it easier for your users to transition over to CRM.
- You can segment and sort your inventory according to criteria that are meaningful to your business.
- Makes reporting on your sales and purchase data quick and painless.
On the Product form, there are 2 customisable dropdown fields: Group and Main Category.

Once you’ve added your options to either field, you’ll be able to start using these fields in Reports, Dashboards and List View.

Product Group field in a Report
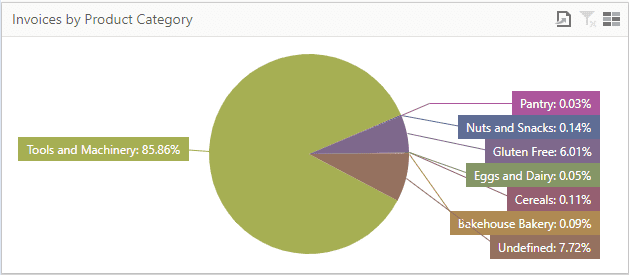
Invoices by Product Category on a Dashboard

Product Category column in List View
See also:
HOW?
- From Admin > Settings > Inventory you can access both fields for customisation – just click on a field name.

- You can then add your own category and group options to CRM.

See also:
4 – Configure your Product settings
WHY?
There are a range of options you can configure at a system level to suit your requirements:
Optional settings:
- If you import goods from overseas, you’ll want to enable the Landed Cost Management features in your database.
- If you bill your customers for time spent, you’ll want to enable the Time Billing function in your database.
Required settings:
- Specify GL codes and tax rates to apply by default to Products in your inventory.
See also:
HOW?
From Admin > General scroll down the page and you will find the areas for:
- Product Settings – here you can set default GL codes and tax rates to apply to your inventory. Note that the default codes and rates will be added to all new Products, but you can change the option that is selected at any time.

- Landed Cost Calculation – this is where you can enable the Landed Cost Management functions in CRM (if applicable).

- If you bill customers for time spent, you’ll want to enable the Time Billing function in your database (if applicable).

- Pricing settings lets you choose how prices are displayed and which tax rates are applied by default.

- Scroll to the top of the page and click on Save to apply any changes you make.

See also:
5 – Set up your Suppliers
WHY?
As well as being able to identify and manage your suppliers, you can set up links between theme and the Products you buy from them.
This means that when you are working with purchasing in CRM, you can save time by having orders automatically load specific details for the chosen Supplier e.g. price, part number, description, tax rate, purchase currency etc.

Setting up Supplier details for a Product
You can also configure specific pricing for each Product with the Supplier e. g. if there are volume-based discounts that apply.
See also:
HOW?
Mark Companies or Contacts as Suppliers
Companies and Contacts in CRM can be either customers or a suppliers; this is determined by which boxes are ticked on the record – do you sell to or buy from?
Depending on which option is chosen, CRM will enable a set of features on the record for either sales or purchasing.
If you are connected to Xero, you can have both boxes ticked on a record, if you have MYOB, you can only select one option.

Buy & sell boxes on a Company in edit mode
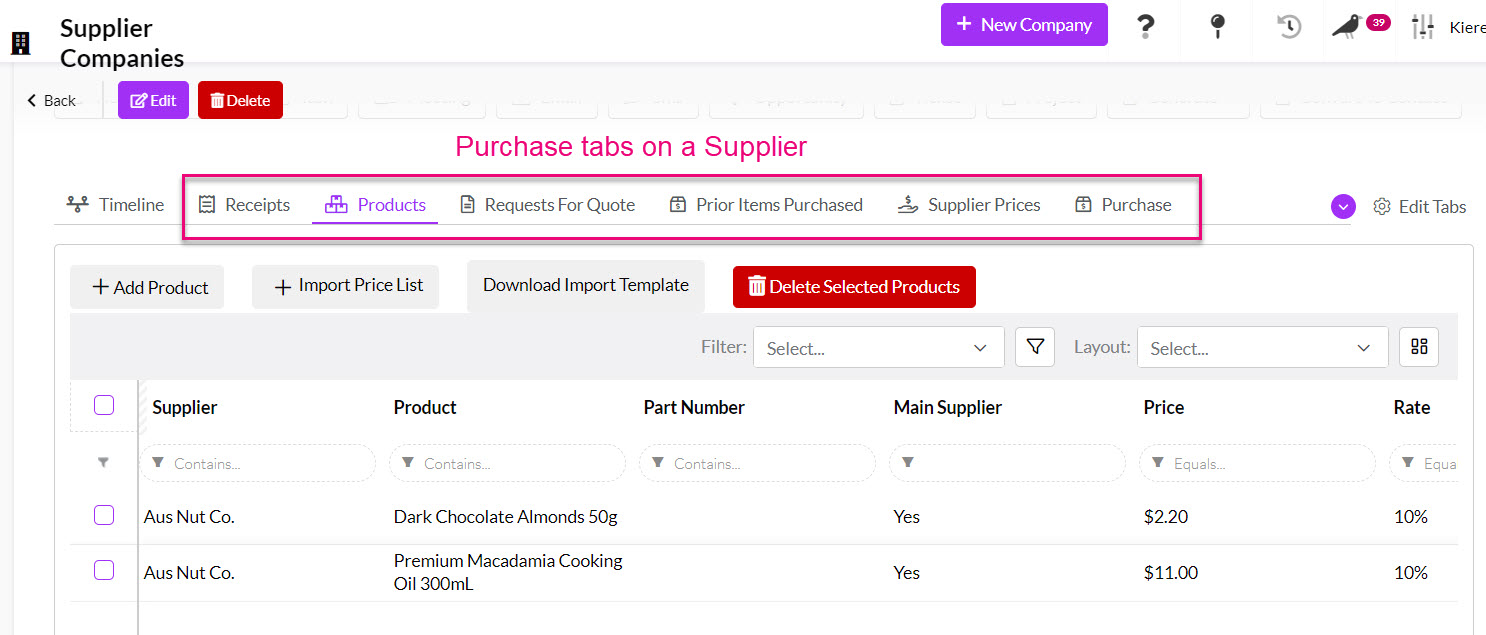
On a record that has been marked as someone you buy from:
- The record will show in Inventory > Supplier Companies or Inventor > Supplier Contacts, rather than in the Companies or Contacts area.
- On the supplier record, you will see a range of tabs related to purchasing functions in CRM.
If you cannot see these tabs, they may be hidden, and you need to edit the record tabs to make them visible.
See also:
Link Suppliers to Products
Once the purchasing functions are enabled, you can go about setting up links between your Suppliers and the Products they sell. There are 2 ways to do this:
- On a supplier record, go to the Products tab and click on Add Product.

Linking a Product to a Supplier
- On a Product record, go to the Suppliers tab and click on Add Supplier.

Linking a Supplier to a Product
- Both options will display a form where you can enter in specific details for that Supplier and Product.
Supplier details form for a Product
See also:
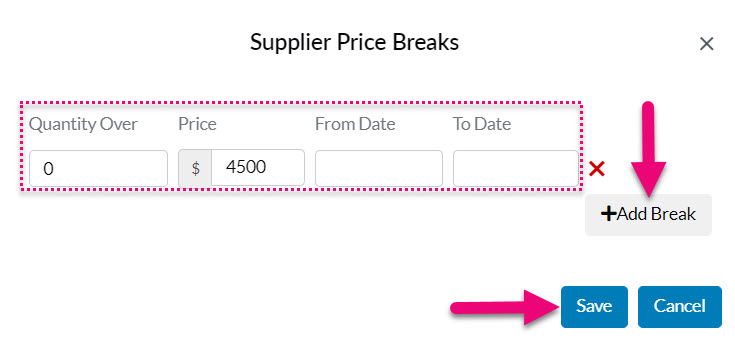
Configure Supplier pricing
You can also configure specific pricing for each Product with the Supplier e. g. if there are volume-based discounts that apply.
Note that to perform this step you must first have linked your Suppliers and Products together. You also only need to perform this step if there is more than 1 price at which a Supplier can sell a Product.
- On a supplier record, go to the Supplier Prices tab, then click on any Product to open up the pricing configuration box.

Configure pricing for Products from a Supplier record
- You can then add in as many quantity-breaks as you require.
Configuring Supplier Pricing
See also:
6 – Set up your sales pricing
WHY?
CRM lets you define unlimited price levels which you are able to assign to customers for easy selling – anything you quote, sell or invoice that customer will be automatically priced correctly.
There are a number of ways that you can configure sales pricing, based on:
- Your standard price list – Price Types lets you create labels and apply prices based on a price list e.g. retail, wholesale, trade prices.
- Who the customer is – Customer Special Pricing lets you configure unique prices for specific customers.
- Where the customer is located – you can break your customers up into Sales Regions and then have a different price for each region with Location-based pricing (sell to).
- Where you are located – you can have multiple Locations for your stock in CRM and then sell goods for a different price at from each Location with Location-based pricing (sell from).
- The quantity of goods ordered – Quantity-based pricing lets you adjust sale prices based on the number of items being sold i.e. if I sell you 1 cupcake it costs $2.00 but if I sell you 50 cupcakes, the unit price drops to $1.50.
See also:
- Price Types
- Customer special pricing
- Quantity-based pricing
- Location-based pricing
- Supplier pricing
- Pricing settings
- Sales Regions
- Locations in CRM
HOW?
Decide what type of pricing is relevant to you and then select the appropriate guide/s that explain how to configure each option.
Price Types
- Firstly, you’ll need to define the types of prices by setting them up in CRM with names. This is done from Admin > Settings > Inventory > Price Types.

- Once you have added types into your system, they will be visible from the Price Breaks tab on your Product records.
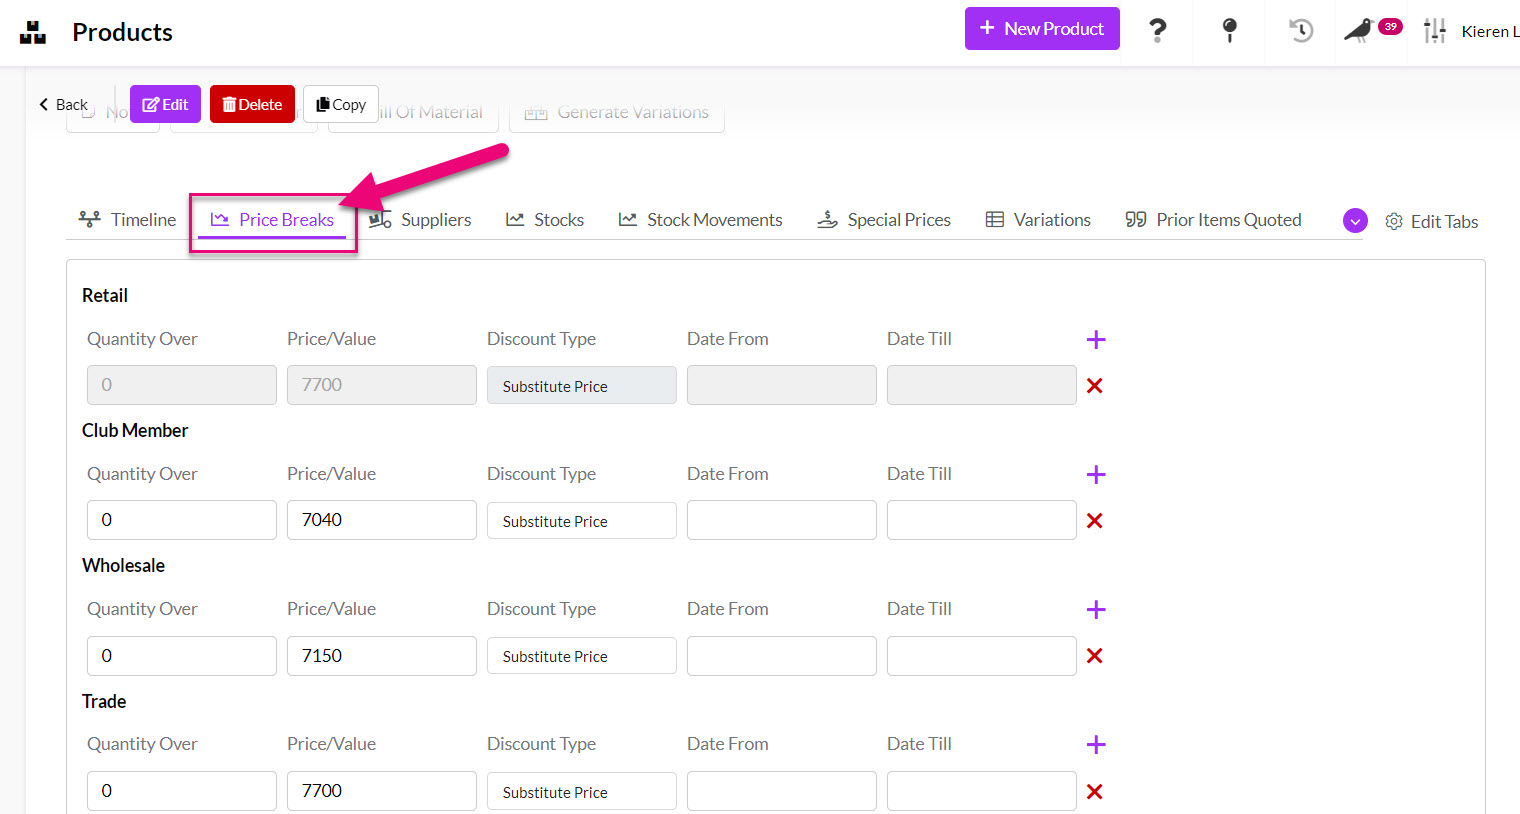
- You can manually go and configure pricing for each Product or do this in bulk for your all Products at once.
See also:
Customer Special Pricing
This can be configured from either a customer record (Company or Contact) from the Special Prices tab, or from a Product record.

Adding a Special Price from a Company record

Adding a Special Price from a Product record
See also:
Quantity-based pricing
- You need to have defined your Price Types first, then you are able to add Quantity Breaks to each Type.

Quantity breaks on a Product record
See also:
Location-based pricing (sell to)
- Firstly, you will need to set up Sales Regions in your system.

- Then apply the relevant Sales Region to your customer records (Company or Contact).

Applying a Sales Region to a Company
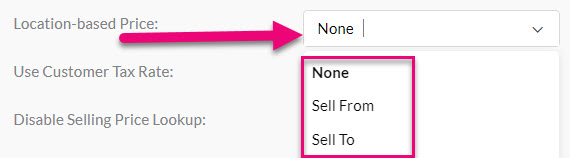
- Next, you’ll need to tell CRM that you want to base your prices on where you are selling TO. This is done from Admin > General > Pricing Settings.
- Once this is done, you’ll have the option to enter different prices for different Sales Regions when you are working with Price Types.

See also:
Location-based pricing (sell from)
If you don’t have multiple stock Locations in CRM, you can skip this section.
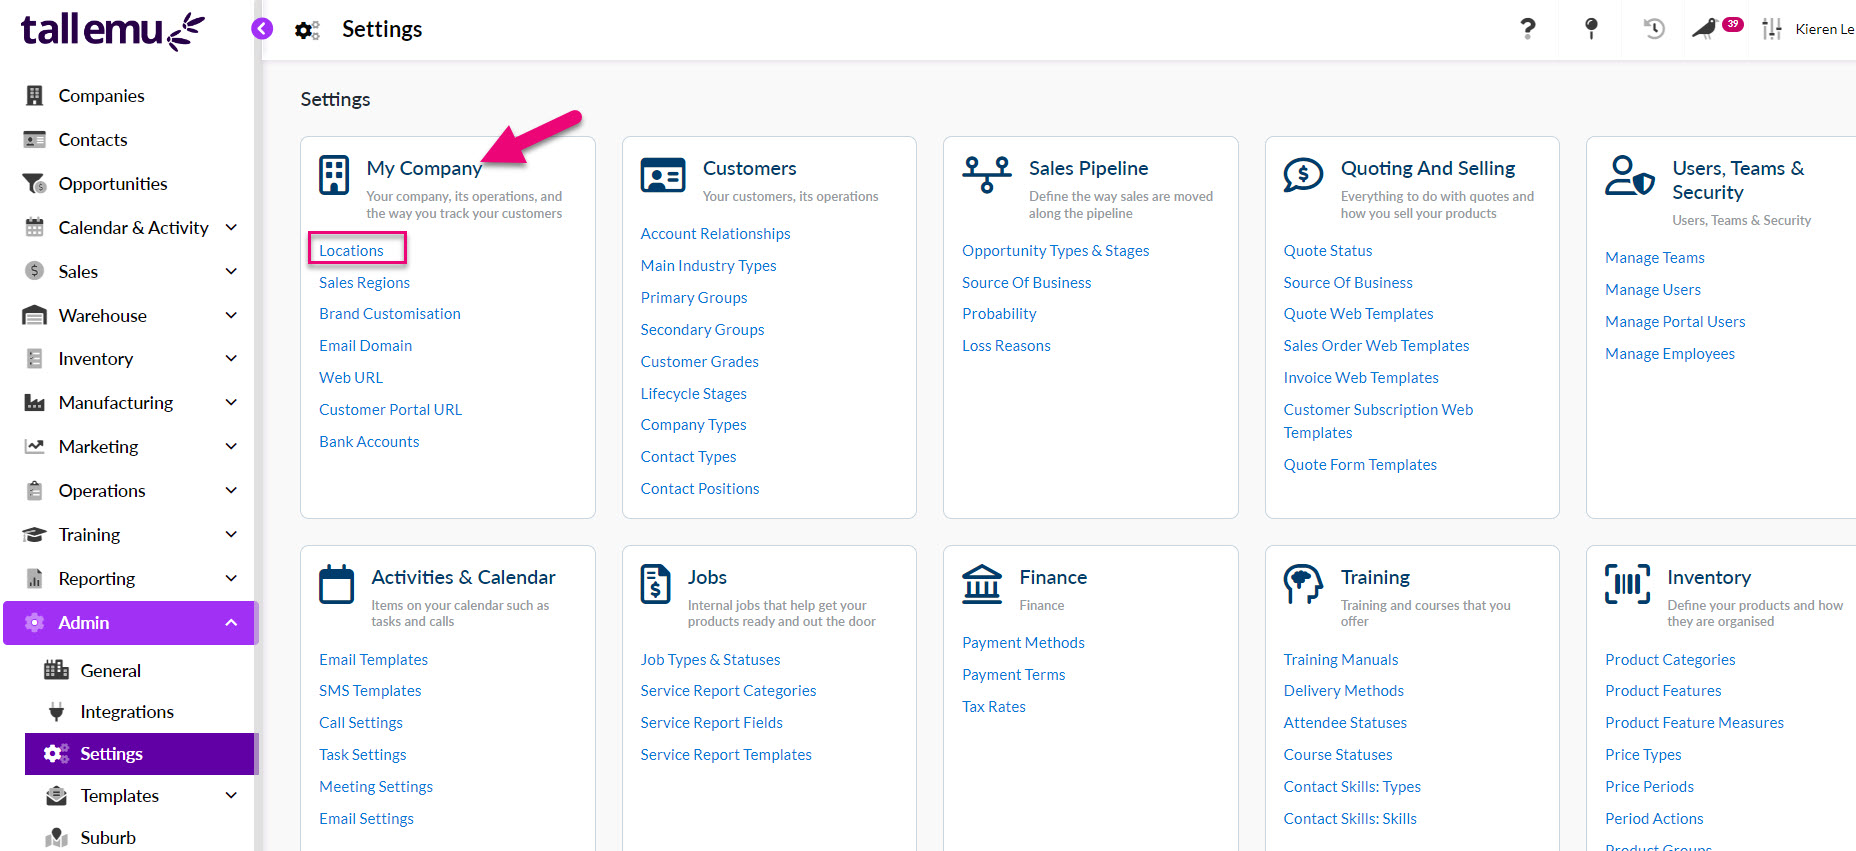
- If applicable, check the Locations that are set up in your system from Admin > My Company > Locations.
- Next, you’ll need to tell CRM that you want to base your prices on where you are selling FROM. This is done from Admin > General > Pricing Settings.
- Once this is done, you’ll have the option to enter different prices for different Locations when you are working with Price Types.
See also:
7 – Add stock details for your Products
Note that this is only relevant to your stock-tracked Products.
WHY?
For each product in your inventory, you are able to set up the following information at each Location you have stock:
- Minimum stock level
- Maximum stock level
- Bay Location of the stock
This information then flows through to Inventory > Stocks for you to work with the information by creating Advanced Filters and Layouts to determine things like stock that needs to be re-ordered.


See also:
- Location stock details
- Managing stock
- Purchase Orders
- Advanced Filters
- Layouts
- Search, sort and report in CRM
HOW?
- Open any Product record and go to the Stocks tab.

- Here you will see a different entry for each Location you hold stock at – click on any entry to open up the stock details.
- Add the relevant details and click on Save to apply them.

See also:
8 – Add images to your Products
WHY?
- Each Product record in your inventory can store an image of the item.

- This image can then be displayed in various Web Templates and PDF documents provided to your customers.

A Web Quote showing a Product image
- The images will also appear in your Customer Portal.

See also:
HOW?
Per Product
- Open any Product record and click to Edit it.
- You can then add the image file where shown and Save & Close the record.

In bulk
- From Inventory > Products you can click on the Excel icon and then select Import Images.

- This opens the importer and gives the option to download an import template and then add your file for import.

See also: