-
- Getting Started
- Record Tabs
- Managing Duplicate Records
- Setting Up Grid Layouts
- Show and Hide Columns
- Key setup steps
- Additional setup steps
- Tips & Tricks
- Pinning Activities
- Bulk update
- Timeline
- Bulk uploading images
- Advanced Filters
- Automated Workflows
- System Admin in CRM
- Search, sort and report
- Calendar View
- Dashboard View
- Using Views
- Import troubleshooting
- List View
- Set up your customers in CRM
- Working with Activities in CRM
- Basic Navigation
- Using the Map View
- Using the Kanban View
- Configuring Dropdown Lists
- Creating New Records
- Open or Edit Existing Records
- View Details on Map Pins
- Syncing Your Accounting System
- Change the Column order
- Setting up your CSV file for Import
- Filter Map Records
- Company Information
- Sorting Records
- Export data
- Filtering Records
- Import Data from Excel or CSV
- Colourise Map Records
- Set Up Security Groups
- Invite Other Users
- Connect Outlook
- Connect to Mailchimp or Campaign Monitor
- Set Up Other Reference Data
- Configure Online Quoting
- View Reports and Dashboards
- Connect Burst SMS
- Viewing Tags
- Adding and Editing Tags
- Sorting and Filtering with Tags
- Jobs, Assets & Service Management
- Manufacturing
- Operations
- Reporting
- Training
- Workflow Management
- Quoting & Selling
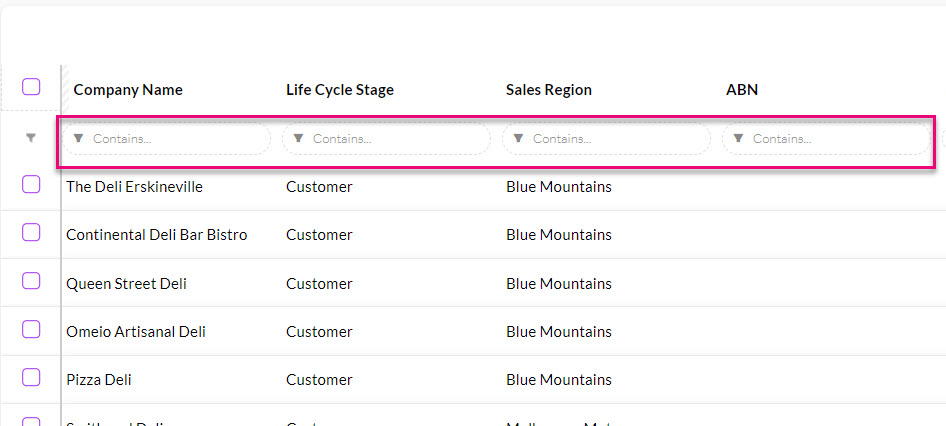
Filtering Records
The row beneath the column headings is the Filter Row.

- Every column has its own search box that you can type directly into and then press enter to search. You can also search in multiple columns at a time.
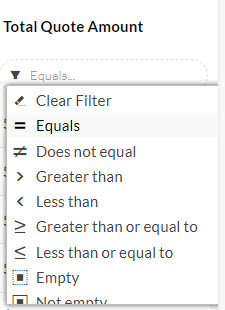
- You can also perform a more advanced search of a column by using the Filter function, which will vary depending on the type of data the column is showing.
The following example shows the Filter options in a column that displays text data.

If the column refers to a Boolean (tick box) field, I will have the following preset Filter options:

If it’s a money field, I’ll have these options:
If it’s a date/time field, I’ll have these options:

You can quickly clear a Filter from a column by selecting the option from the list.
![]()
You can clear Filters from multiple columns at once by clicking on the Master Funnel (which will show as red when you have any Filters applied).
![]()
To save you having to repeat the process of running the same searches over and over, you can perform the process once and then save it as an Advanced Filter so you can quickly select it in future.