-
- Getting Started
- Record Tabs
- Managing Duplicate Records
- Setting Up Grid Layouts
- Show and Hide Columns
- Key setup steps
- Additional setup steps
- Tips & Tricks
- Pinning Activities
- Bulk update
- Timeline
- Bulk uploading images
- Advanced Filters
- Automated Workflows
- System Admin in CRM
- Search, sort and report
- Calendar View
- Dashboard View
- Using Views
- Import troubleshooting
- List View
- Set up your customers in CRM
- Working with Activities in CRM
- Basic Navigation
- Using the Map View
- Using the Kanban View
- Configuring Dropdown Lists
- Creating New Records
- Open or Edit Existing Records
- View Details on Map Pins
- Syncing Your Accounting System
- Change the Column order
- Setting up your CSV file for Import
- Filter Map Records
- Company Information
- Sorting Records
- Export data
- Filtering Records
- Import Data from Excel or CSV
- Colourise Map Records
- Set Up Security Groups
- Invite Other Users
- Connect Outlook
- Connect to Mailchimp or Campaign Monitor
- Set Up Other Reference Data
- Configure Online Quoting
- View Reports and Dashboards
- Connect Burst SMS
- Viewing Tags
- Adding and Editing Tags
- Sorting and Filtering with Tags
- Jobs, Assets & Service Management
- Manufacturing
- Operations
- Reporting
- Training
- Workflow Management
- Quoting & Selling
Automated Workflows in CRM
There are a number of standard business processes that you can automate in CRM, saving time, energy and money.
Following are some of the automations that come with your database.
We also have roadmap plans to introduce the ability for customers to create their own workflows in CRM in future.
Please note that these automations are exclusive of the range of available integrations that will sync data with CRM and enable application specific workflows. For more information about the programs that we currently integrate with, please visit our integrations page.
Forget manual data entry! You can customise your own system to automate all of the following workflows:
- Bringing in leads from anywhere online, direct to CRM.
- Sending an automated confirmation email to the lead.
- Automatically emailing members of your team.
- Adding leads to your existing marketing lists.
How do I get leads in?
1. You create a Web Form to tell CRM:
a) What type of data you would like to gather e.g. name, phone, email, address, ABN etc.
b) Where you want that data to end up in CRM e.g. create a Contact and/or Company and an Opportunity, Ticket or Project.
c) The email you’d like to send to people who submit the form.
d) Who in your team needs to be notified when a new lead comes in e.g. sales.
e) Which of your marketing lists the lead should be added to e.g. newsletter list.
2. You then deploy the form and send the system “live” for people to access via:
a) Scanning a QR code.
b) A form on your website.
c) A link in an email or online ad.
d) All, or a combination of any of the above options.
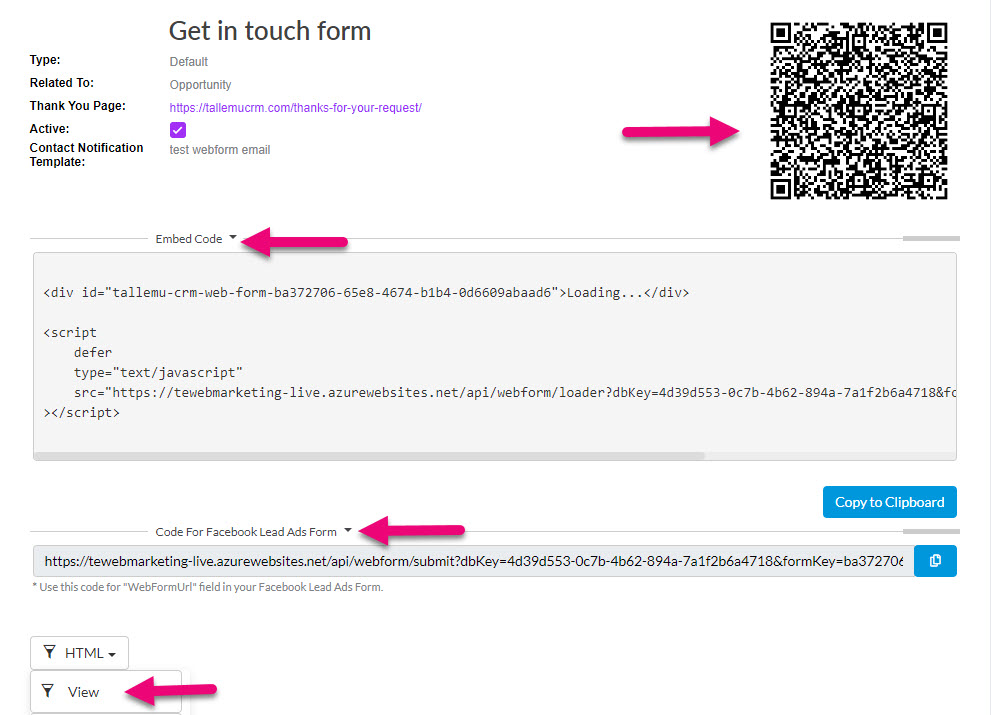
Pro Tips: Wherever you’re going to bring data into CRM, create Filters so you can quickly isolate the records related to Web Forms for workflow and tracking.
From the Calendar & Activity area you can also see a history of every Web Form that’s ever submitted, and every automated confirmation email you’ve ever sent.
Salespeople will automatically be notified when a customer accepts a Quote.
What does it do? Automatically sends a notification email to the salesperson (i.e. CRM User) on the Quote.
When does it do it? The trigger to send the email is when a Quote Status is changed to Accepted. This could be done manually or accepted online by a customer using the Web Quote.
Who does it send to? The person the Quote is Assigned To.

Customisations you can make: N/A – the current notification email template cannot currently be modified.
Enable or disable the workflow: N/A – this is already active by default in your database and cannot be disabled.
Pro Tip: every salesperson should create their own Filters in Quotes, Sales Orders and Invoices so they can quickly see which records belong to them, require follow-up, are due or overdue etc.
You can automatically notify your customers whenever one of their orders is shipped.
What does it do? Automatically sends an email to the nominated person on a Sales Order with a PDF copy of the Delivery Docket attached.
When does it do it? The trigger to send the email is when an Outbound Shipment is marked as Shipped.
Who does it send to? On a Sales Order you can select a Shipping Contact to receive the email.
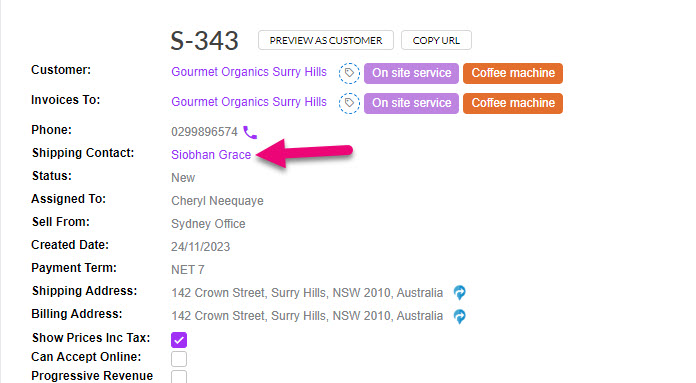
- To save you from having to potentially select the same people over and over on orders for your regular customers, you can go and set up nominated shipping contacts – this means that the Shipping Contact field will be pre-filled.
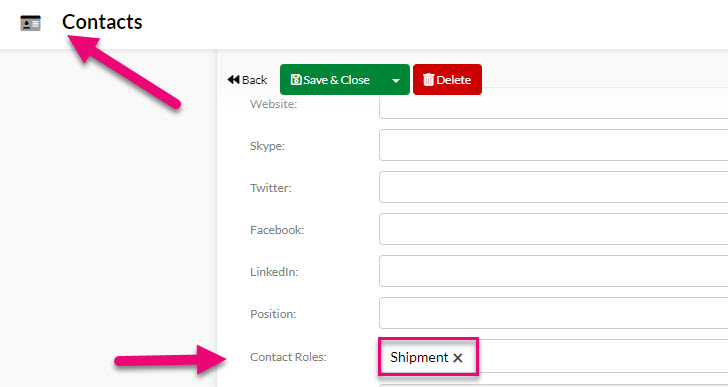
- Just open and edit a Contact that you want to nominate and scroll down to the Contact Roles field and select Shipment, then save & close the record. This person is now the Shipping Contact for the customer.
Customisations you can make: You can modify the system Email Template that is used to send shipment confirmations or create your own and tell CRM to use that as your default template instead.
If you’d like changes made to the Delivery Docket PDF template, please email [email protected] with your changes and we can quote to do this for you (you will soon be able to edit this template yourself).
Enable or disable the workflow: Go to Invoice Settings in your database and go to the setting for Send Shipment Confirmations.
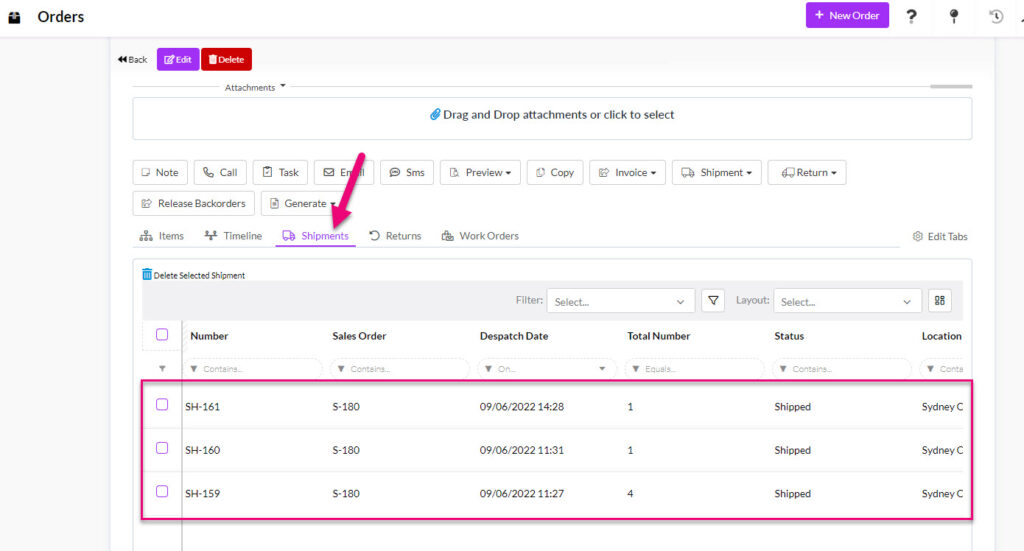
Pro Tip: Create Filters in Sales Orders, Outbound Shipments and Calendar & Activity so you can quickly see which orders a shipped, which shipments are sent, and which confirmations have been emailed.
You can automatically create Invoices for orders that you’ve sent to customers.
What does it do? Automatically creates an Invoice in CRM for the items on an Outbound Shipment. The Invoice is created with a Status of “Issued”.

When does it do it? The trigger to create the Invoice is when an Outbound Shipment is marked as Shipped.
What goes on the Invoice? All the items on the Outbound Shipment will be added to the Invoice. You can have multiple Outbound Shipments for an order, thus multiple Invoices can be created, one each time a shipment is marked as Shipped.
Customisations you can make: You can customise the Web Invoice or PDF Invoice that are used to create Invoices and tell CRM to use your choices as the default templates.
Enable or disable the workflow: Go to Invoice Settings in your database and go to the setting for Shipment Action and set this to be “Auto-Invoice Based on Shipped Quantity” to enable, or “Do Nothing” to disable.
Pro Tips: Create a Filter in Invoices that shows you all records with a Status of Issued – that way you can quickly pull up a list of what needs to be sent out to customers.
Use this workflow in conjunction with the following #5 to automate the entire process and have the Invoices automatically emailed to customers.
You can automatically email Invoices out to your customers.
What does it do? Automatically emails an Invoice to a nominated contact. Note that the Invoice must first have been created by workflow #4 (above) i.e. when a shipment is sent.
When does it do it? The trigger to create the Invoice is when an Outbound Shipment is marked as Shipped (as per workflow #4), upon creation, the Invoice is then automatically emailed.
Who does the Invoice get sent to? You need to have first set up a specific person or people to be the invoice receivers for your customers. To do this:
-
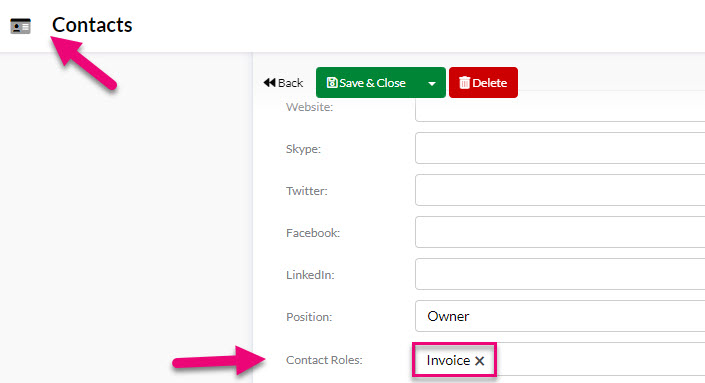
- Open and edit a Contact that you want to nominate and scroll down to the Contact Roles field and select Invoice, then save & close the record. This person is now the Invoice Contact for the customer.
Customisations you can make: You can modify the system Email Template that is used to send Invoices or create your own and tell CRM to use that as your default template instead.
Enable or disable the workflow: Go to Invoice Settings in your database and go to the setting for Automatically Email Invoices and tick the box to enable or de-select to disable.
Pro Tip: Create Filters in Invoices and Calendar & Activity so you can quickly see which invoices have been sent, along with the emails sending them out.
Rather than manually needing to move a sale through different phases, CRM can do this for you.
What does it do? A Quote will be automatically converted to a Sales Order when it’s accepted, and that Sales Order will be turned into an Invoice if the order has also been paid (CRM will also create a Payment).
When does it do it? The trigger to create a Sales Order is when a Quote Status is changed to Accepted – this could be done manually or accepted online by a customer using the Web Quote.
If you have a payment gateway integrated with CRM and the customer also pays when they accept the Quote online, CRM will convert the Sales Order to an Invoice and create a linked Payment (this could be either a deposit or the full amount).
Other options: If you don’t use Web Quotes or don’t have a payment gateway integrated, you can use workflow #4 and CRM will automatically create an Invoice for orders as you ship them.
Customisations you can make: You can customise the Web Sales, Web Invoice or PDF Templates that are used to create each type of record and tell CRM to use your choices as the default templates.
Enable or disable the workflow: Go to Quote Settings in your database and go to the setting for Simple Quote Acceptance and de-select the box to enable this and select it to disable it. If the setting is selected i.e. disabled, when a Quote is accepted, CRM will just change the Status to Accepted and no further action will take place.
Pro Tip: Create Filters in Quotes, Sales Orders, Invoices and Payments so you can quickly see which records have been created and what their status is.
CRM Web Quotes come with a built in, online Q&A feature.
What does it do? When you send a customer a Web Quote, they can submit a question online, which comes directly into the Quote in CRM and sends an email notification to the salesperson (i.e. person the record is Assigned To).
For example: the customer types their question in the box on the Web Quote and presses to submit it.

- The Status of the Quote in CRM is updated to Customer Comment.

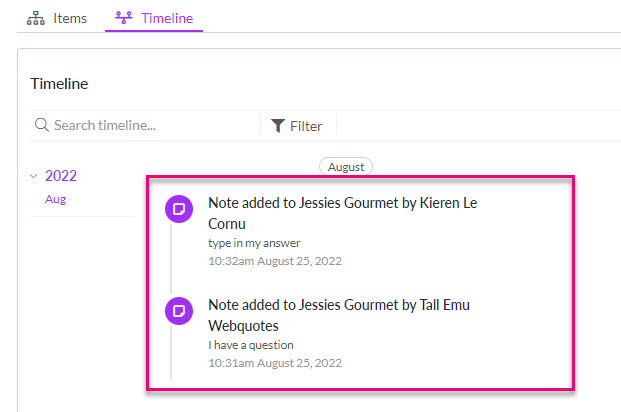
- On the Quote Timeline in CRM, an entry is added with the question.

- An automated notification email is sent to the person the Quote is Assigned To.
- The salesperson opens the Quote and clicks on the question on the timeline and then clicks Reply.

- This opens a Note where the reply can be added, then click Save.

- An automated notification email is sent to the customer to let them know a reply has been sent.
- The Web Quote has also been updated each time so that the full Q&A history is captured here.

- As the Q&A progresses, the record timeline is updated, and each party is sent an automated notification email when a response has been sent.
- When the Quote is Accepted the record in CRM is locked and cannot be edited, along with the Web Quote.
Customisations you can make: N/A – the current notification email template cannot currently be modified. You can edit the Web Quote Template to your liking.
Enable or disable the workflow: N/A – this is already active by default in your database and cannot be disabled.
Pro Tip: Create a Filter in Quotes that shows you all records with a Customer Comment – that way you can quickly pull up a list of and keep track of customers to respond to.
Rather than manually needing to email members of your team when something important happens (or just to give them an ‘fyi’) they can automatically be notified when you mention them.
What does it do? Creates an alert in the CRM notifications area and also sends an email notification to the person who has been mentioned in a Task, Email, Note, Phone Call, Meeting.
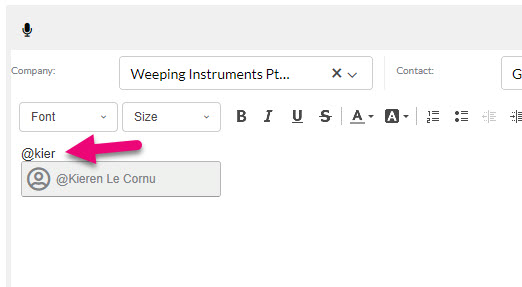
What is a ‘mention’? If you type the “@” symbol in CRM immediately followed by the first letters of someone’s name, you will be able to select from a list of Users to mention; this is basically tagging someone – just press enter or click on their name to add them.

When does it do it? As soon as you click save on the record containing the mention, this triggers the alert and email.
Customisations you can make: N/A – the current notification email template cannot currently be modified.
Enable or disable the workflow: N/A – this is already active by default in your database and cannot be disabled.
Pro Tip: Don’t want to deal with the alert in CRM right now? Click on the alarm clock to reveal options to push it back.

You might want to be able to keep track of specific products that you’ve sold to customers for warranty purposes or because you’ll install or service the product later; in CRM we call these Assets and each customer can have an unlimited number of these records.
What does it do? Creates an Asset record in CRM and pulls through all applicable information from the sale i.e. the customer and product details and any batch/serial numbers etc.
When does it do it? You can specify whether the record is created when you ship the sale or invoice it.

Enable or disable the workflow: from Asset Settings you can choose what the trigger to create an Asset is and which products will be automatically turned into one.
Pro Tips: Customise the Asset Class and Subclass fields to suit your requirements.
If you can’t find a spot on the Asset form to capture particular information you need, you can always go to Admin > Custom Fields and create new fields to store your data.
Have a look at workflow #10 if you’re going to be servicing products for your customers.
If you service or maintain products for customers, you can automate the ongoing Job process in CRM, based on a service interval you specify.
Prerequisites: for scheduled servicing to work, you’ll first need to have set up some Service Products (the work you’ll be doing i.e. parts, labour, travel etc.) and have some Assets for your customers (the products you’ll be servicing).
What does it do? Creates a Job in CRM for the initial service and then continues to create Jobs for future scheduled services.
When does it do it? You can specify if a service schedule should apply and if so, what the schedule is – this is done from an Asset record.
For example: once the initial Job below is completed on 27/11/23, CRM will (within a minute or so) create another Job scheduled for 26/5/24 and when that is marked complete, another will be created for 6 months from then etc.

Enable or disable the workflow: N/A – this is already active by default in your database and cannot be disabled.
Pro Tips: Create Filters in Assets and Jobs so that you can see which customers and products need servicing, how often and when the next service is booked for.
Create Service Report Templates so you can quickly produce a PDF report to give customers that details the work you’ve done.
In Reporting > Reports there are a range of reports you can run on an ad-hoc basis, but you can also schedule reports to be automatically emailed.
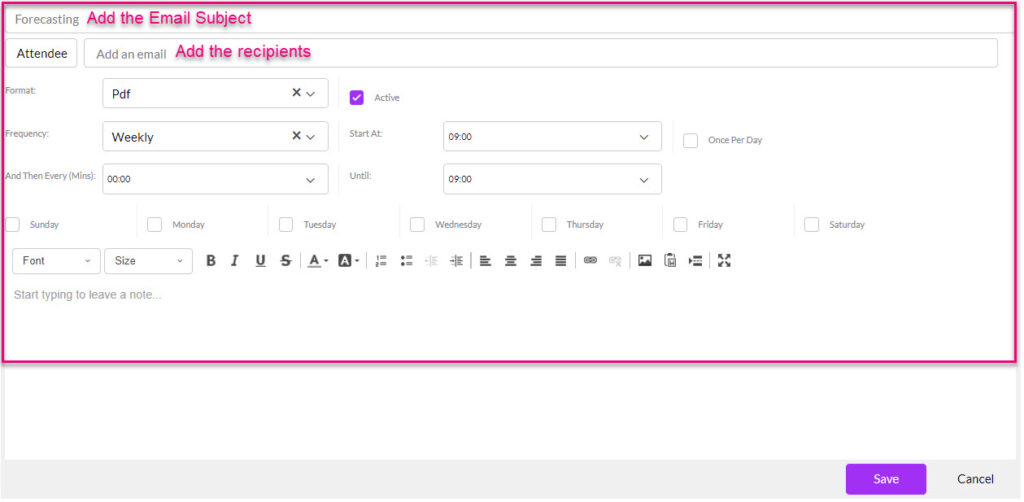
What does it do? Sends an email to the recipients you specify with a copy of a report attached, in the format you have chosen (i.e. PDF, xls or CSV) with any optional email text you want to add.
When does it do it? You can specify the exact frequency that the email is sent – daily, weekly, monthly, even multiple times a day.
Enable the workflow: open any report and click on the Create Schedule button, then input the specifics.

Disable or adjust the workflow: in Reporting > Scheduled Reports you can see anything you have scheduled previously – just click on a record to open it and adjust the details, or de-select the Active box to disable the workflow.
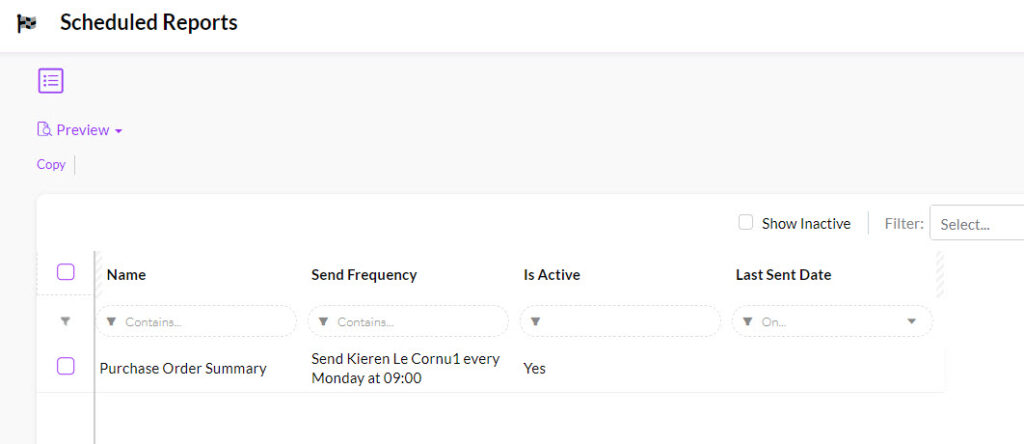

Pro Tip: if you have a lot of reports scheduled and can’t remember exactly what they are, select one in the Scheduled area and use the preview button to quickly view it.
