Set up Manufacturing in CRM
This guide will take you through how to set up CRM for manufacturing and production.
1 – Set up manufactured products
WHY?
The first thing you need to do it tell CRM which products in your inventory you manufacture; the system can then give these items a range of additional features that relate to manufacturing.
If you don’t identify products in your inventory as being manufactured items, you’ll find that you are missing a range of functions, such as the ability to:
- Set a Bill Of Material (BoM) for an item.
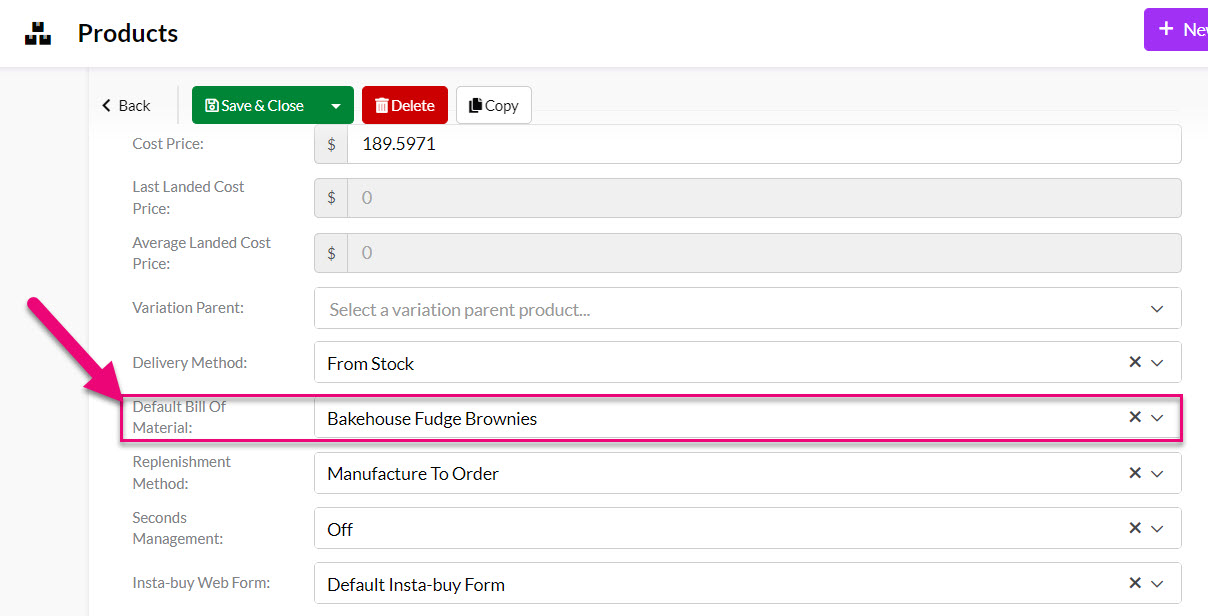
Selecting a Default BoM on a Product in edit mode
- Add an item you manufacture to a BoM as an Output Product.
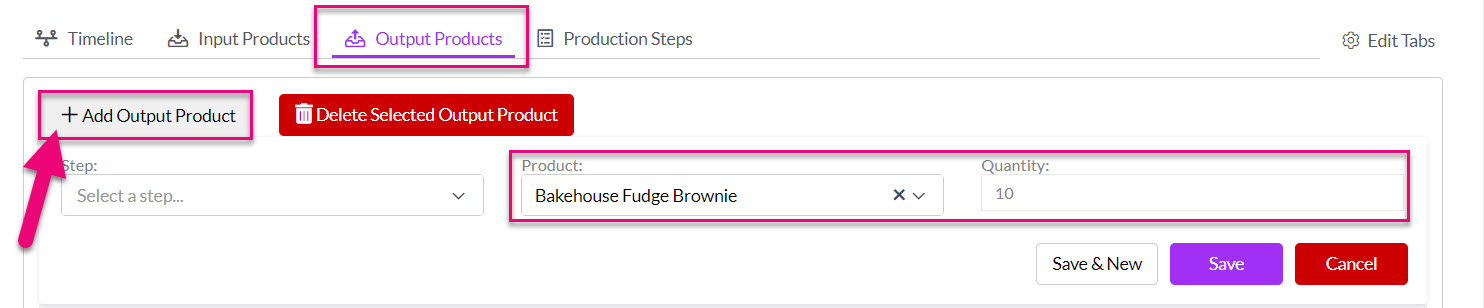
Selecting a Product as an Output Item on a BoM
- Manufacture an item in CRM via a Work Order.

Generating a Work Order for a manufactured item on a Sales Order
HOW?
There is a checkbox on the Product form called “I make this product” – this box needs to be ticked on every item in your inventory that you make – this turns on the manufacturing functions in CRM.
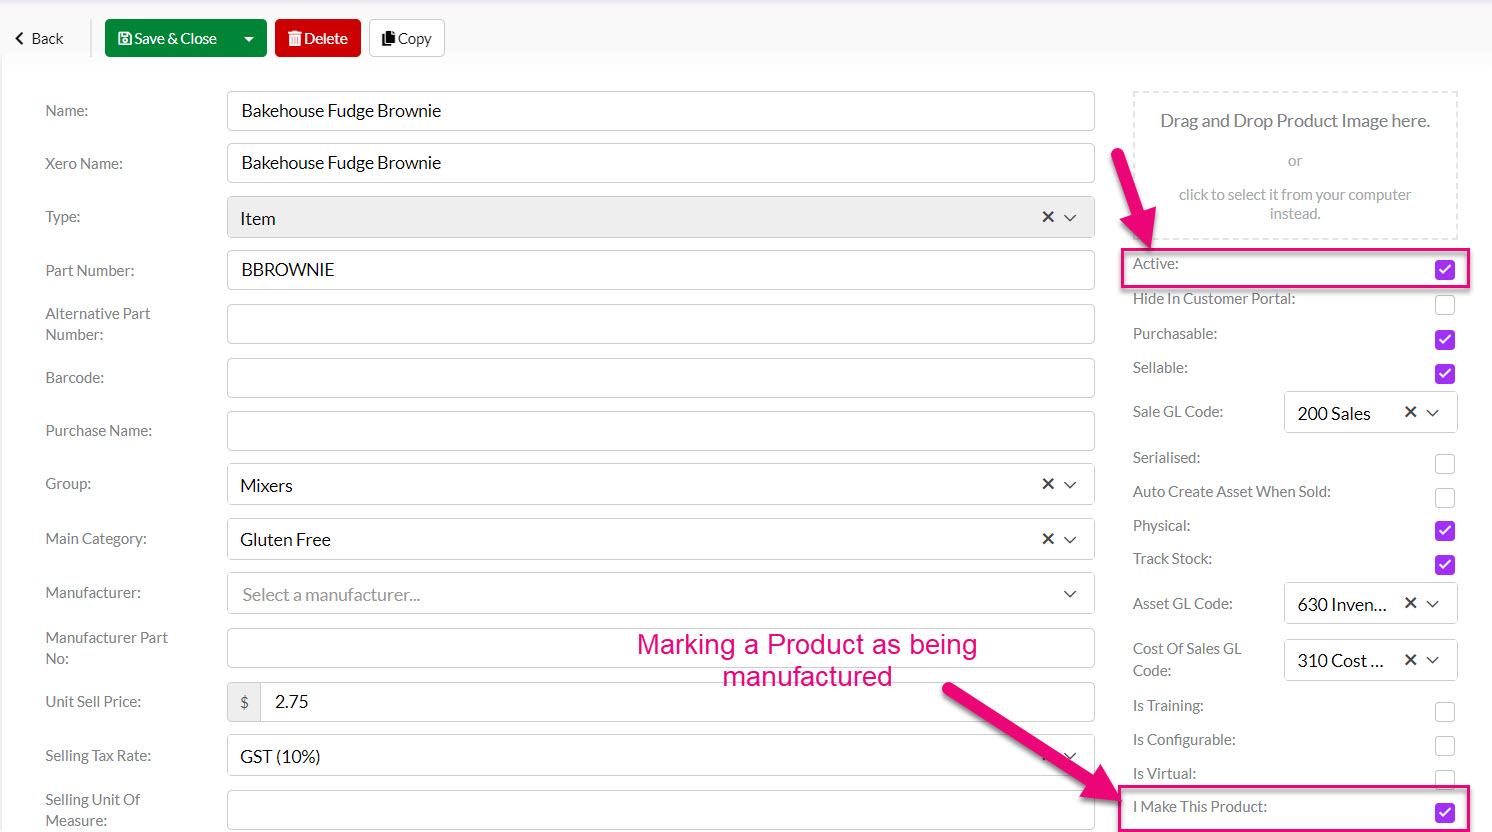
“I Make This Product” box on a Product in edit mode
There are 2 ways that you can enable this option on your items:
1 – Manually edit Products
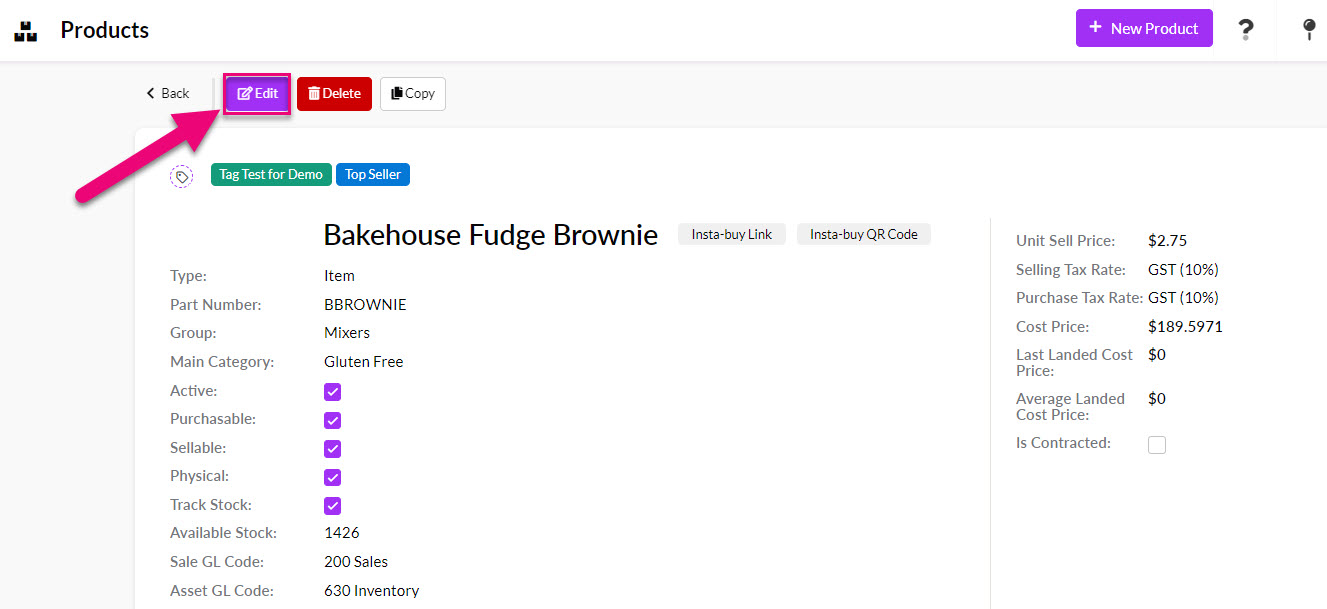
- Open a Product and click Edit, then tick the I Make This Product box, make sure the Active box is ticked and then Save & Close the record to apply the change.

2 – Export & reimport your data
- Export your Product data from CRM to Excel, update the value in the I Make This Product column to equal “Yes” then reimport the data into CRM to update the applicable records.

See also:
- Setting up manufactured products
- Our guide on exporting & reimporting Product information.
2 – Set up Bills Of Material (BoMs)
WHY?
Now that you’ve told CRM which Products you manufacture, you need to tell the system how they are made.
This is done using Bills Of Material (BoM) in CRM that specify the items, quantities and steps involved to create manufactured items; think of a BoM as a recipe for manufacturing.
Then when you need to tell CRM that you’ve manufactured items, you’ll do so using a Work Order, which takes the BoM and puts it in motion by adjusting the stock of items you are consuming and creating during your production process.
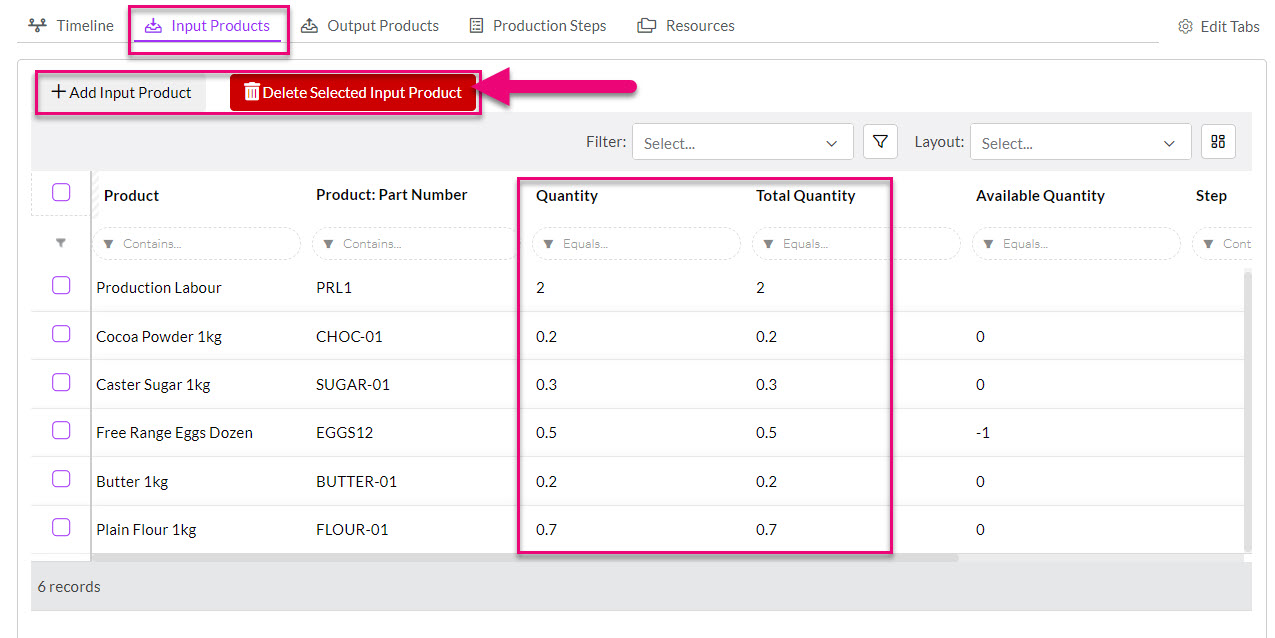
Input Products on a BoM i.e. the items you are using to manufacture something
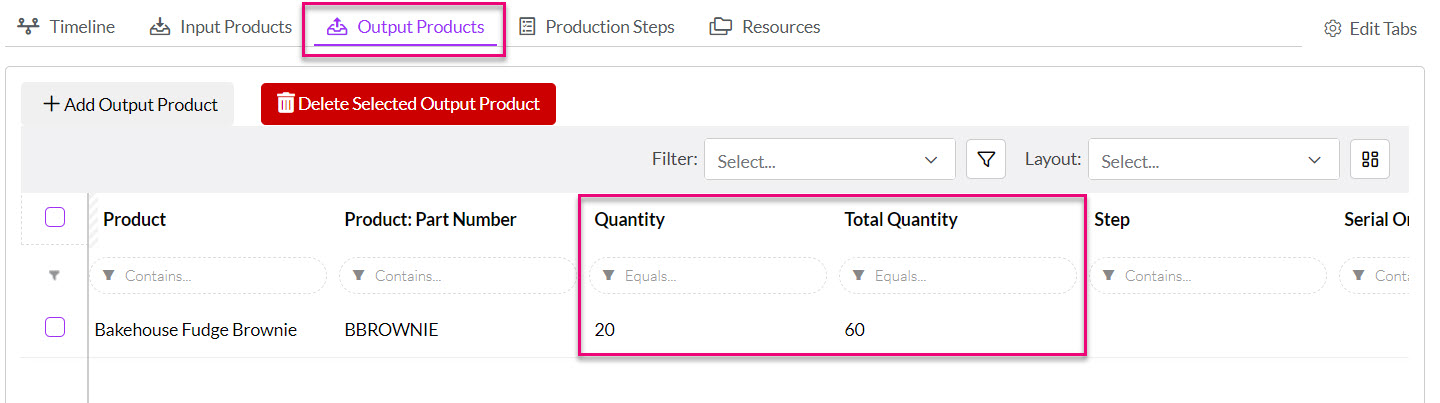
Output Products on a BoM i.e. the item/s you are manufacturing
See also:
HOW?
There are a few ways you can get your BoMs into CRM:
1 – Import from MYOB
- If you are using MYOB and have your builds of assembly already set up, these will be automatically imported into CRM into Manufacturing > Bills Of Materials.
- You can edit the BoM records to add further details to them in CRM, like adding Production Steps or allocating Resources for production.
See also:
2 – Manually create BoMs
- From Manufacturing > Bills Of Materials you can set up new BoMs using the New BoM button.

See also:
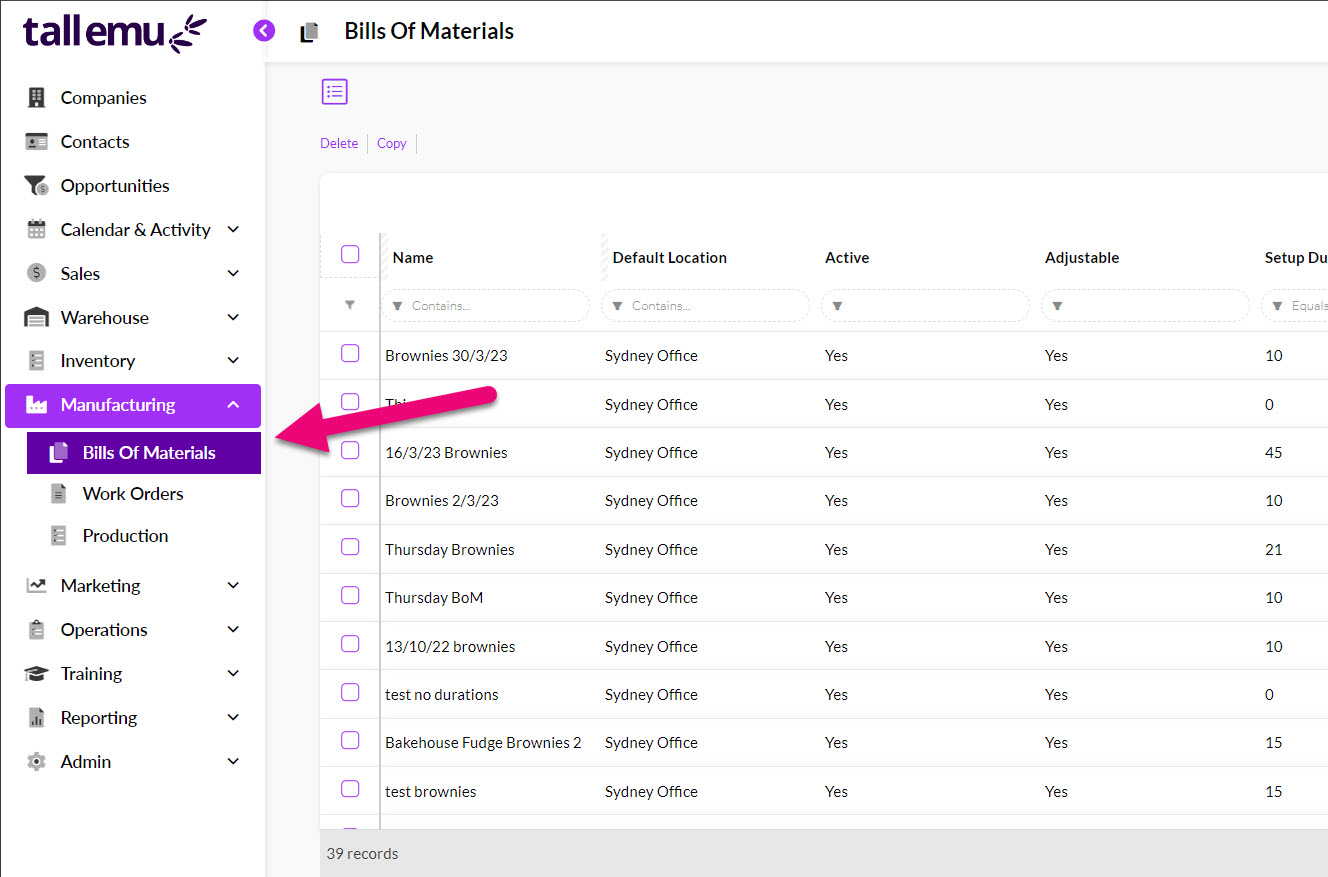
3 – Copy an existing BoM
There are 2 ways that you can copy an existing BoM:
- From Manufacturing > Bills Of Materials you can select an existing BoM record and then click on the Copy button on the toolbar.
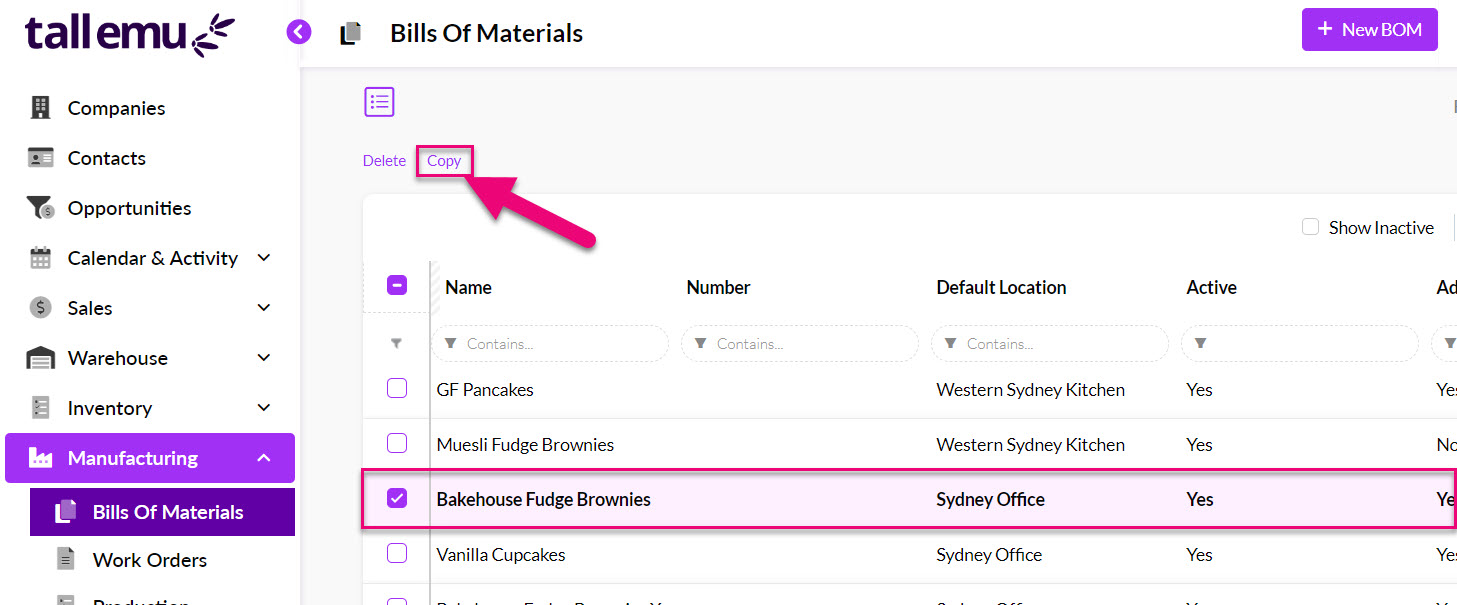
- Open any BoM record and use the Copy button on the toolbar.
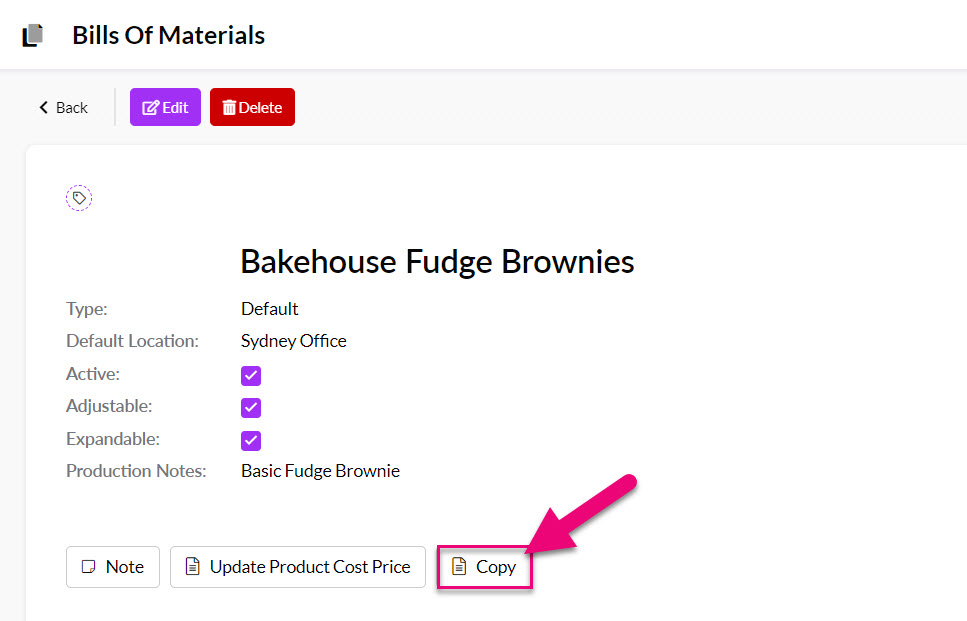
- In both instances, CRM will ask you how many copies of the BoM you’d like to make.
Select the number of BoM copies to create
See also:
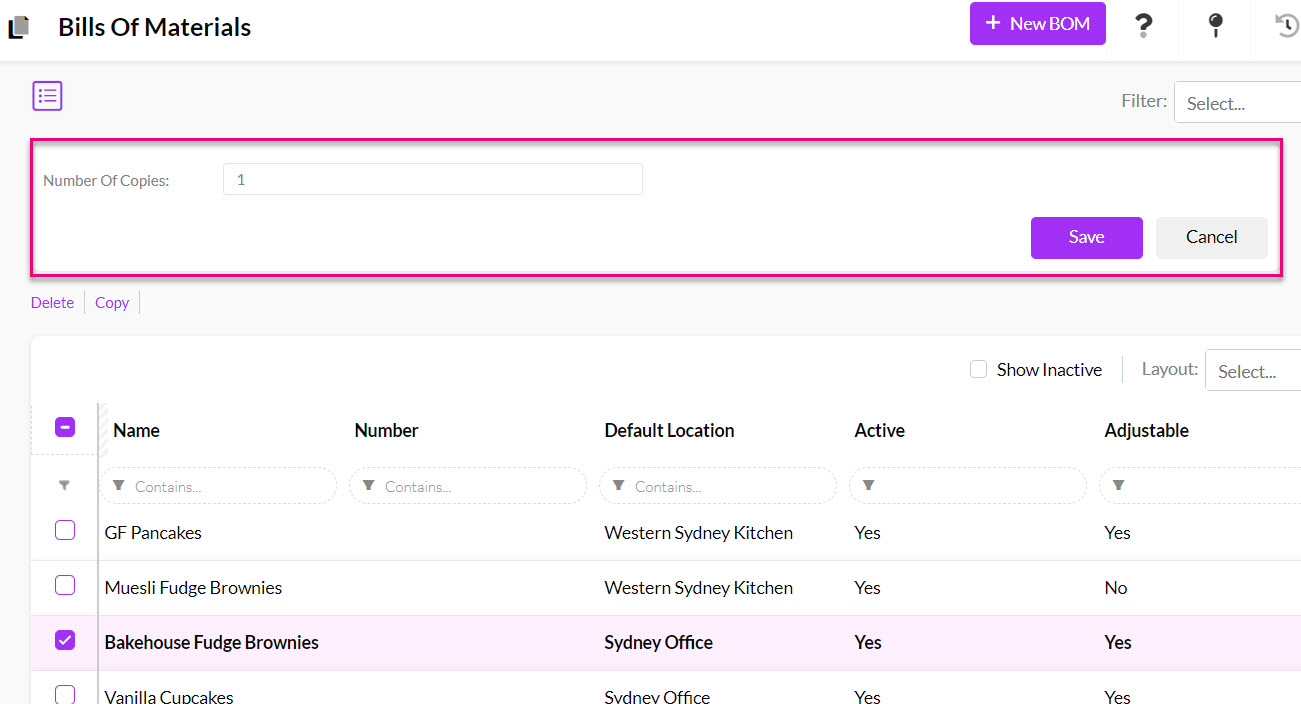
4 – Import BoMs in bulk
- From Manufacturing > Bills Of Materials you can click on the Excel icon in the top right corner and select Import Bills Of Material.
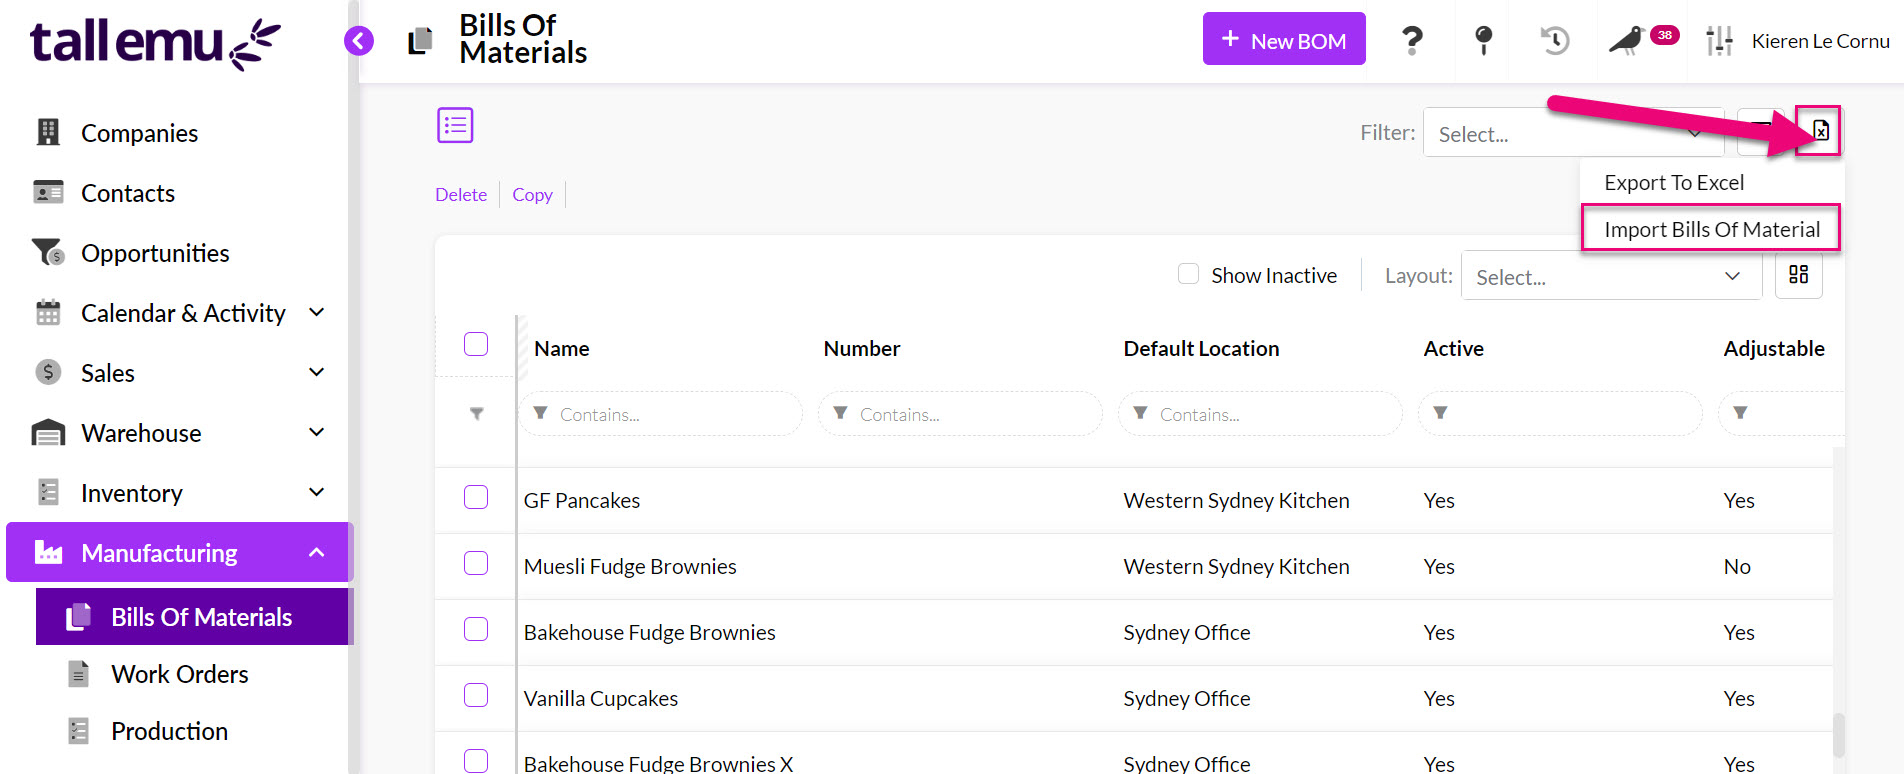
- You’ll then be taken to the import screen where you can download a copy of the import template, add your data to it and then import it into CRM.


See also:
3 – Set up manufacturing Resources
WHY?
This is an optional step.
If you use machines, rooms or tools that you use in your manufacturing process, you can set these up in CRM so that:
- Each Resource has its own calendar in CRM.
- Resources are organised into Resource Groups e.g. if I use ovens for manufacturing, I can have a group of ovens under which there are specific ovens to choose from.
- You can assign various parts of your manufacturing process to Resources, using Production Steps either in CRM or via the Time Tracker integration.
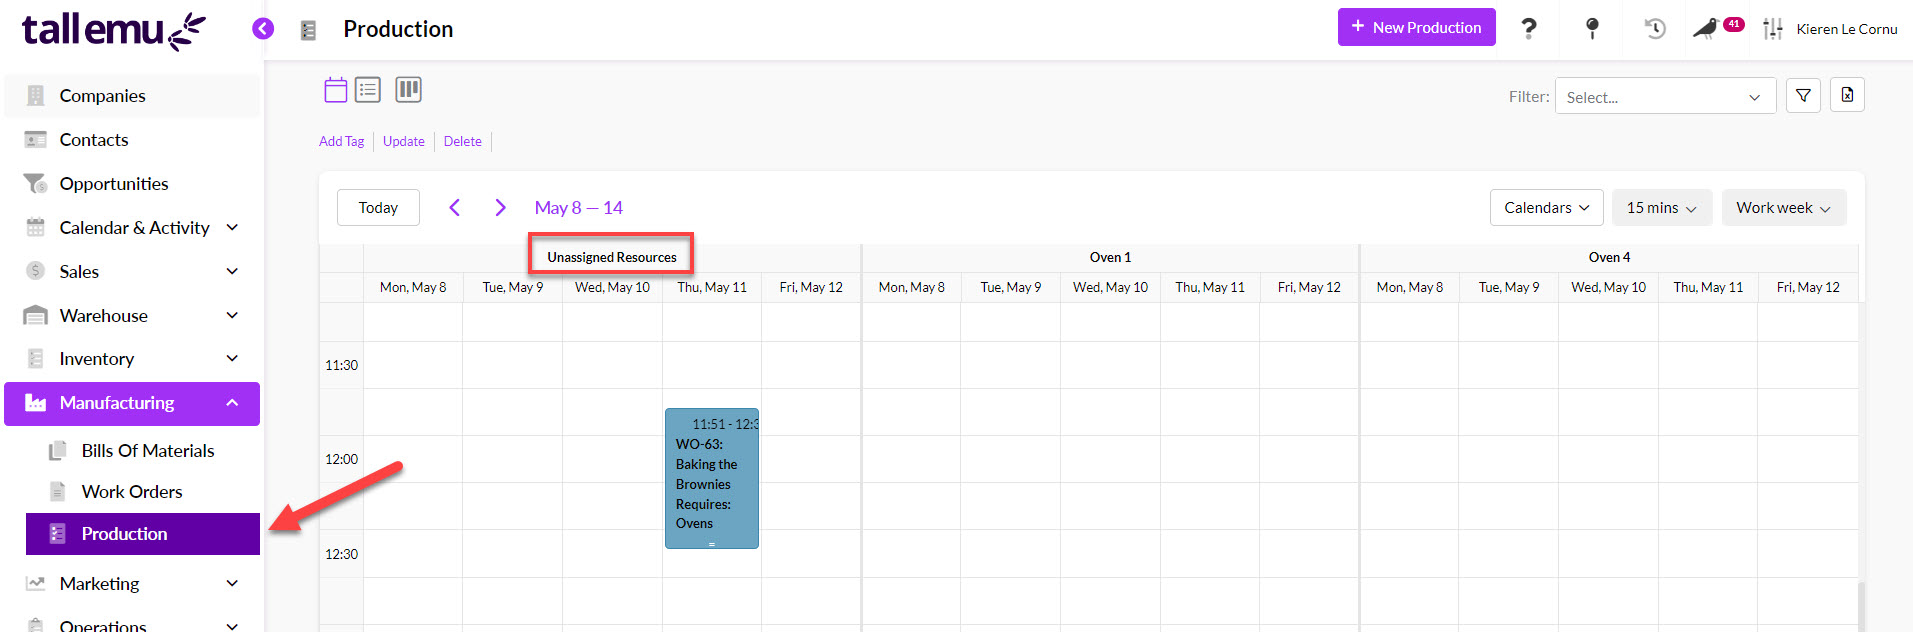
- You can view and schedule your manufacturing process in CRM via the calendar view in Production, which allows you to manage your Resources in relation to your manufacturing process.
Resource calendars in Production
Resources in the Time Tracker integration
See also:
HOW?
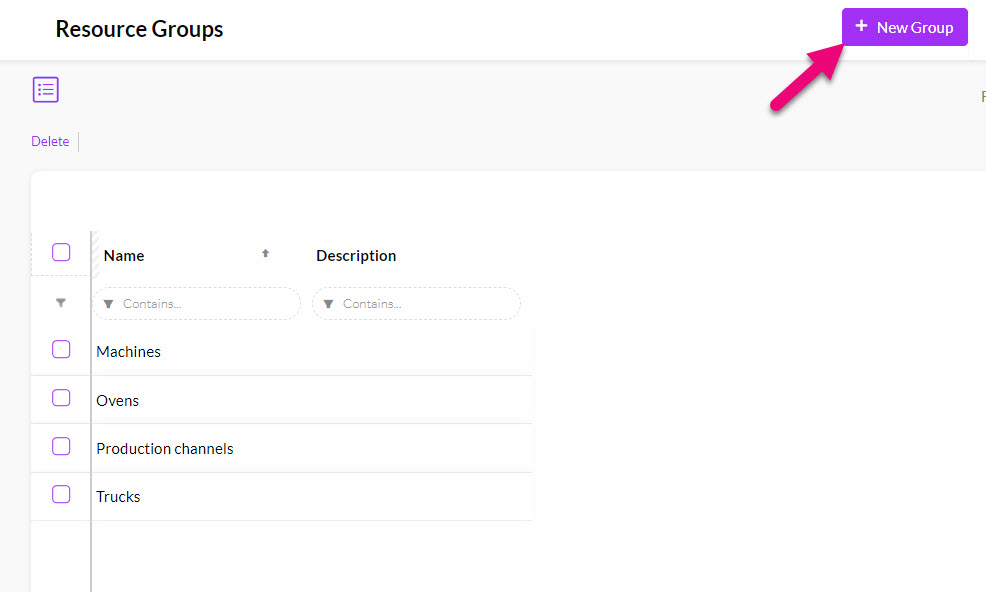
- Go to Admin > Settings > My Company > Resource Groups.
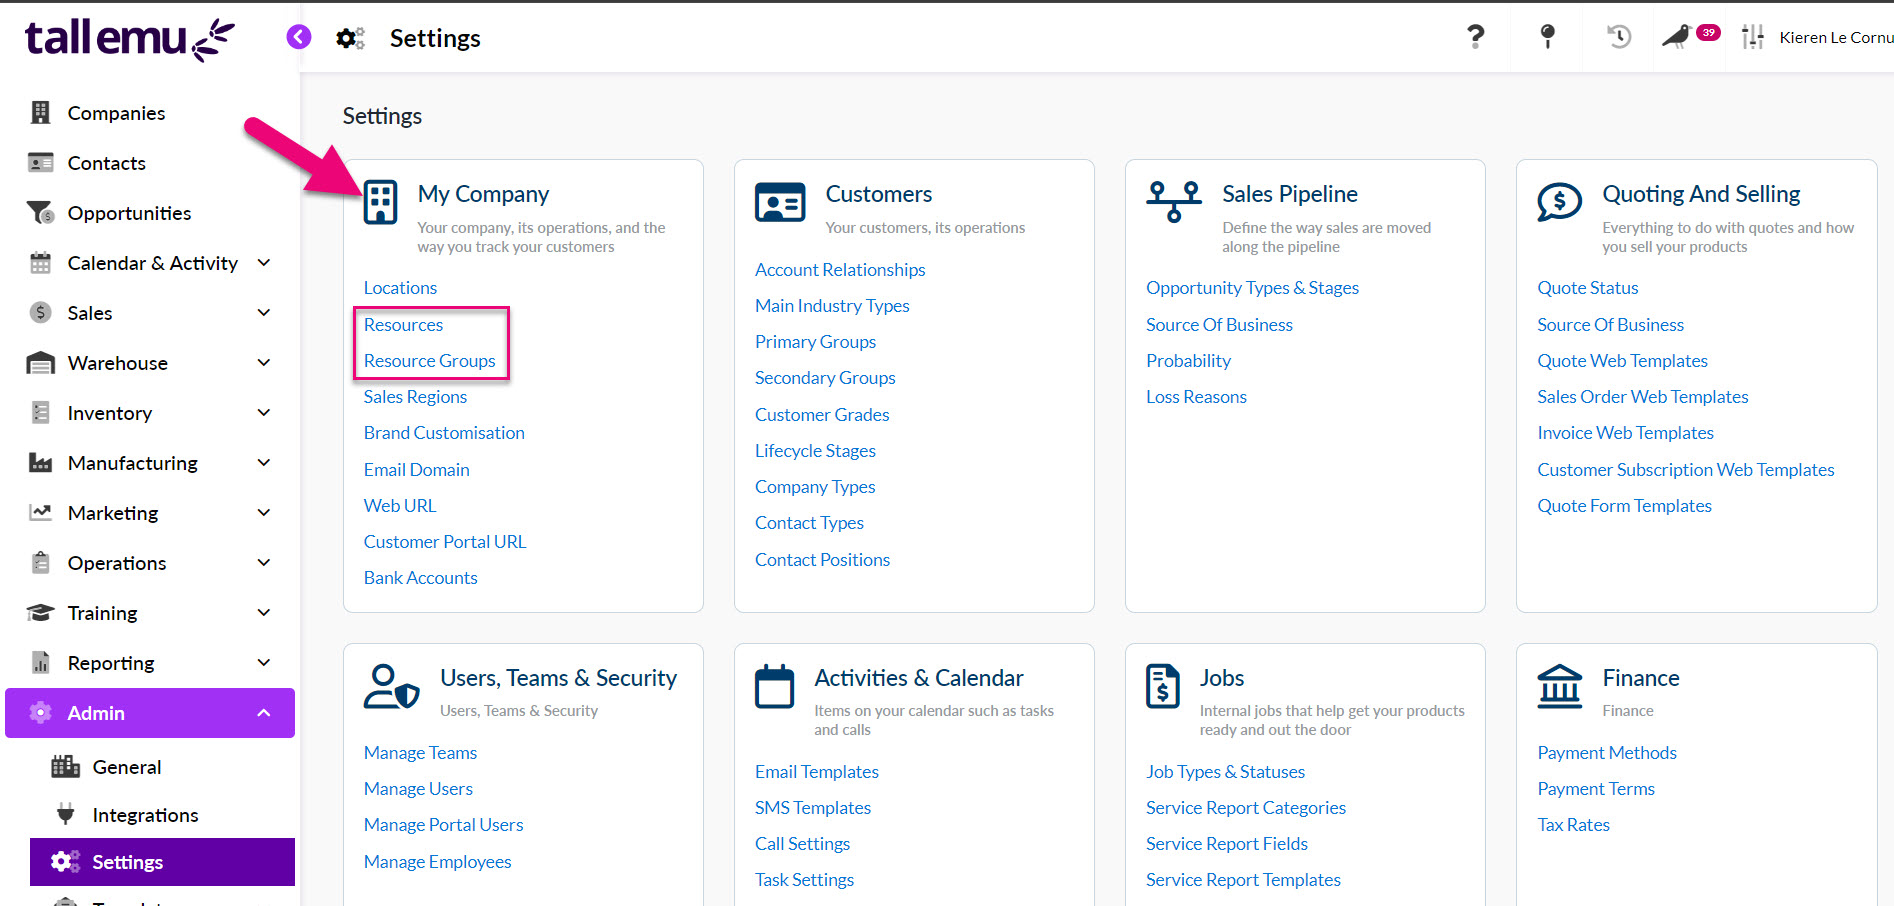
- From here you can create a new Resource Group e.g. “Ovens”.
- Then go to Admin > Settings > My Company > Resources and create your Resources and link them to the applicable Resource Group.

- You will then be able to see and work with your Resources in the manufacturing area in CRM, as well as the Time Tracker integration.

Resource Group on the calendar in Production

Resource Group selection on a Production Step
See also:
4 – Enable Time Tracker for manufacturing tasks
WHY?
This is an optional step.
As well as managing your manufacturing processes from Work Orders and Production in CRM, you can also manage your Production Steps using a start/stop task manager for CRM called Time Tracker.

Production step in progress in Task Tracker
Any manufacturing Resources you’ve set up will also be available to work with from Time Tracker.
Resources in the Time Tracker integration
See also:
HOW?
- From Admin > Integrations you can enable the Time Tracker for your database – just click on Activate to get started.
![]()
- From the integration settings page all you need to do is click on Save and your tracker will be instantly activated. You can then access it by clicking the link.

- You can then decide which of your Users can access the Time Tracker integration – see our full guide on Time Tracker for more information.
It is a good idea to add the Time Tracker link to your browser favourites: https://tewebtimetracker-live.azurewebsites.net/
See also:
5 – Customise your manufacturing options
WHY?
Work Orders have dropdown fields for Type and Stage which can be customised to show options relevant to your requirements.

Adding your own options to these lists will make it easy moving forward to segment, sort and workflow your manufacturing processes in CRM, whether using Kanban View, List View or Advanced Filters and Layouts to work with your data.

Work Orders by Stage in Kanban View

Stage & Type field columns in Work Orders in List View
HOW?
Customise Work Order Types & Stages
- From Admin > Settings > Manufacturing click on Work Order Types & Stages.

- This opens a new box where you can add and manage the options that appear on the Type and Stage dropdown lists in Work Orders. See our full guide on Work Orders for more details.

See also:
6 – Set up workflow lists
WHY?
Working with your manufacturing data day-to-day can be streamlined for all your users by setting up some basic workflow lists to quickly display key information.
For example, there is some information that every business will want to see:
- How many open orders do I have?
- How many orders haven’t been started yet?
- Which production steps are in progress?
Instead of performing a lookup from scratch every time you want to view this information, you can save workflow lists that can be made visible to all Users (or only visible privately) so that everyone is literally on the same page.
HOW?
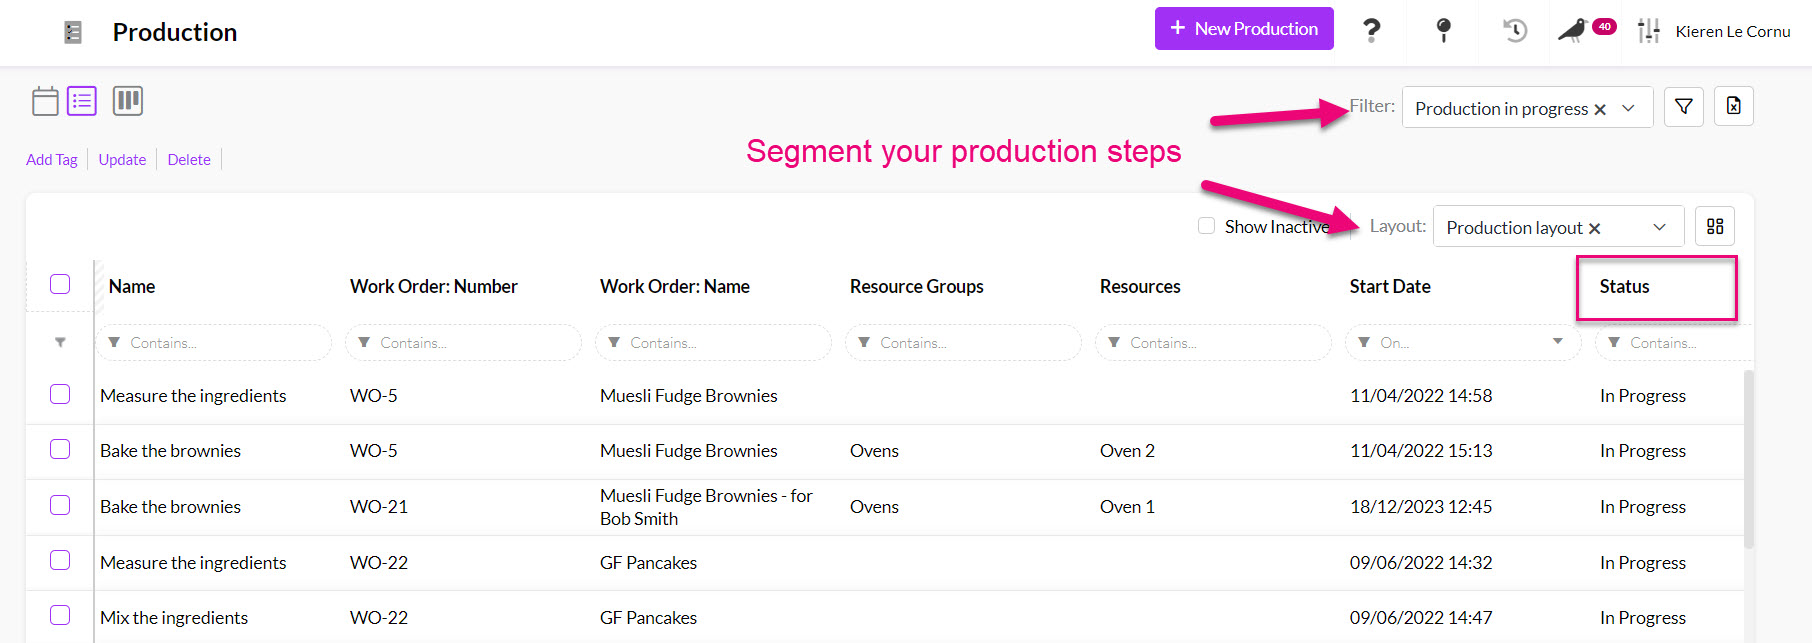
First, you need to decide what questions you frequently ask about your manufacturing pipeline, both as a business and a User. You can then set about creating workflow lists for all your Work Orders and Production Steps.
In this example, we’re going to find all the Work Orders in a manufacturing pipeline that are in progress.
Advanced Filters
Each of these questions you want to answer about your pipeline can be turned into an Advanced Filter.
You can have as many of these as you want, and you can choose which ones are publicly available to all your Users (shared) and which ones are for your use only (private).
- Click on the Filter icon and select New – this opens the form to create a new filter.
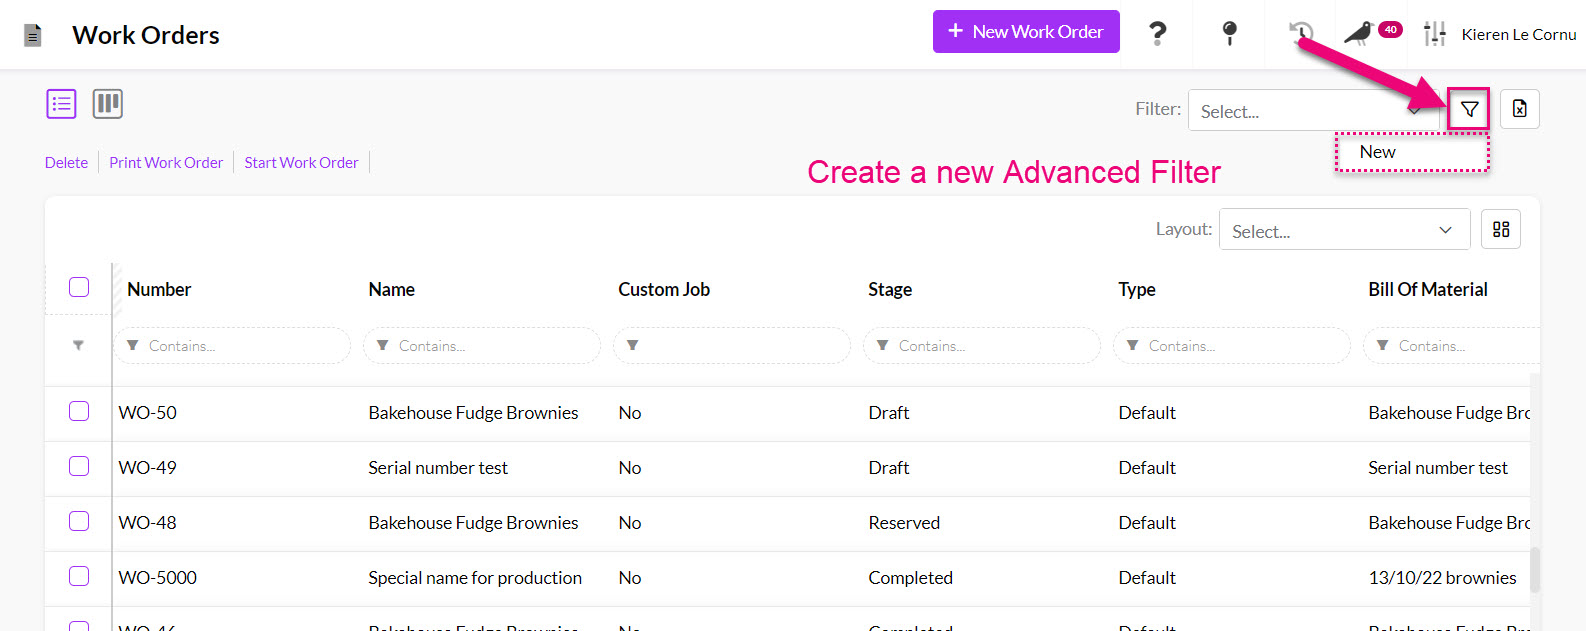
- Enter in a short name for the filter that will make it easy to identify in your list of filters e.g. “Orders in progress”.
- If you want to share this with others, click the Shared box, otherwise the filter will remain private and only the creator can see it.
- You can then start building criteria to answer your question by adding a field in CRM and then choosing the value it must meet – the following screenshot provides an overview.
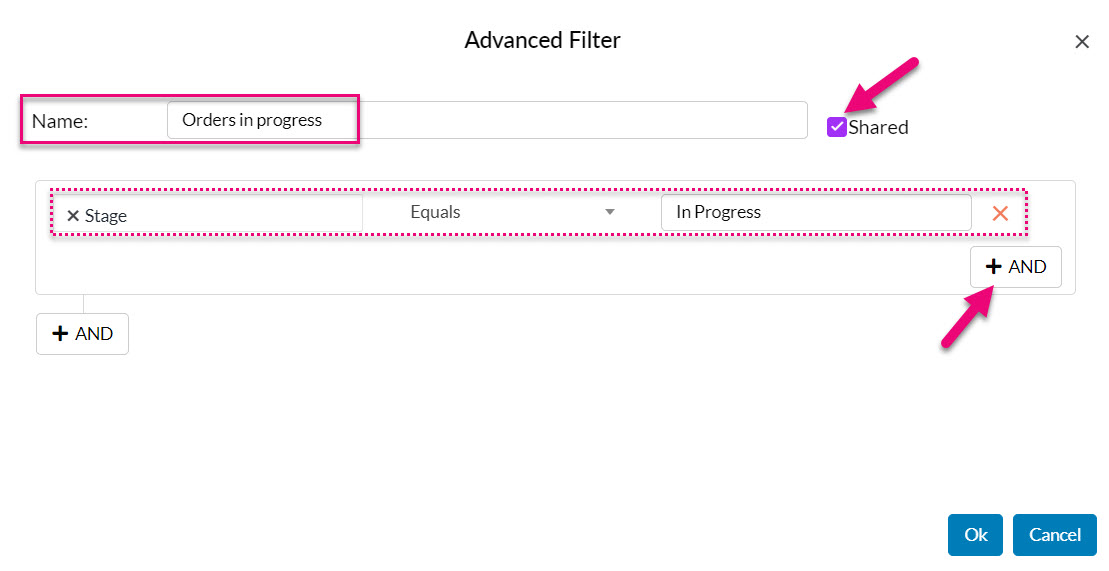
Creating an Advanced Filter in Work Orders
- Once saved, you can now see and select the Filter from the list to apply it.

See also:
Layouts
Once you’ve decided on the records you want to see in your Advanced Filters, you’ll likely come across the problem that once you’ve applied your Filter, the columns that you’re looking at don’t display the data you want to see.
In the following example, I have applied my Advanced Filter “Orders in progress” but I can’t see the columns with key information like Start Date. I’d also like to be able to see who the record is Assigned To, along with any Production Notes. I’ll want to see this same information whenever I deploy my “Orders in progress” filter.
Rather than manually adjusting the columns to display the required data each time, I can do this once and save it as a Layout; I can then select this from a list, exactly the same way I can choose an Advanced Filter to apply.

- To prepare my Layout, I’ll want to add, remove and re-position columns so that what’s displayed matches my requirements.
- I can then click on the button to create a new Layout.

- A box will open, and you’ll need to add an easily identifiable name for the Layout and decide whether or not it’s shared.
- In this case, I’m just going to give the Layout the same name as the Advanced Filter as I’ll be using these together.
- Press OK to save the changes.

- You’ve just created a Layout that can now be chosen from the list and applied anytime.

You’ll also want to set up Advanced Filters & Layouts in Manufacturing > Production so that you can segment all your Production Steps by things like Status.
In Inventory > Products it’s a good idea to set up an Advanced Filter & Layout to quickly display all your manufactured items.

See also:
7- Selling manufactured Products
WHY?
When it comes to selling items that you manufacture, you can add items to Quotes, Sales Orders and Invoices just as you would any other item in your inventory.
However, when CRM detects that an item is manufactured, several additional functions and options are available:
- You can generate a Work Order from a Sales Order if you need to manufacture an item you don’t currently have in stock, or custom items that are built to requirements. This allows you to have a direct relationship between the sale and manufacture.

A linked Work Order on a Sales Order
- You can expand the manufactured item so that all the components used to create the finished product (i.e. the Bill Of Materials or BoM) are visible on the sale – this is particularly useful if you sell items as kits or need to order underlying components before you can start the manufacturing process.

An expanded BoM on a sale

A linked Purchase Order on a Sales Order
See also:
HOW?
- To be able to generate Work Orders from a Sales Order, the only requirement is that the Product is marked as “I make this Product”; this automatically engages applicable manufacturing functions.
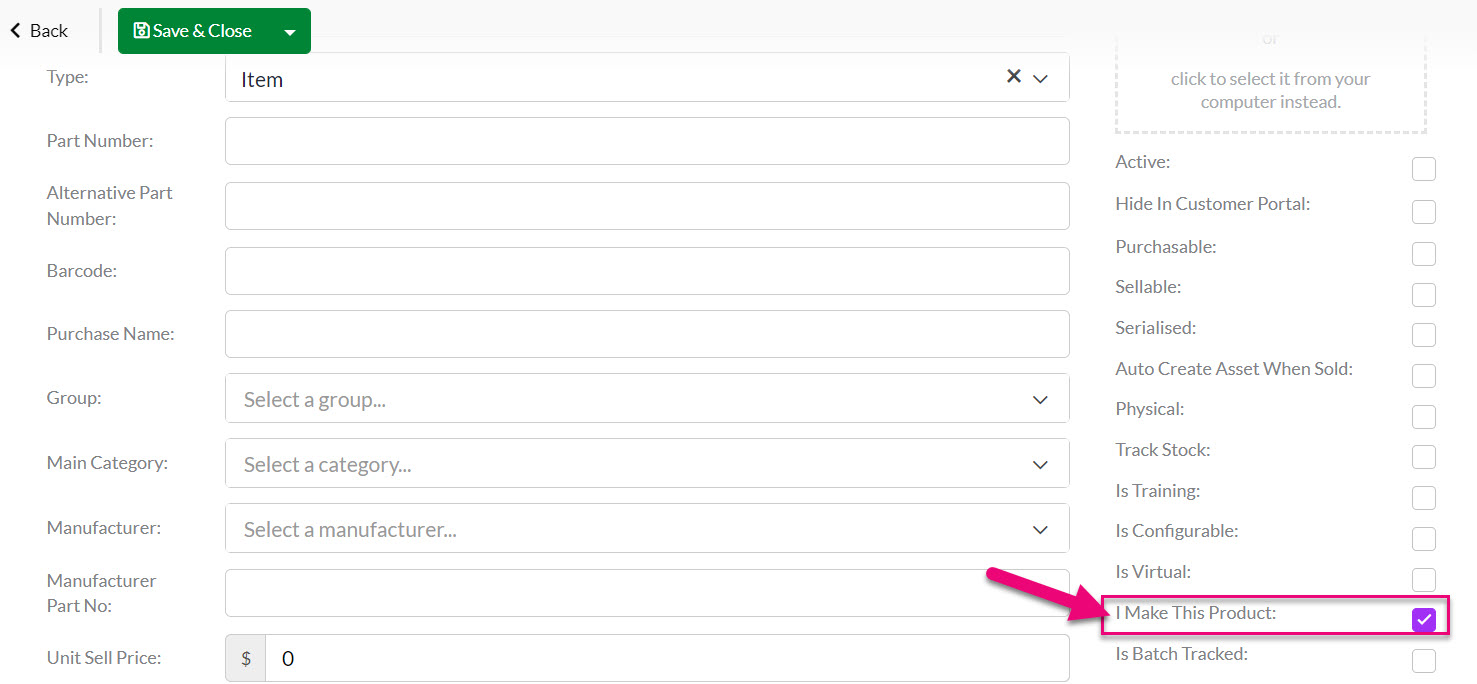
Marking a Product as manufactured
- To manufacture a custom item from a Sales Order, you just need to tick the “Is Custom” box and then enter in the required customisation details, which will carry over to the Work Order. Note that the Product still needs to be marked as “I make this Product”.
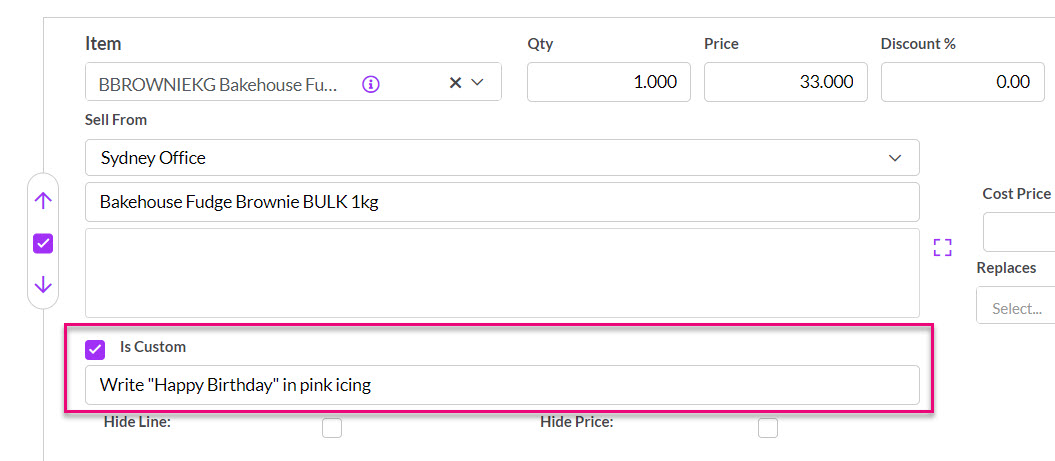
A custom manufactured item on a Sales Order
- To display the materials used to create a manufactured Product, there are 2 settings you can apply from Admin > General:
- From Quote Settings: Autoexpand BoM via Sales Order Generation – means that if you have an item on a Quote that you manufacture using a Bill of Materials, turning this option on allows you to show all the BoM components on the Sales Order.
- From Sales & purchase settings: Expand BoM on Sale – enabling this option means that when a manufactured Product is added to a Sales Order, the Input Items from the Bill Of Materials will be shown.
Note that in both cases, you need to have the expandable option enabled on the BoM for this to work.

See also:
8 – What next?
Now that your system is set up and ready to go for manufacturing, you’ll want to learn more about how to work with records day-to-day: