-
- Getting Started
- Record Tabs
- Managing Duplicate Records
- Setting Up Grid Layouts
- Show and Hide Columns
- Key setup steps
- Additional setup steps
- Tips & Tricks
- Pinning Activities
- Bulk update
- Timeline
- Bulk uploading images
- Advanced Filters
- Automated Workflows
- System Admin in CRM
- Search, sort and report
- Calendar View
- Dashboard View
- Using Views
- Import troubleshooting
- List View
- Set up your customers in CRM
- Working with Activities in CRM
- Basic Navigation
- Using the Map View
- Using the Kanban View
- Configuring Dropdown Lists
- Creating New Records
- Open or Edit Existing Records
- View Details on Map Pins
- Syncing Your Accounting System
- Change the Column order
- Setting up your CSV file for Import
- Filter Map Records
- Company Information
- Sorting Records
- Export data
- Filtering Records
- Import Data from Excel or CSV
- Colourise Map Records
- Set Up Security Groups
- Invite Other Users
- Connect Outlook
- Connect to Mailchimp or Campaign Monitor
- Set Up Other Reference Data
- Configure Online Quoting
- View Reports and Dashboards
- Connect Burst SMS
- Viewing Tags
- Adding and Editing Tags
- Sorting and Filtering with Tags
- Jobs, Assets & Service Management
- Manufacturing
- Operations
- Reporting
- Training
- Workflow Management
- Quoting & Selling
CRM Tips & Tricks
We often get asked for guidance on how users can make the most out of CRM.
As we here at CRM are all users of our own CRM, this guide will take you through our ‘Top Tips’ that can help you to quickly get organised.
As well as the written help below, we also have a video that takes you through our Tips & Tricks.
Don’t forget that our Help Articles section is organised the same way as the main CRM menu, so it’s easy to find the help you’re looking for when using different modules.
Filters are your friend! Advanced Filters let you set up a permanent search for data in CRM. You can share your Filters with other Users, or just keep them to yourself.
Think about what data you need to see or work with each day and then make sure you have Filters set up to quickly access the information you’re looking for.
The perfect complement to Filters is Layouts – so once you’ve decided on WHAT data you want to see in your Filters, you can then decide HOW it is displayed by loading selected columns in

A lot of users never move beyond the standard column view in modules, simply because they don’t know that columns can be added or removed from views. Typically, whichever module you are in, you can add a column to display each field that you see on the module form.
This is why configuring your drop-down field options during setup phase is so important, if you have your options set up correctly, viewing, sorting and organising your data in future is a breeze.
As well as creating Advanced Filters & Layouts to suit your daily needs, you can also quickly play around with your data in a number of other ways:
We often get asked whether to send emails from Outlook or CRM; ultimately, it’s down to your personal preferences. We Emu’s use both methods, it just depends on what is fastest and easiest for you at the time.
When sending emails from CRM:
- You can use an Email Template in CRM, which means you get the benefit of merge codes to quickly populate your email with relevant information from CRM.
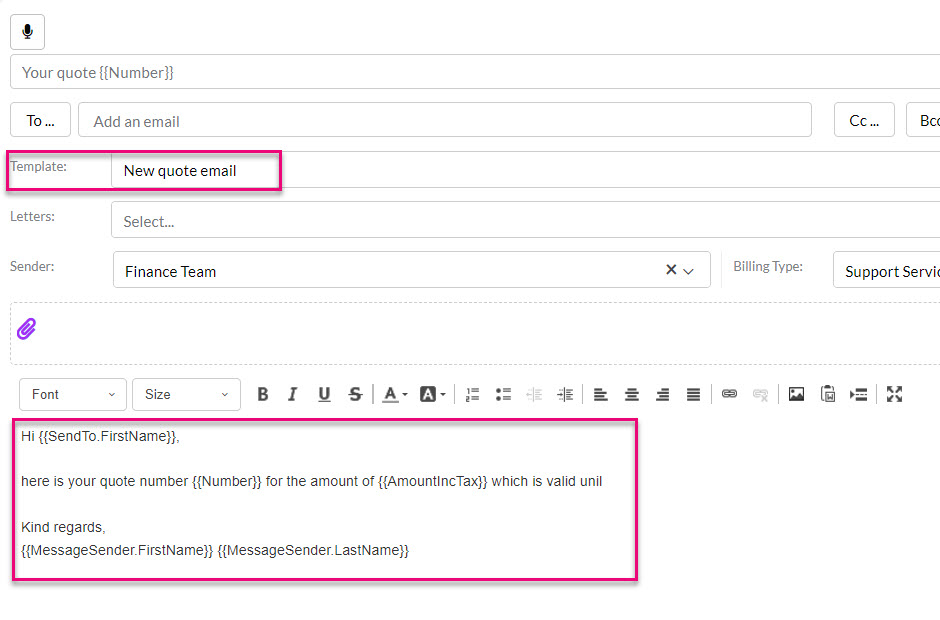
- Any email you send from CRM is automatically added to the Timeline of the record you send it from and will populate back to the Timeline on the applicable Company/Contact records.
- You can search, sort and view all emails sent from within CRM from Calendar & Activity > Calendar by filtering the list view to show Emails.

When sending and receiving emails from Outlook:
- Provided you have set up Inbox Insights, you can track your sent and received emails back to CRM. As well as tracking an email back to a Company and/or Contact record, you can also choose other records for a customer e.g. you may want to track the email back to a specific Invoice.
- You can be selective about which emails you track back to CRM.
If I receive an email in Outlook, I’ll usually respond to it straight from there and track it back to a record in CRM. If I’m sending a new email, I’ll typically do this from CRM so I can use a template and have it go straight to the applicable record Timeline.
You can select multiple records when you are in List View and then update field values for them in bulk. I would be lost without this feature! It’s a great way to update batches of records to apply or remove values.
To do this:
- Select the records that you want to update
- Click on the Update button on the toolbar
- Select the field/s you want to update
- Choose the new field value/s
- Click on Update

Bulk updating Company fields
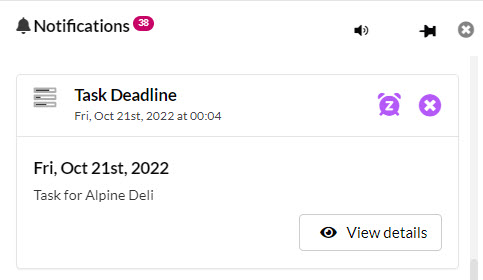
As well as using Reminders on your Tasks, Calls and Meetings, you can also quickly be alerted in the Notifications area when a record needs to be followed up.

I’m a big fan of this because it means I don’t need to go the extra step and create Tasks to remind myself that I need to check in with someone or take a quick look at something. I’ve also got Filters set up in areas of CRM that I frequent so that I can quickly see which records have a follow up date set either this week or today.
This is also great for managing Opportunities in your sales pipeline and following up Quotes or Invoices.
To utilise this type of notification, edit a record, add a date to the Follow Up Date field and then Save & Close the record.
- In order to receive the notification yourself, you need to either have the record Assigned To yourself (e.g. an Opportunity, Invoice, Sales Order etc.) OR
- Be the Follow Up Assignee for the record (e.g. Quotes).
- You (or the User that is Assigned) will get a notification on the set date.
Learn more about how to set Notifications & Reminders in CRM.
Above the activity bar, you have a row of icons that show what types of views are available in the module and different options are available in different modules.
Switching between different views literally gives you a different perspective on your data and depending on what you want to do with the data, a view other than the standard List may be more helpful.

The icon for the view you are currently in will be purple and other view icon options will be grey.
Learn more about views generally, or what you can do with each type:
- List – this is the default view of columns in each module
- Kanban
- Calendar
- Map
- Dashboard
- Merge Duplicates
This is so simple and effective. The majority of record forms in CRM contain a Description box that you can use to input pertinent details for quick future access, for example:
- In an Opportunity: use the box to quickly highlight ‘next steps’ or the gist of the last conversation e.g. “last conversation was re product range, next call to be about pricing”.
- In a Company or Contact: record things like customer preferences or protocols to be observed e.g. “only call this customer before 3pm as they leave to collect kids”.
- In an Invoice: notes about payment timing or method e.g. “customer will pay this in 2 lots”.
While each record has its own Timeline area, rather than relying on your Users to scour this for key information, put it in the Description box so it’s highly visible.
To add information to this box, Edit a record, scroll down to the Description box, enter your text and then click Save & Close.

A Company record without a Description

The same Company with the Description box
We often get asked what you can do with Tags – the answer is essentially “whatever you want!”.
The easiest way to think of Tags is as a limitless set of custom fields that you can create, control and utilise to break down your data.

What you use them for is entirely up to you – some people use them to complement the Lifecycle Stage field in Companies, others to collect customer coffee and tea preferences, others to track types of products customers are interested in – you can use them for anything.
Learn more about how to work with Tags:
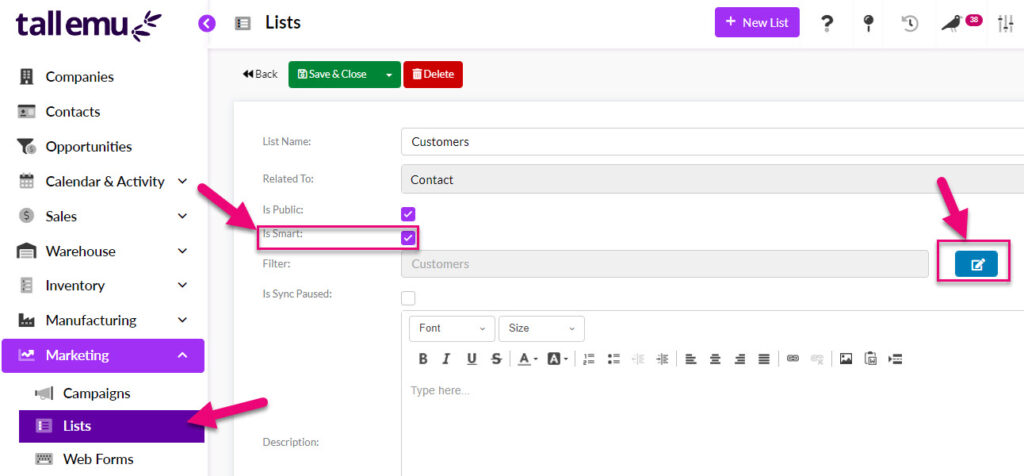
This is a dead simple way to have CRM automatically maintain Lists for you – just go to Marketing > Lists and click on New List.
- Give the List a name and relate it to either Contacts or Companies.
- Tick the Is Smart box.
- Next to the Filter field, click on the button to create a new Filter.
- You can then specify the criteria that records need to meet in order to qualify for the List, the same way that you would create a Filter anywhere else in CRM.
- Save & Close the record.
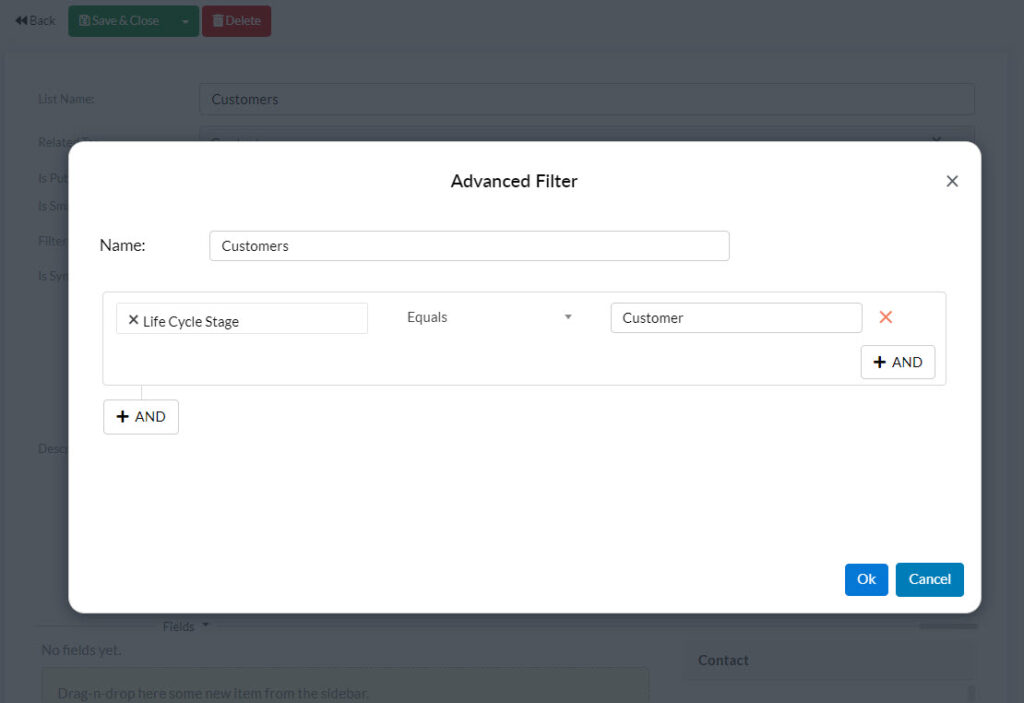
When you have saved the record, click on the Update Data button – CRM will then go and perform a search to find all the records that meet your criteria and pull them through to the List.

If you have Mailchimp or Campaign Monitor integrated with your CRM, you can schedule to push these Lists out to either service on a regular basis.
If there are CRM records not assigned to you personally, but you’d still like to stay up to date on what’s happening, you can use the Follow function and if you want to keep someone else in the loop on one of your records, you can use the Notify function.

Follow a record
Just click the Follow button and whenever the record is updated, you’ll get an email letting you know e.g. when another User creates a Note on the record Timeline.
Set up Notify on a record
Just click the Notify button and select a User to receive notifications so that whenever the record is updated, the User will get an email letting them know e.g. when you created a Note on the record Timeline.
This has to be one of my favourite features of CRM because not only is it a time saver, it’s also just plain FUN! We have a quick video on how this works here.
It’s especially useful for users who are out on the road as they can just have a quick chat to CRM to send an Email or create a Task, rather than having to type it.
Whenever you create a new Activity in CRM (a Note, Call Task, Email, Meeting, SMS) you will have a microphone button – just click this (and allow your browser to access your microphone) then start talking.
![]()
CRM will then transcribe into your chosen activity, and you can choose whether or not you also want to save a copy of the audio file to the activity.
We have guides on how to use the transcription feature in the following Activities:
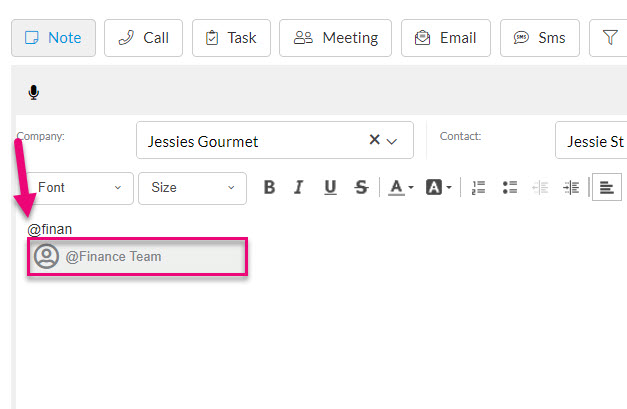
You can quickly update another User or Team when you are adding Notes, Calls, Meetings, Emails or Tasks to CRM by typing “@” immediately followed by the first few letters of the User or Team name to reveal a mention tag.
Once you have added this, the User/s you mentioned will get an email with details of the mention, as well as notification in CRM.
I find this really handy for keeping colleagues in the loop when I’m adding notes to a Call record or typing up a summary of a meeting in a Note – I can quickly let others know what is going on, without having to send a separate email. I also frequently ask questions about particular records in CRM by tagging another User in a Note.
In the example below, I want to tag my colleagues in the finance team in a Note I am writing, so I type in “@finan” to reveal a tag option, then click on this to select the Team; when I save my Note, the Users in the Team will get an email alert.

Following is an example of a mention notification in CRM.

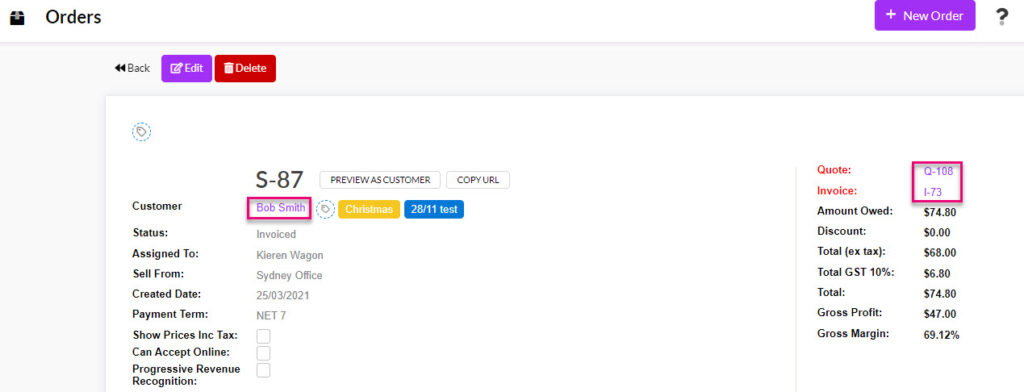
From a number of records in CRM, there are hyperlinks for associated records that can you right-click to open in a new browser tab or window.
You can also just click on any of these links to open the associated record in the same tab and then use the Back button to get back to the record you started in.
Hyperlinks in records
The following example shows record links on a Sales Order, that allow you to quickly view the customer, Quote and Invoice on the order without having to go hunting for details in different areas of CRM.
Opening records from List View
Select any record and then right click on any of the links to reveal the option to open the record in a new tab or window.

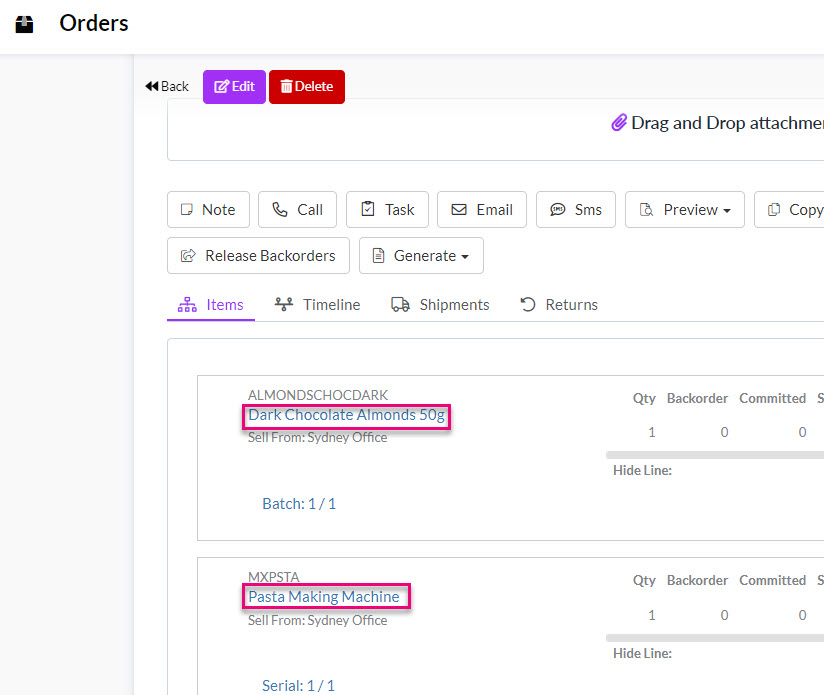
Product hyperlinks
Clicking on a Product on any sale or purchase will automatically open the record in a new tab – you do not need to right-click the link.
If you create Tasks and assign them to other Users, you can stay in the loop as the Task is worked on by adding yourself as an Attendee – just start typing your name in the Attendee box and select yourself.
If you want to add other Users as well, you can type their names in and select them or search for someone by clicking on Attendee to reveal a search box.
In the example below, I’ve created a Task and assigned it to a colleague. I’ve added myself as an Attendee so that whenever Cheryl updates the Task, I’ll get an email. As I’ve assigned the Task to Cheryl, she’ll also get an email to notify her that I’ve given her the Task.


I can also add in date & time details so that the person the Task is Assigned To will receive notifications in CRM when work needs to be done.
Learn more about how to set Notifications & Reminders in CRM.
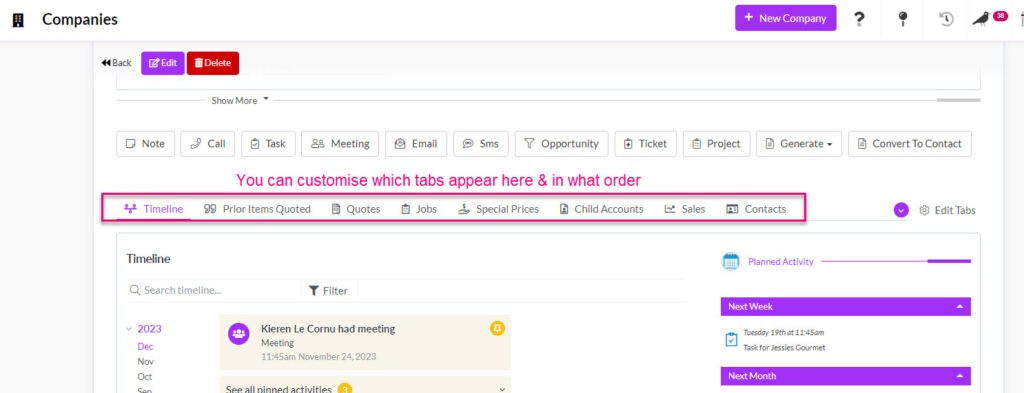
Each record in CRM has a series of tabs that shows different types of information about the record or associated records.
You are able to customise the tabs that appear on records. If you change the configuration of tabs, this applies only to you and not to other Users.
Tabs on a Company
Tabs on a Product

Viewing other tabs
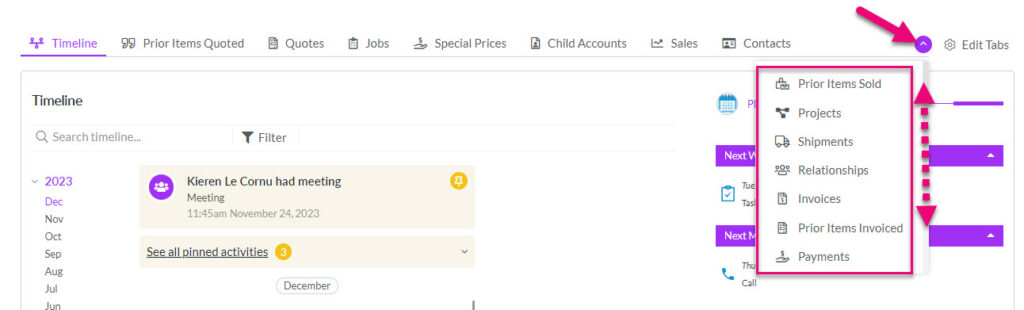
In some cases, not all available tabs are visible at once.
- You can reveal more tabs by clicking on the blue circle, which will display a list of other available tabs – just click on any tab to display it.
- You can also sometimes scroll the list of available tabs using the bar on the right.
Showing other tabs on a record
Customising tabs
Users can customise the tabs that show on records by removing tabs they don’t want to see and re-ordering tabs. If you change the configuration of tabs, this applies only to you and not to other CRM Users.
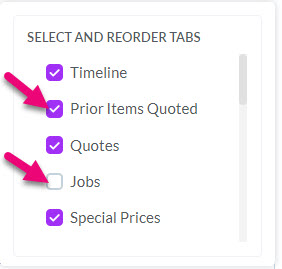
- Click on Edit Tabs to display a box that will allow you to edit the tabs on the record.

- To hide a tab, de-select the checkbox next to it. The tab will no longer be visible.
- To show a tab that is not currently visible, ensure the checkbox next to it is ticked.
- To reorder the tabs, click on the dots to the left of the tab name (next to the checkbox) and drag the tab name into a new position on the list (up or down).
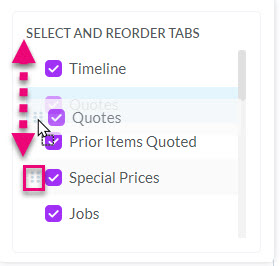
- If you move a tab higher up the list, it will show further to the left in the tab area.

- If you move a tab lower on the list, it will show further to the right in the tab area.

Pinning items on CRM allows for you to manage records more effectively by highlighting key information so that it can be accessed quickly and easily by all Users.
Record Timelines are made up of a series of Activities:
- Notes
- Calls
- Tasks
- Meetings
- Emails
- SMS
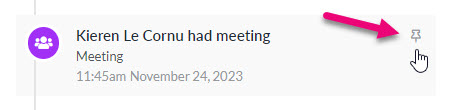
When an Activity is pinned, it will appear highlighted towards the top of the Timeline section for all Users.

To pin an Activity, simply click on the Pin Icon. Multiple items can be pinned at a time.
For further information, please see this help guide.