Set up servicing in CRM
This guide will take you through how to set up CRM to service products that you sell to customers.
1 – Set up Products to create Assets
WHY?
If you sell Products to your customers that you will install, service or maintain, you’ll want to use Assets in CRM; these allow you organise and track products that your business has an interest in – whether it’s marketing collateral provided to franchises, appliances that you lease to customers or machinery you sell that requires regular servicing.
For example, I sell coffee machines to customers that I also provide regular servicing for and also perform repairs if a machine stops working. To effectively manage all the processes associated with servicing, I need to be able to see the following information:
- Which customers I’ve sold a coffee machine to.
- Where the machine is located and what condition it’s in.
- When each machine was last serviced and when the next service is due.
- If there have been any unscheduled repair jobs.
All this information can be managed from Operations > Assets.
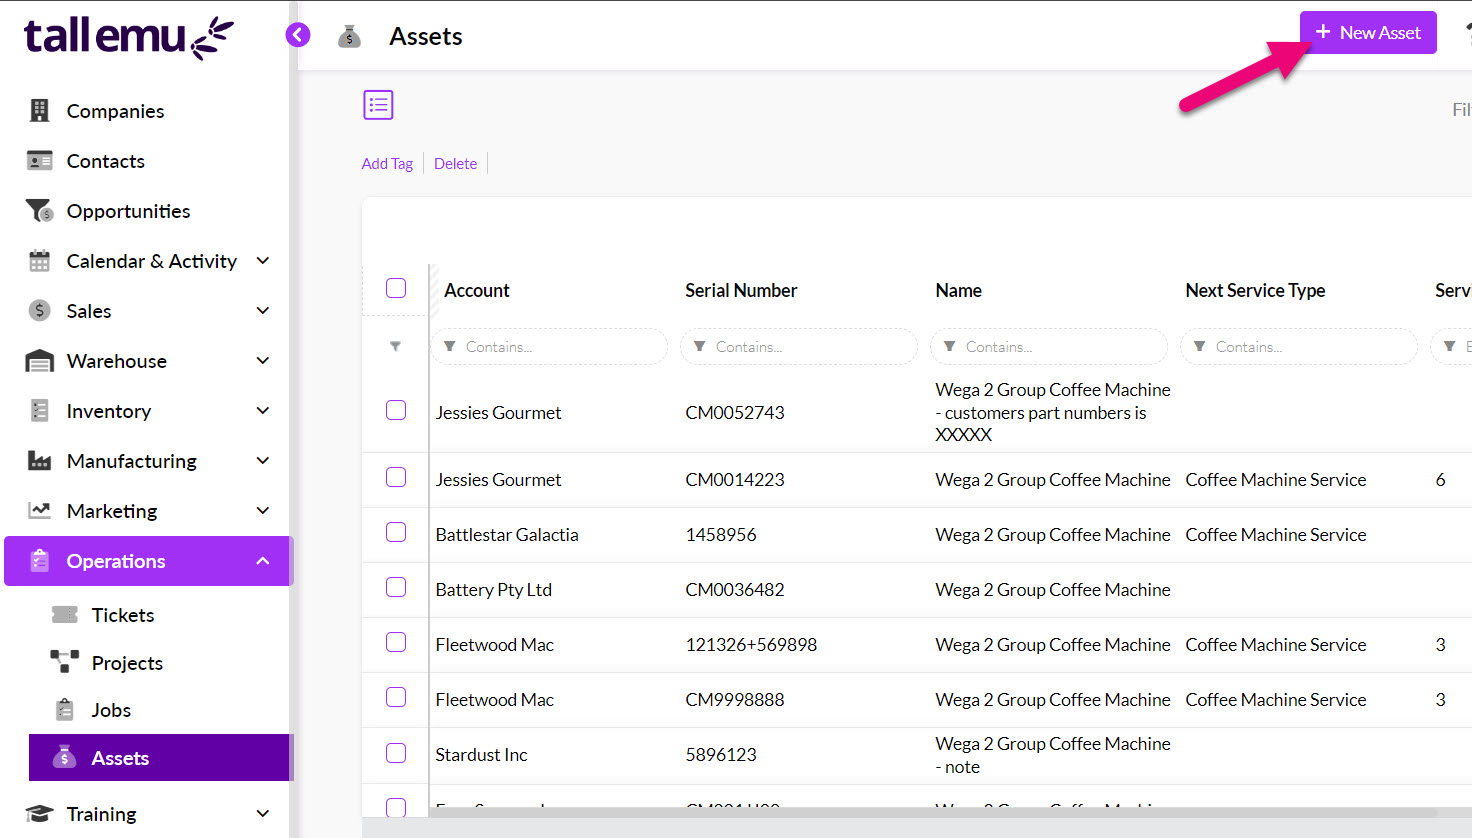
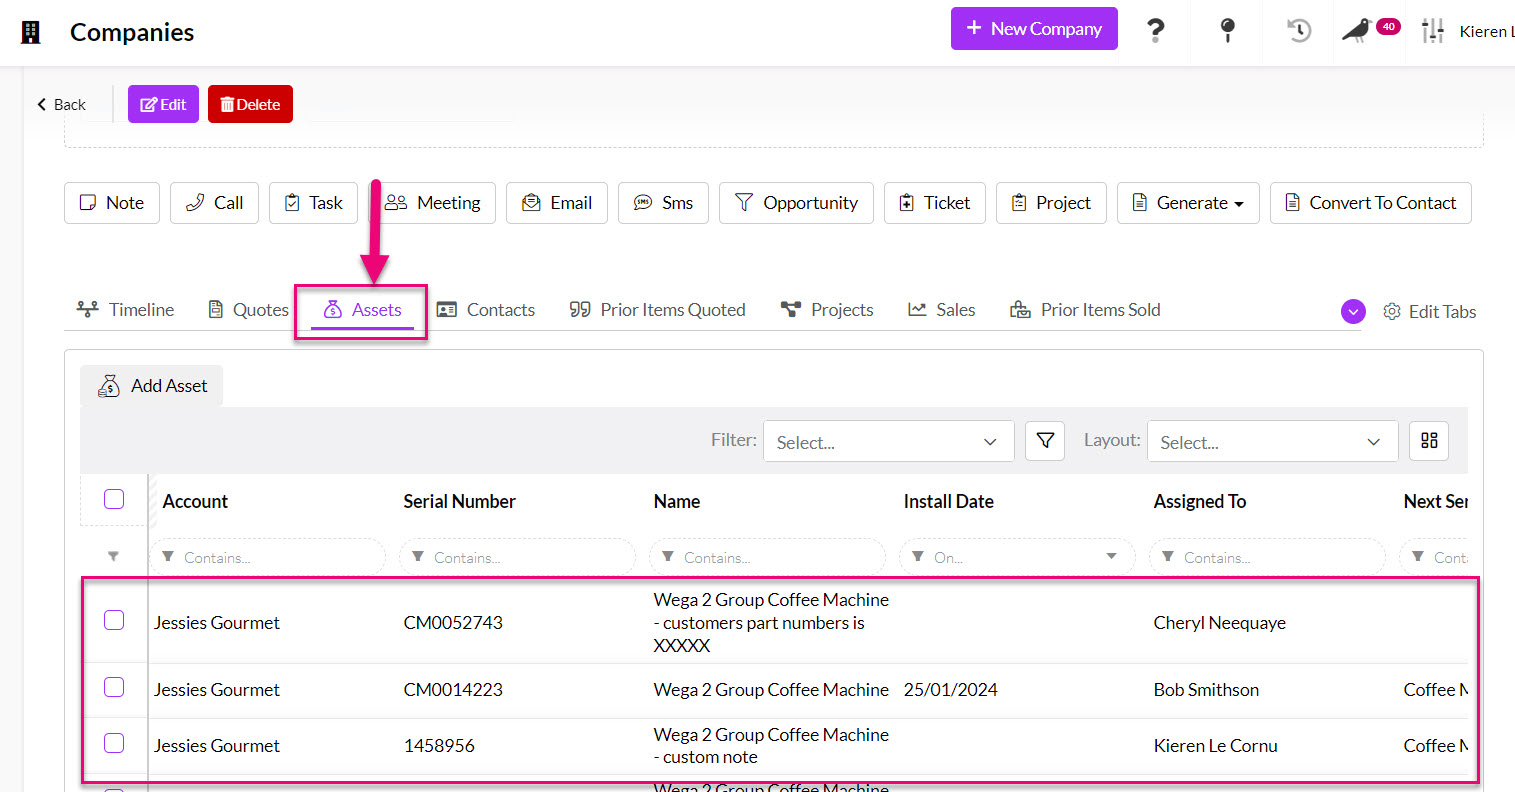
Assets will also be linked to the relevant customer record (Company or Contact) via a tab.
See also:
HOW?
As well as setting CRM up to automatically create Asset records, you can also manually create them at any time. There are 3 ways that you can enable this option on your items:
1 – Manually edit Products
- Open a Product and click Edit, then tick the Auto-Create Asset When Sold box, make sure the Active box is ticked and then Save & Close the record to apply the change.
- This means that every time you sell that particular Product, an Asset record will automatically be created for the customer.
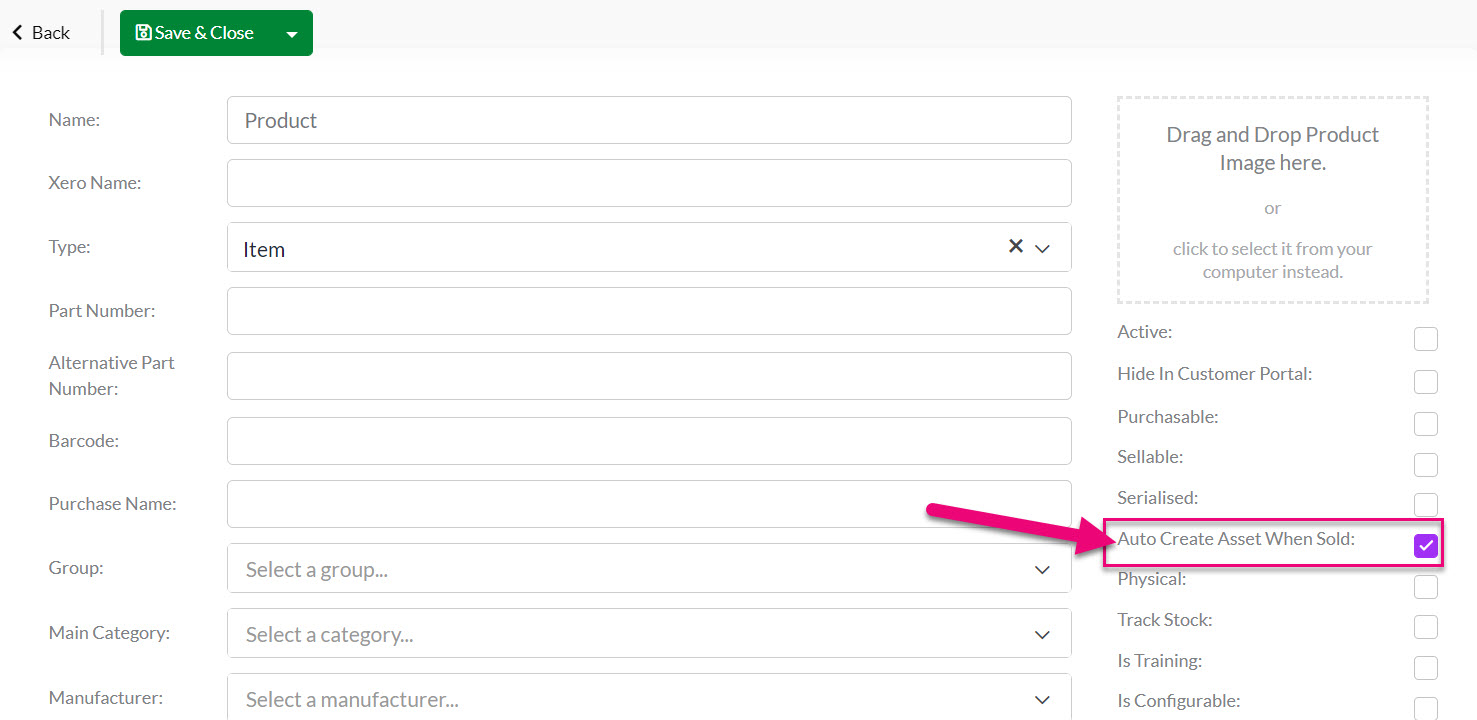
Auto-Create box on a Product in edit mode
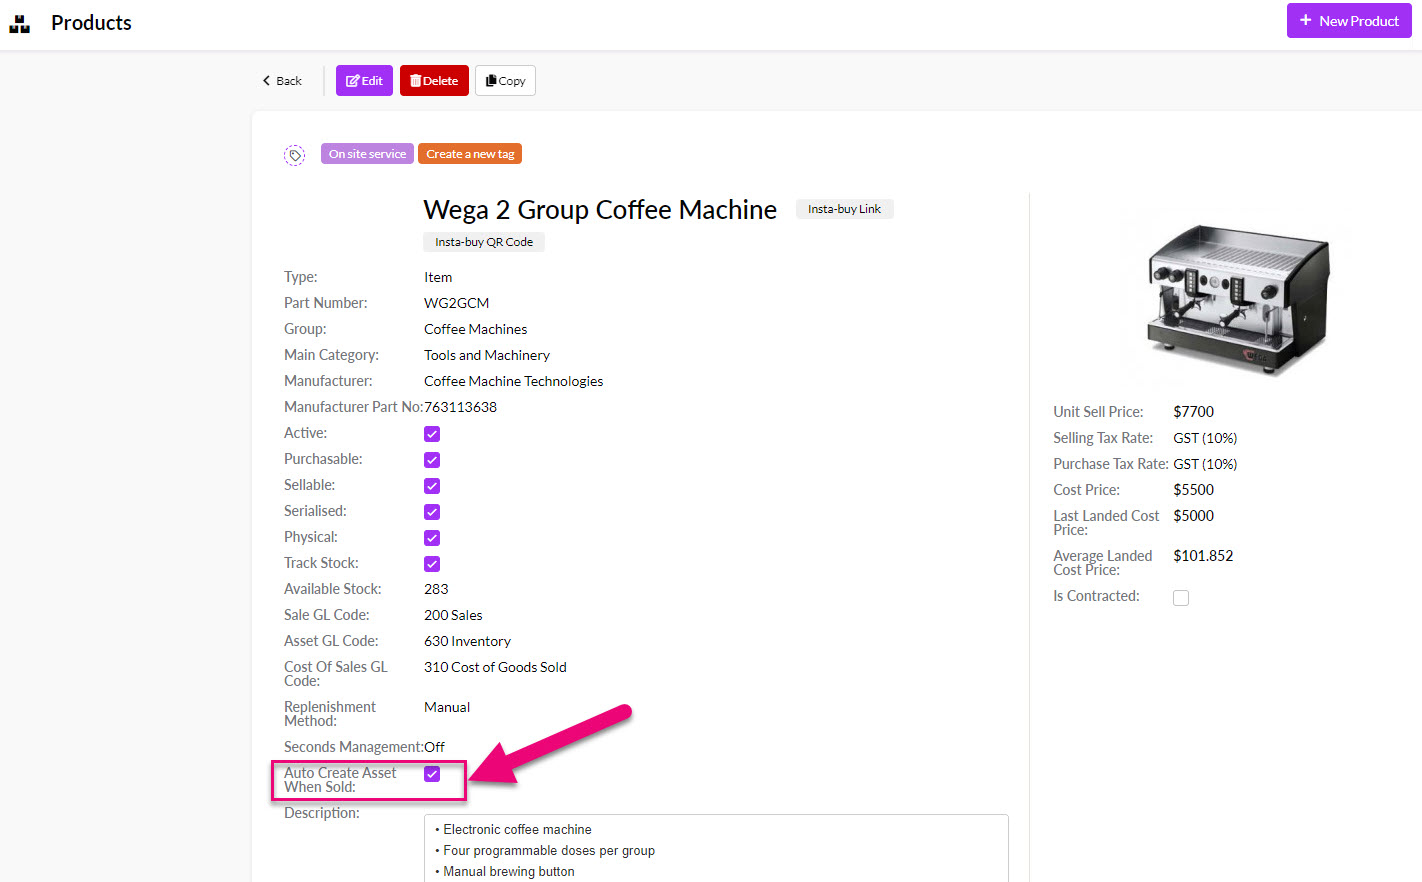
Auto-create box on a saved Product
You can then quickly search for Products that create Assets by adding the column for Auto Create Asset When Sold to your Layout in List View.

See also:
2 – Export & reimport your data
- Export your Product data from CRM to Excel, update the value in the I Make This Product column to equal “Yes” then reimport the data into CRM to update the applicable records.

See also:
- Our guide on exporting & reimporting Product information.
3 – Asset settings
- From Admin > General > Asset you can also choose when Assets are created, and which Products will create Assets.

- Auto Create Asset – here you can choose which Products will auto-create Assets. You can Manually Choose Product, set it to happen on All Products, or have it only applied to Serialised Products.
- Auto Create Asset On – here you can choose the trigger/s for creation from either Shipment, Invoice or Both.
See also:
2 – Set up Service Products
WHY?
Different to standard items in your inventory, Service Products are equipped with a few additional fields for their intended purpose, this ‘Service’ specification adds a level of additional detail to general product records so they’re more suited to service and job management.
This type of Product allows you to set up a cost for the service itself, as well as being able to bundle in the cost of any parts or items used in the service.
For example, I sell coffee machines to my customers and also service them, so I have a “Coffee Machine Service” Product in my inventory. It takes 3 hours to service a machine and the cost to the customer is $231. In addition to the cost of the service is the cost of the parts I’ve used, which will come at an additional cost of $500 on top of the base service cost.
Setting up a Service Product for this means that the total cost of the service can be accounted for i.e. $231 for the service + $500 for parts = $731 total service cost.
It is then easy to add a pre-loaded service Product to a Job or sale, rather than having to input all of the parts as separate line items each time, along with a line for the cost of the service itself.

Service Parts tab on a Service Product

The cost of service parts on a Job
- See also:
HOW?
When you create new Products in CRM there is a field for Type in which you can choose the Service option.
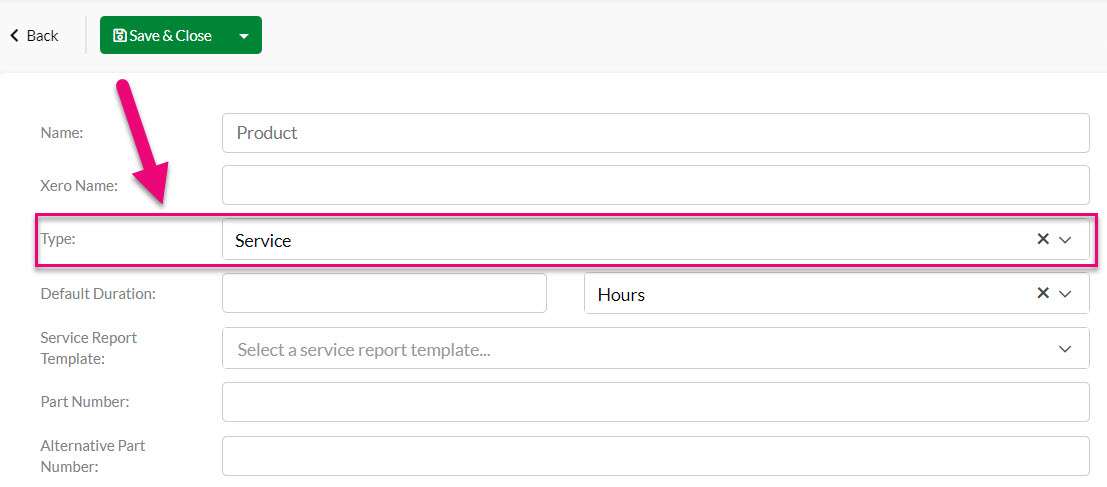
Type field on a Product form
Once you select this option, new fields will show on the Product form that allow you to enter in detail specific to the service, such as the Default Duration and a Service Report Template.

Service fields on a Product form
As an example, I sell coffee machines to my customers and also service them, so I have a “Coffee Machine Service” Product in my inventory. It takes 3 hours to service a machine, so I populate the Default Duration fields accordingly.
I have also made a Service Report for my “Coffee Machine Service” so that whenever I perform the service, I can quickly produce a PDF report for my customers that shows the work that was performed (we’ll look at these in the next section).
Once you have saved an item as a Service, you’ll be able to access a tab for Service Parts – this is where you add other Products that are used to complete the service work.

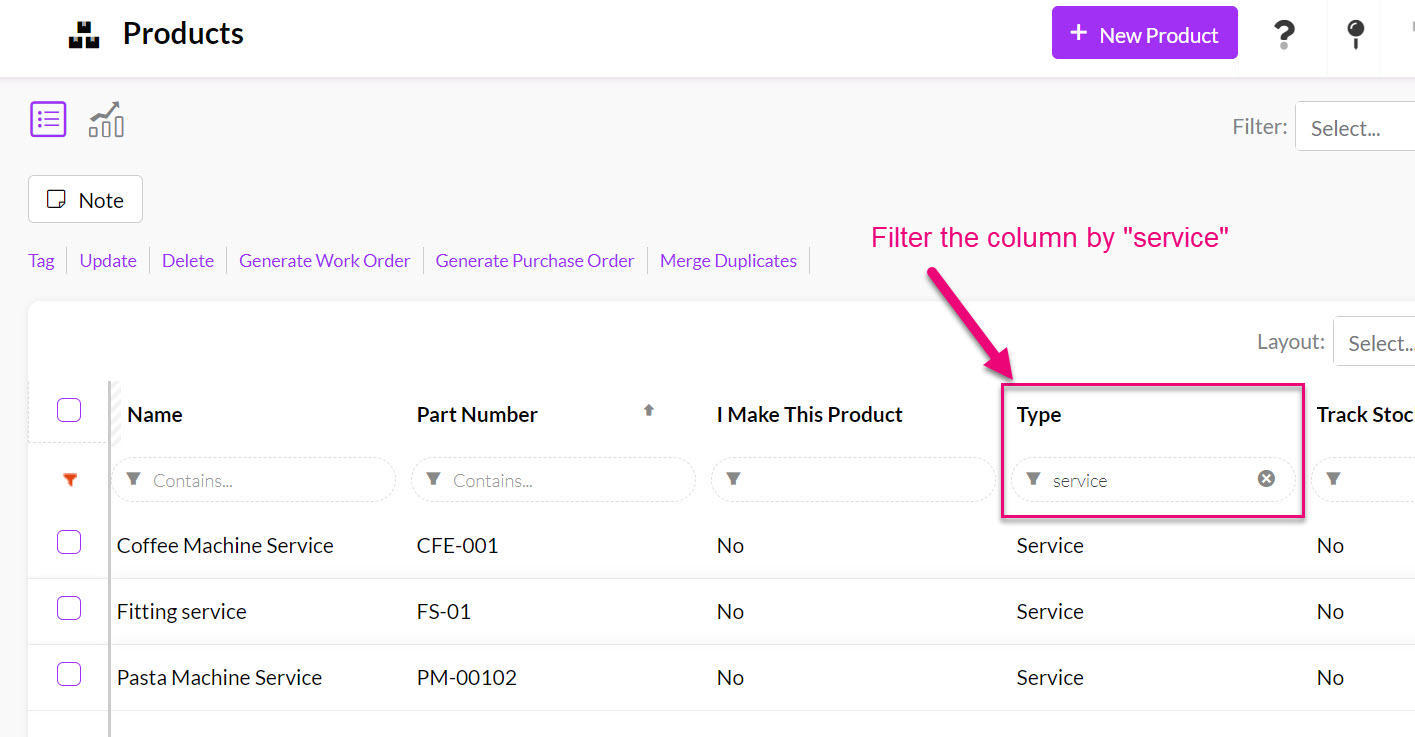
Once you’ve set up Service Products in your inventory, you can quickly find them by filtering the Type column. To save you doing this regularly, you can set up an Advanced Filter to quickly pull up these records in future.
See also:
- Creating Service Products
- Service Report Templates
- Filtering records
- Advanced Filters
- Layouts
- List View
- Show & hide columns
3 – Set up Time Products
WHY?
Different to standard items in your inventory, Time Products are equipped with a few additional fields for their intended purpose, this specification adds a level of additional detail to general product records so they’re more suited to service and job management.
You can create a Time Product in CRM when you want to be able to charge for labour or travel services based on a period of time i.e. hour, day, week, month, quarter or year.
- When adding items to a Job, you can add Time Products as line items – just select the applicable Product and use the Start and End fields to track how much time has been spent (i.e. the period between these two times).
- CRM will then calculate the Amount for you, using the Unti Sell Price from the Product, multiplied by the period of time spent, based on the Time Period you set up on the Product.
For example, using the “Production Labour” item here, the time spent is 3 hours and 24 minutes (the time between the Start and End fields).
The Time Period I have selected on the Product is 1 hour, so CRM will multiply the 3h 24m by the Unit Sell Price of $110 = $339.453 as the Amount.

See also:
HOW?
When you create new Products in CRM there is a field for Type in which you can choose the Time option.

Once you have made this selection, new fields will appear for:
- Time Period: here you can enter in a numerical value along with a choice of the period type (Hour, Day, Week, Month, Quarter, Year) e.g. 1 Hour.
- Time Type: you can select from either Labour or Travel in this field.

Once you’ve set up Time Products in your inventory, you can quickly find them by filtering the Type column. To save you doing this regularly, you can set up an Advanced Filter to quickly pull up these records in future.

See also:
4 – Create Service Report Templates
WHY?
From a Job in CRM, you can produce a Service Report as a PDF document that shows all the tasks that were undertaken as part of a service.
The reports are customisable so that they reflect the work that has been carried out. You can have as many Service Report Templates as you want.
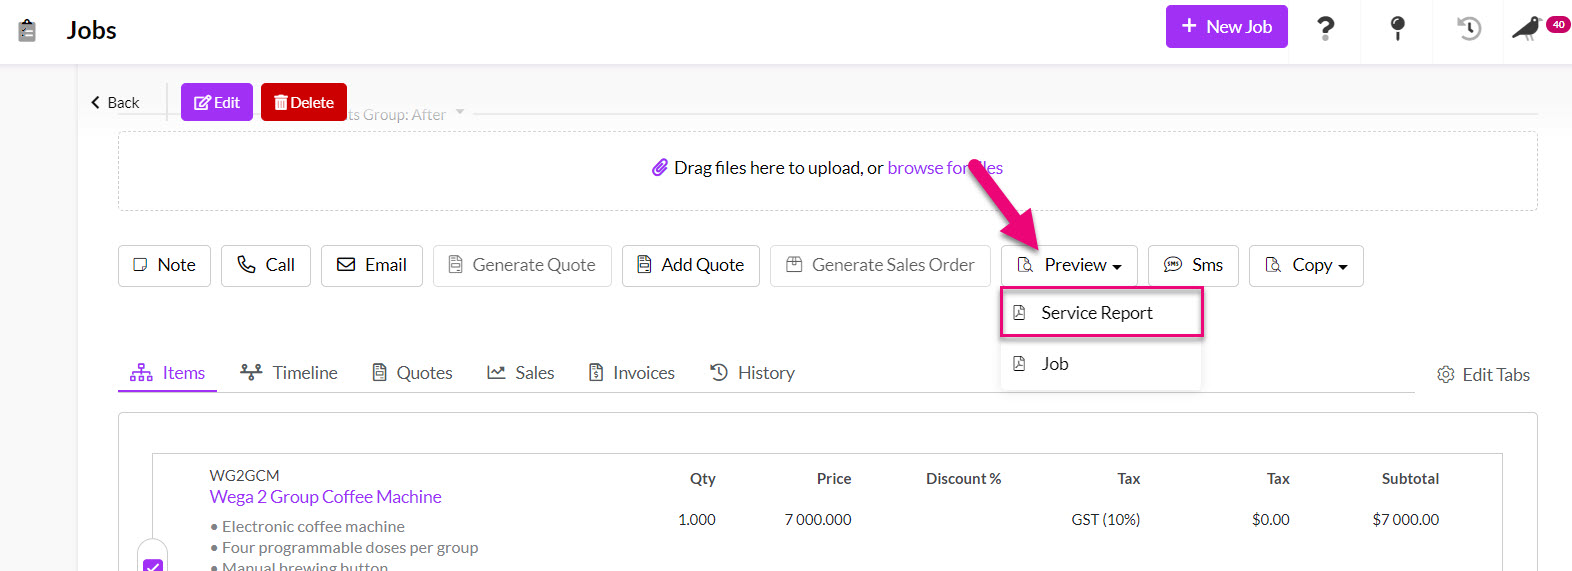
Generate a Service Report from a Job
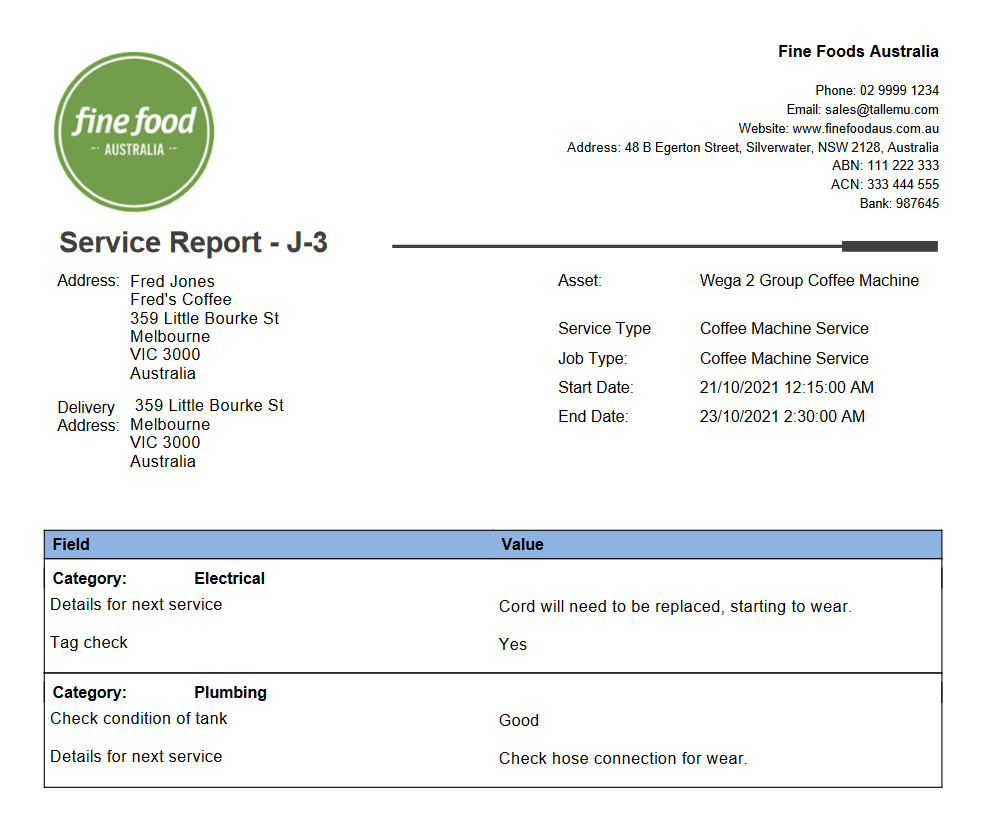
An example of a PDF Service Report
This PDF can then be quickly emailed to customers to provide a record of work.
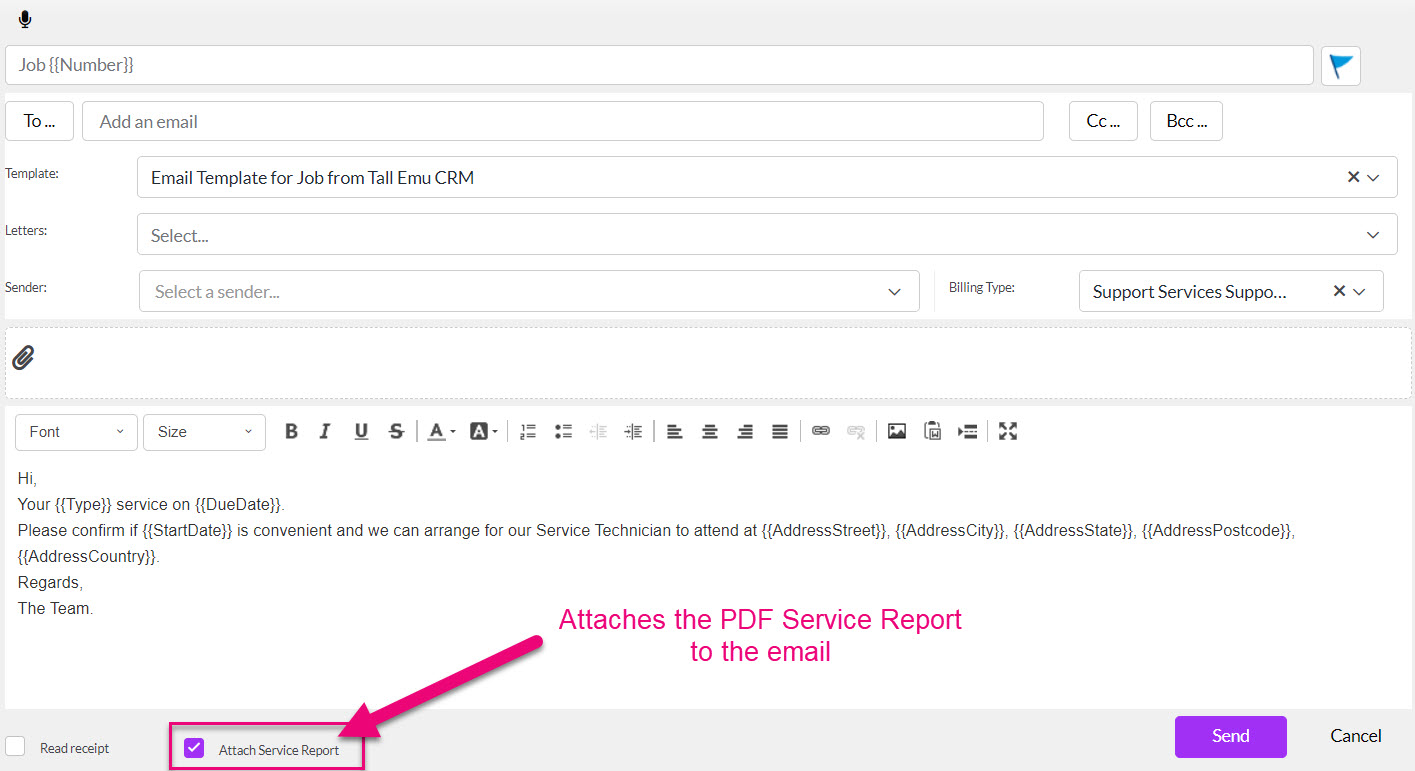
Emailing a Service Report from a Job
You can also nominate a specific template to be used for each of your Service Products.

Service Template choice on a Service Product
See also:
HOW?
From Admin > Settings > Jobs you can access the following areas to configure your templates:
- Categories
- Fields

You’ll then be able to pull these elements together to create report templates.

See our full guide on Creating Service Report Templates.
See also:
5 – Customise Asset fields
WHY?
On the Asset form there are fields for Asset Class and Asset Subclass that you can customise to display your own options.
Populating these fields with your own options mean that you can quickly segment and sort your Assets in a meaningful way.

HOW?
- From Admin > Settings > Assets you can access the fields for Asset Class and Asset Subclass.

- You can then add, remove and edit the options that appear in the dropdown fields on your Asset form.

See also:
6 – Set up workflow lists
WHY?
Working with your Asset data day-to-day can be streamlined for all your users by setting up some basic workflow lists to quickly display key information in the Jobs and Assets areas.
For example, there is some information that every business will want to see:
- How many Assets do I manage?
- Where are the Assets located?
- What condition are the Assets in?
- Which Assets have scheduled servicing?
- When was the last and next service?
- Which services need to be booked in?
Instead of performing a lookup from scratch every time you want to view this information, you can save workflow lists that can be made visible to all Users (or only visible privately) so that everyone is literally on the same page.
See also:
HOW?
First, you need to decide what questions you frequently ask about your service pipeline, both as a business and a User.
In these examples, I’m going to create:
- A list of Assets that have scheduled servicing set up.
- A list of upcoming service Jobs.
Advanced Filters
Each of these questions you want to answer about your pipeline can be turned into an Advanced Filter.
You can have as many of these as you want, and you can choose which ones are publicly available to all your Users (shared) and which ones are for your use only (private).
- Click on the Filter icon and select New – this opens the form to create a new filter.

- Enter in a short name for the filter that will make it easy to identify in your list of filters e.g. “Serviced Assets” will be the name of my Asset filter and “Upcoming jobs” will be the name of my Job filter.
- If you want to share this with others, click the Shared box, otherwise the filter will remain private and only the creator can see it.
- You can then start building criteria to answer your question by adding a field in CRM and then choosing the value it must meet – the following screenshot provides an overview.
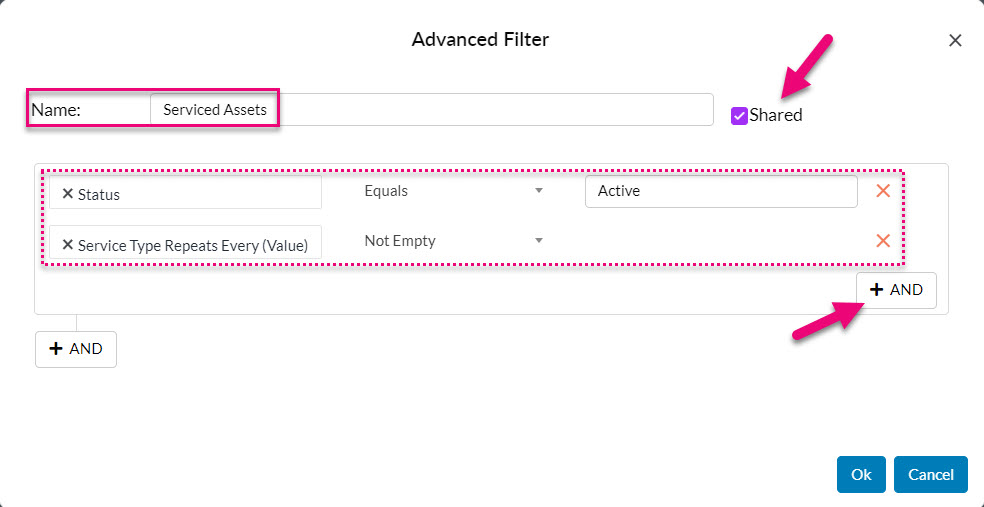
An Advanced Filter in Assets
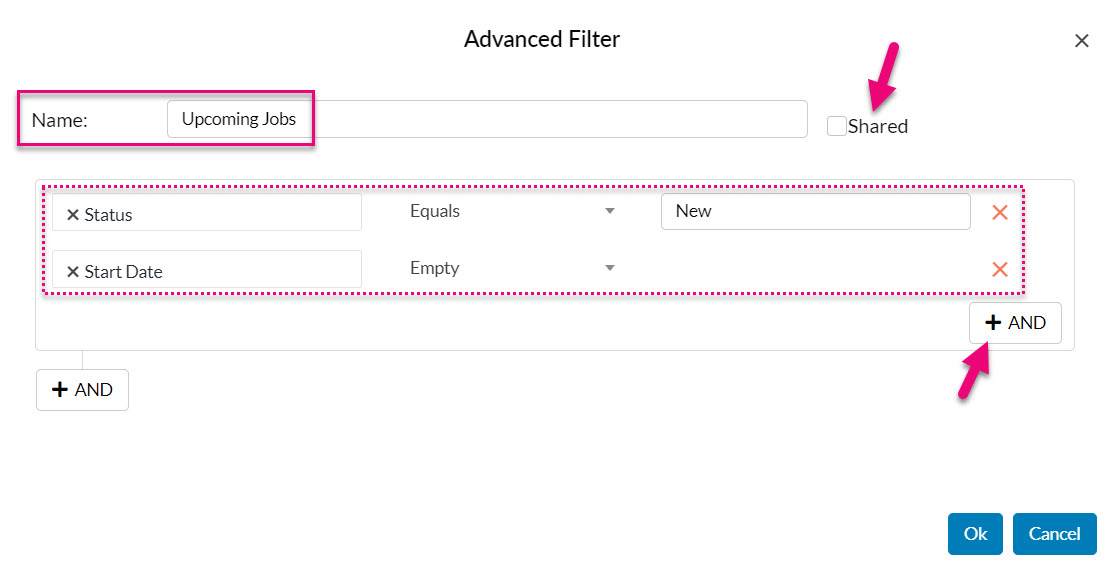
An Advanced Filter in Jobs
- Once saved, you can now see and select the Filter from the list to apply it.


See also:
Layouts
Once you’ve decided on the records you want to see in your Advanced Filters, you’ll likely come across the problem that once you’ve applied your Filter, the columns that you’re looking at don’t display the data you want to see.
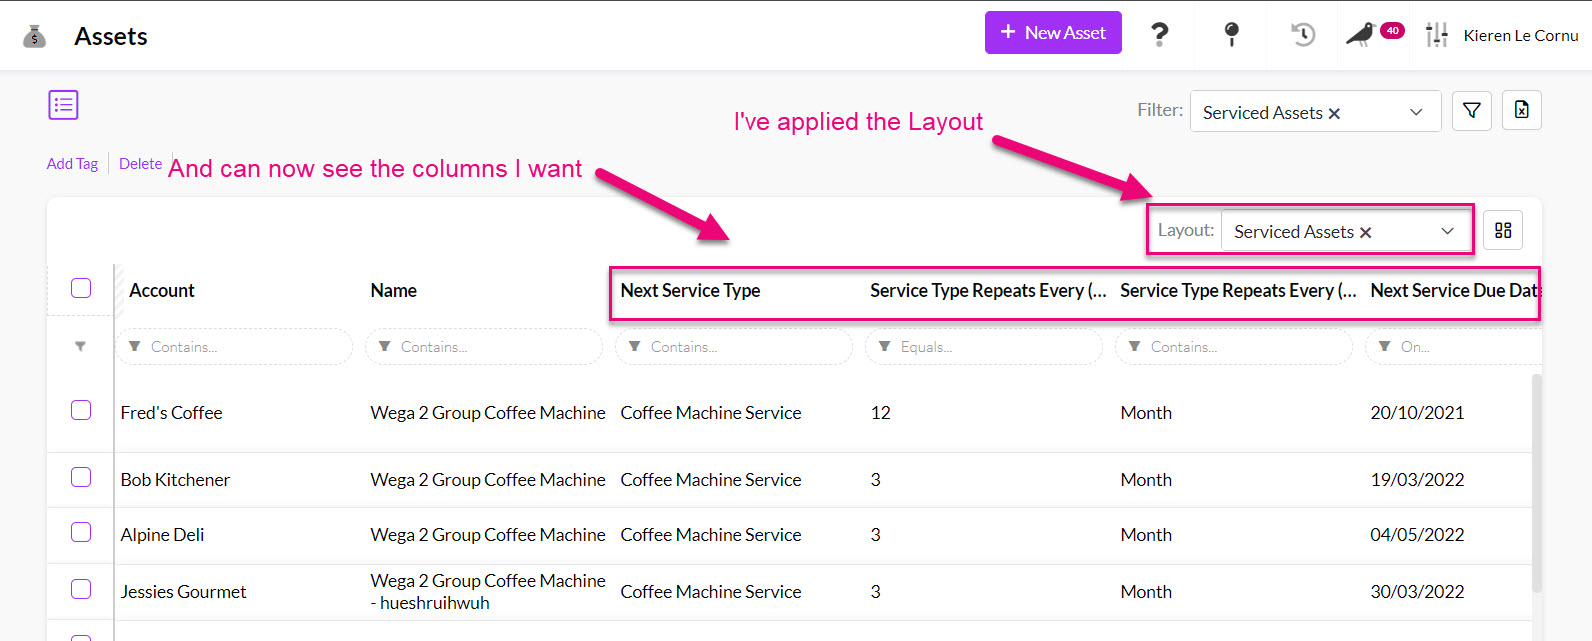
In the following example, I have applied my Advanced Filter “Serviced Assets”, but I can’t see any of the columns that relate to servicing. I’ll want to see this same information whenever I deploy my “Serviced Assets” filter.
Rather than manually adjusting the columns to display the required data each time, I can do this once and save it as a Layout; I can then select this from a list, exactly the same way I can choose an Advanced Filter to apply.
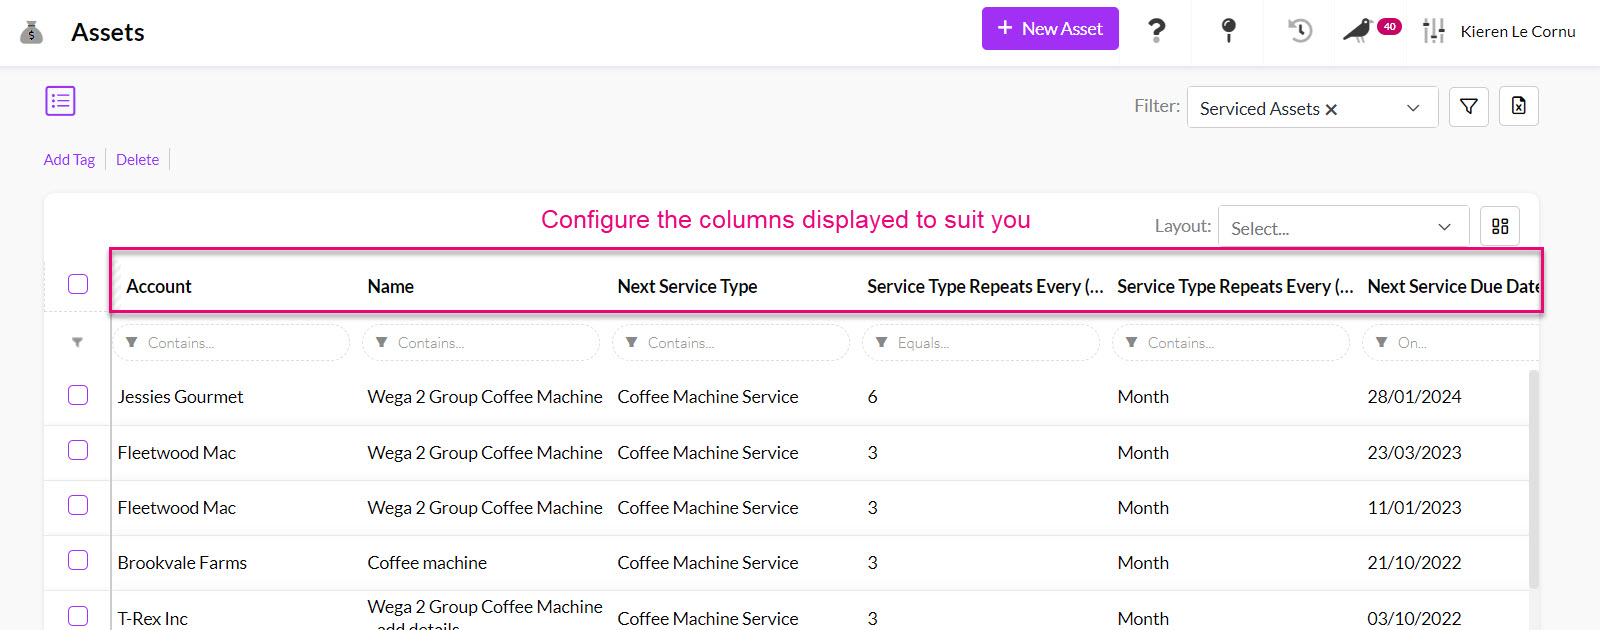
- To prepare my Layout, I’ll want to add, remove and re-position columns so that what’s displayed matches my requirements.
- I can then click on the button to create a new Layout.

- A box will open, and you’ll need to add an easily identifiable name for the Layout and decide whether or not it’s shared.
- In this case, I’m just going to give the Layout the same name as the Advanced Filter as I’ll be using these together.
- Press OK to save the changes.

- You’ve just created a Layout that can now be chosen from the list and applied anytime.
See also:
7 – What next?
Now that your pipeline is set up and ready to go, you’ll want to learn more about how to work with Assets and Job records day-to-day:
- Working with Assets
- Creating Assets for servicing
- Working with Jobs
- Creating a service Job
- Adding Attachments & Notes to a Job record
We also have some more general guides on managing workflow in CRM:
- How to search, sort and report in CRM
- Creating Notifications & Reminders
- Workflow and reporting in CRM
- Working with Activities in CRM