-
- Getting Started
- Record Tabs
- Managing Duplicate Records
- Setting Up Grid Layouts
- Show and Hide Columns
- Key setup steps
- Additional setup steps
- Tips & Tricks
- Pinning Activities
- Bulk update
- Timeline
- Bulk uploading images
- Advanced Filters
- Automated Workflows
- System Admin in CRM
- Search, sort and report
- Calendar View
- Dashboard View
- Using Views
- Import troubleshooting
- List View
- Set up your customers in CRM
- Working with Activities in CRM
- Basic Navigation
- Using the Map View
- Using the Kanban View
- Configuring Dropdown Lists
- Creating New Records
- Open or Edit Existing Records
- View Details on Map Pins
- Syncing Your Accounting System
- Change the Column order
- Setting up your CSV file for Import
- Filter Map Records
- Company Information
- Sorting Records
- Export data
- Filtering Records
- Import Data from Excel or CSV
- Colourise Map Records
- Set Up Security Groups
- Invite Other Users
- Connect Outlook
- Connect to Mailchimp or Campaign Monitor
- Set Up Other Reference Data
- Configure Online Quoting
- View Reports and Dashboards
- Connect Burst SMS
- Viewing Tags
- Adding and Editing Tags
- Sorting and Filtering with Tags
- Jobs, Assets & Service Management
- Manufacturing
- Operations
- Reporting
- Training
- Workflow Management
- Quoting & Selling
How to search, sort and report in CRM
This guide will take you through the various ways you can search, sort and report on your data in CRM.
Changing the data that’s displayed
Adding & removing columns from view
You can customise what you see on any screen in List View by adding and removing columns.
1. From the column menu
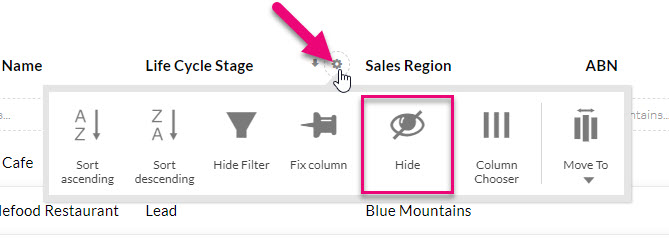
- Hover over the name of any column until a gear icon appears, then click the icon.
![]()
- This brings up a menu where you’ll want to select Column Chooser.

2. From the column sidebar
- Click on the grey sidebar next to either the first or last column name > then click on Column Chooser.

- A box will appear to give you the option to add and remove fields as columns in your view.

Pro Tip: Rather than using the central buttons, you can also double-click on a column name to quickly add or remove it from either side.
In some cases, there are fields available to select as a column that reference another module in CRM i.e. the field is a lookup field. An example of a lookup field would be something like the Account Manager field on a Company record.
I can click on these fields (which display with an arrow next to them) to expand them and show fields from that module that I can also add as a column i.e. I can add the value of the field itself, or any of the values of the fields in the module as columns.
![]()
- Once you are done, click on Apply to save your changes.
Quickly hide a column
- Hover over the name of any column until a gear icon appears > click the gear icon > select Hide.
Change the order of the columns in view
You can move columns into new positions in 2 ways:
1. Drag & drop a column
- Click & hold on any column name and then drag the column to a new position. Release the hold when you have the column in its new position.

2. Use the column menu
- Hover over the name of any column until a gear icon appears > click the icon > select Move To and then select an option from the list.
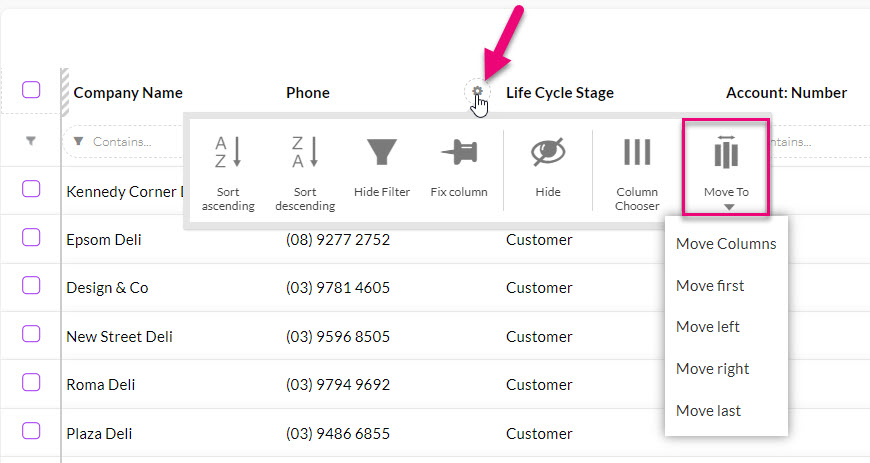
- Move Columns will open a new box where you can use the arrows to move the columns up or down.

- Move first puts the column into the 1st position.
- Move left will move the column one position to the left.
- Move right will move the column one position to the right.
- Move last put the column into the last position.
Pro Tip: If you have a lot of columns in your view, it can quickly become difficult to scroll back and forth to take in all the data. Fixing a column in place allows you to lock important data in the first few columns and is similar to freezing a row or column in Excel.


Sort the contents of a column
There are 2 ways to do this:
1. Click on the column name
- Click on the name of any column to sort it.

- A sort indicator will then display to show the sort direction.
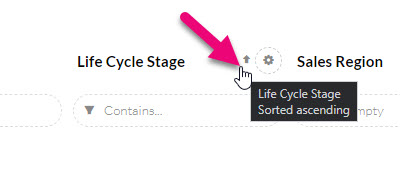
- To reverse the sort direction, click on the column name again and the indicator will update.

2. Use the column menu
- Hover over the name of any column until a gear icon appears > click the icon > select from either Sort ascending or Sort descending.

- A sort indicator will then display to show the sort direction.
Saving column configurations (Layouts)
To save you having to repeat the process of adding & removing columns, you can perform the process once and then save it as a Layout so you can quickly select it in future.
- Set up your columns in the desired arrangement.
- Click on the box to add a new Layout.

- A new box will open where you can enter in a name for your Layout and choose whether or not it will be Shared:
- If this is ticked, other Users will be able to see and use it.
- If this is NOT ticked, you will be the only person who can see and use it. (it will be Private).
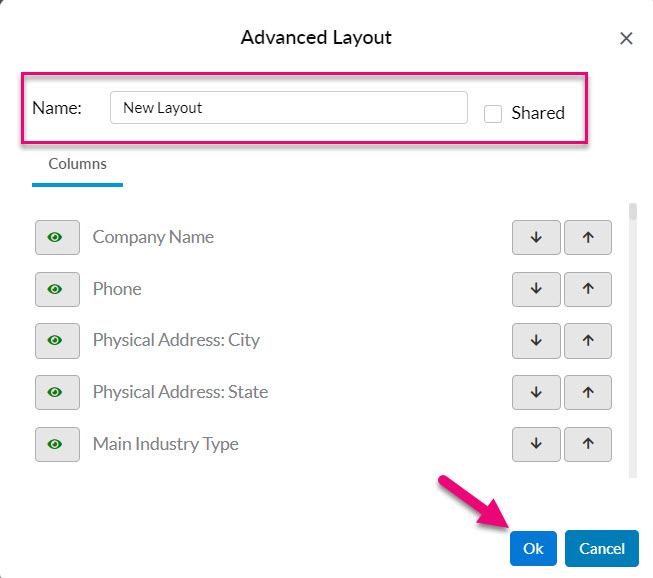
- Once saved, your Layout will appear for selection from the Layout box. Shared and Private Layouts will be shown in different areas on the list.

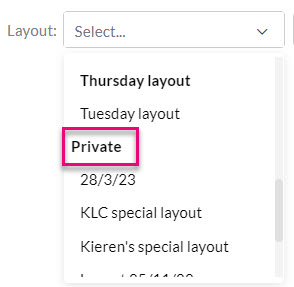
- Once you’ve created a Layout, you can select it to have it apply to your screen or click the box to clear the select or edit or delete the Layout.
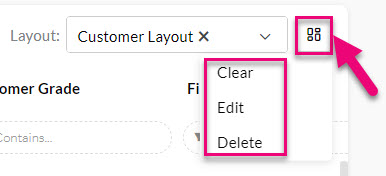
Note: you can only edit Layouts that you’ve created, not ones that other Users have made.
Searching for data (Filters)
There are a few different ways that you can search for data.
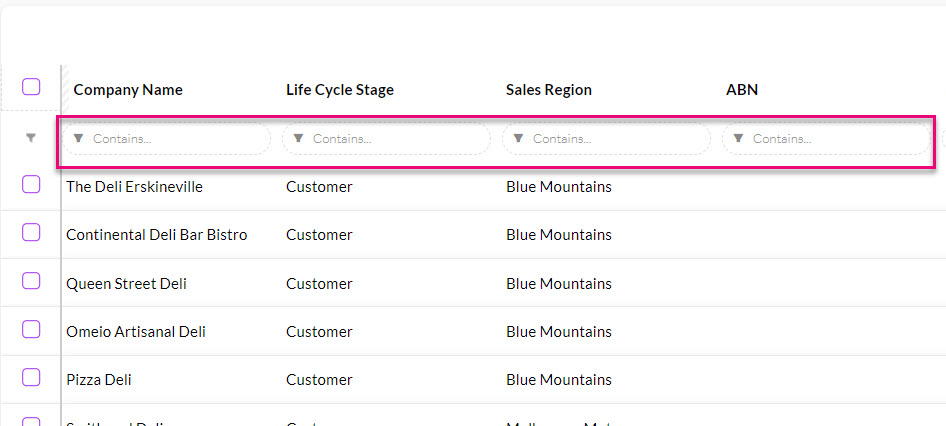
Within a column
Every column has its own search box that you can type directly into and then press enter to search. You can also search in multiple columns at a time.
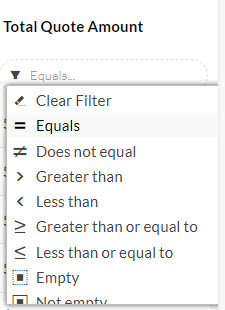
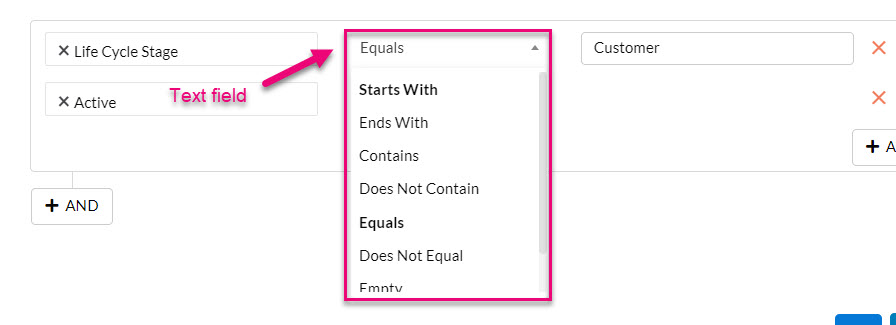
You can also perform a more advanced search of a column by using the Filter function, which will vary depending on the type of data the column is showing. The following example shows the Filter options in a column that displays text data.

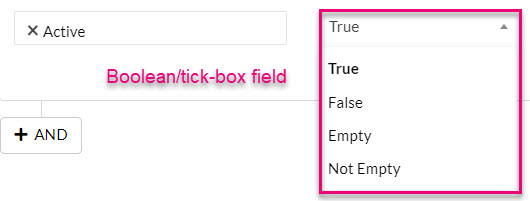
If the column refers to a Boolean (tick box) field, I will have the following preset Filter options:

If it’s a money field, I’ll have these options:
If it’s a date/time field, I’ll have these options:

You can quickly clear a Filter from a column by selecting the option from the list.
![]()
You can clear Filters from multiple columns at once by clicking on the Master Funnel (which will show as red when you have any Filters applied).
![]()
Saving searches (Advanced Filters)
To save you having to repeat the process of running the same searches over and over, you can perform the process once and then save it as an Advanced Filter so you can quickly select it in future.
There are 2 ways to create an Advanced Filter:
- Set up one or more Filters and then save the configuration as an Advanced Filter.
- Build an Advanced Filter from scratch.
1. Save an existing Filter as an Advanced Filter
- Set up your column Filters with the desired searches.
- Click on the box to add a new Filter.

- CRM will automatically bring the details of your column Filters into the Advanced Filter – you just need to give it a name and decide whether or not it will be Shared:
- If this is ticked, other Users will be able to see and use it.
- If this is NOT ticked, you will be the only person who can see and use it. (it will be Private).
- You can also add any additional search criteria at this point (optional), then click OK when you are done.

2. Create an Advanced Filter from scratch
- Click on the box to add a new Filter.
- You need to give it a name and decide whether or not it will be Shared:
- If this is ticked, other Users will be able to see and use it.
- If this is NOT ticked, you will be the only person who can see and use it. (it will be Private).
![]()
You can then start building the conditions for your Advanced Filter with these basic rules:
- Add a condition – press the + AND button. You can have as many condition lines as you want.
- Remove a condition – press the red “x” next to a line.
- Add a new group of conditions – press the group + AND button. You can have as many condition groups as you want.

Basic worked Example:
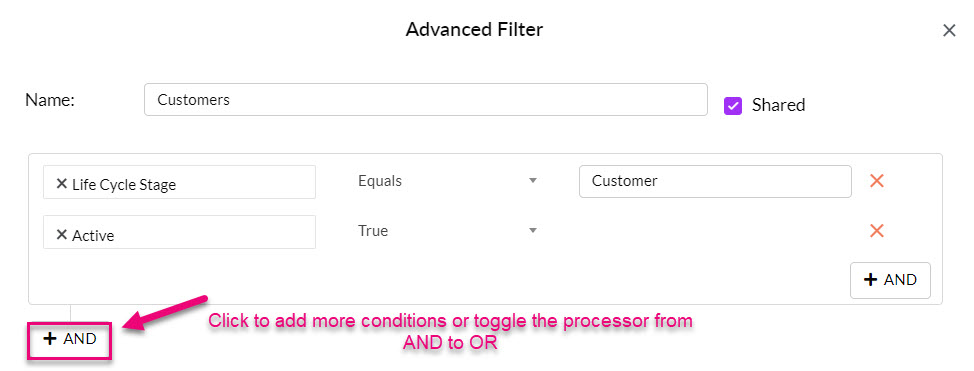
Let’s build a basic example of an Advanced Filter in Companies; I’d like to be able to quickly bring up a list of anyone who is a customer, without having to run a manual search each time.
- I enter in a Name that means the filter will be easy to find later on.
- I decide to share it with other Users as this information will be useful for everyone.
- I create the conditions I want the data to meet:
- The Lifecycle Stage field (Text field) must Equal a value of Customer.
- I’m also going to run a 2nd check here and say that the Active box (Boolean field) on the record must be True i.e. it is ticked, meaning that the record is not inactive.
This is what my Advanced Filter looks like:

Field conditions
You will notice that as you select fields for your conditions, the options you have in the centre for the type of value that must be met will vary, depending on the type of data in the field i.e. date/time, Boolean, text, money etc.


Processing conditions
Another option I have is to change the way that CRM processes my conditions.
- By default, CRM will select AND as the condition processor.
- In the example, this means CRM will look for any Company records where the Lifecycle Stage field = Customer AND Active = True. The results will only include records that meet both conditions.

- If I click on AND, I can change this to an OR processor.
- In the example, this means CRM will look for any Company records where the Lifecycle Stage field = Customer OR Active = True. The results will include records that meet both or either condition.

Groups of conditions
You can add multiple groups of conditions, which can be useful if you want to:
- Use different processors i.e. have 1 group use AND and another group use OR.
- Build complex filters that have numerous conditions that need to be processed in a specific sequence, with different processors.
To add more groups of conditions, click on the following button. You can also change the processor on each group by clicking on the word AND to change it to OR.
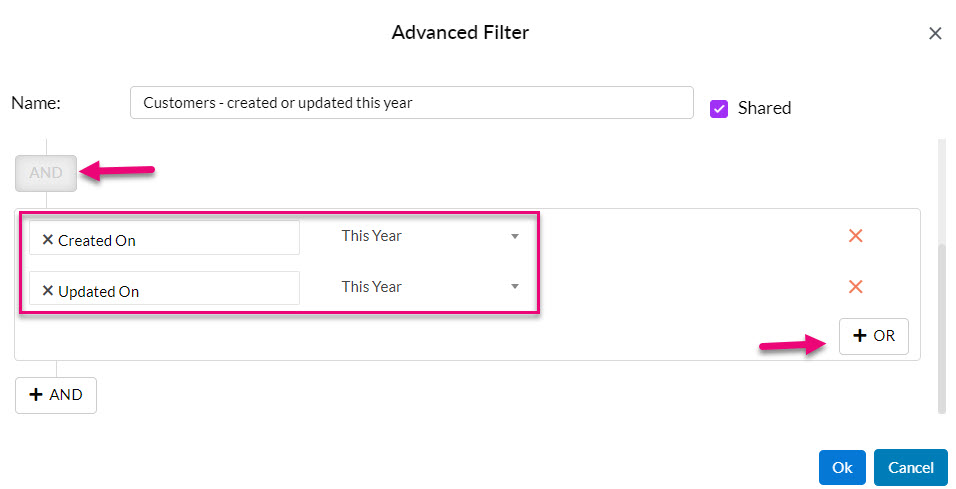
Using the earlier example, I’m going to add in a 2nd group of condition so that I can see a list of active customers that were either created or updated this year.
- I’ve used the AND processor for my 2nd group of conditions.
- For the conditions within the group, I’ve used the OR processor.
Using Rules
As you can see, there is a LOT you can do with Advanced Filters!
However, not everything needs to be handcrafted as we’ve given you some prebuilt conditions you can use – these are called Rules.
- The Rules available will vary, depending on the area of CRM you are in.
- To access Rules, when you select a field for a condition, scroll to the bottom of the list until you see Rules – everything following this heading is a prebuilt condition you can select.

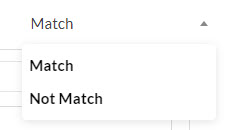
If I select the Rule for “Meeting of type XXXXX in the last X days” as a field, it automatically populates the fields where I need to input criteria:
- Match/Not Match: select whether or not the conditions you input have to be met.
- In this case I need to select an Activity Type from the list and also input a number of Days.


There are a number of very useful Rules you can use all over CRM that will save you having to create multiple Advanced Filters for different Users or save time creating complex ones. One of the most useful is:
- Assigned To Me – this means that the selected records need to be assigned to the person currently logged into CRM, which means you don’t need to create a different filter for each User, one filter will automatically display the records for that User.
Accessing & editing Advanced Filters
- Once saved, your Advanced Filters will appear for selection from the Filters box. Shared and Private Filters will be shown in different areas on the list.


- Once you’ve created a Filter, you can select it to have it apply to your screen or click the box to clear the select or edit or delete the Filter.

Note: you can only edit Advanced Filters that you’ve created, not ones that other Users have made.
Using different Views
At the top of every module homepage, you will see a number of icons – these are view selectors.
Clicking on an icon will allow you to visualise your data in a different way; depending on which area of CRM you are in, you will see different view options.
![]()
The view options available are:
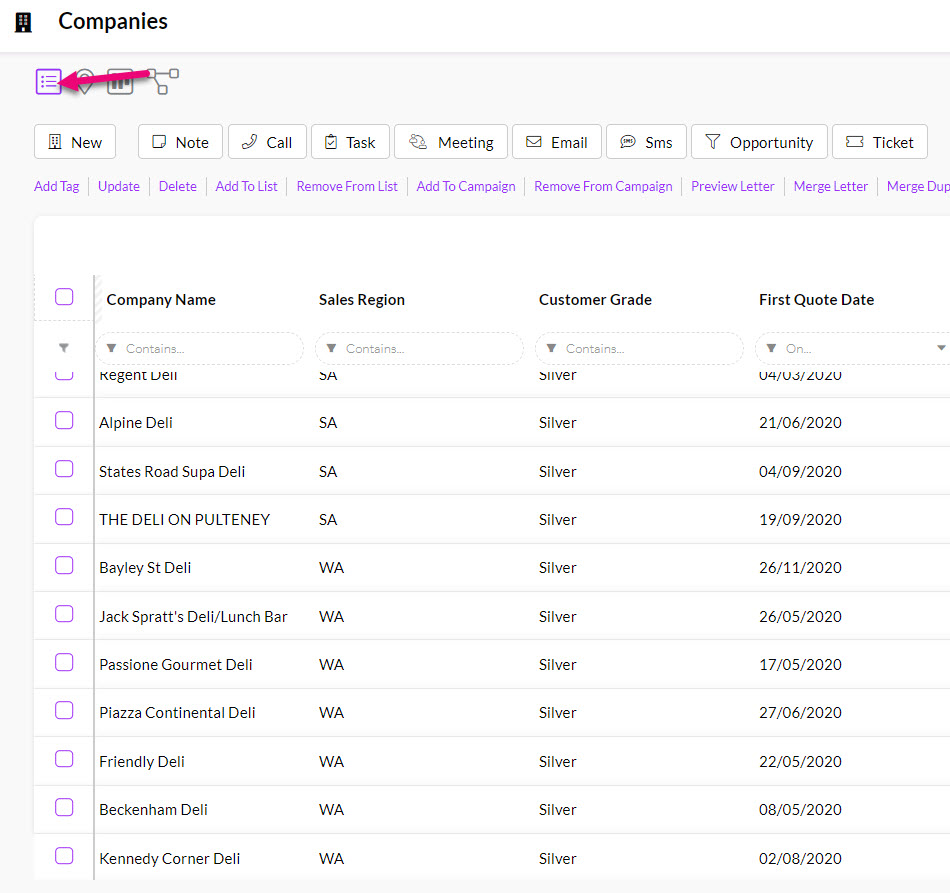
List view
This is the main view in CRM that will open by default in most modules – it displays records as a list.
![]()
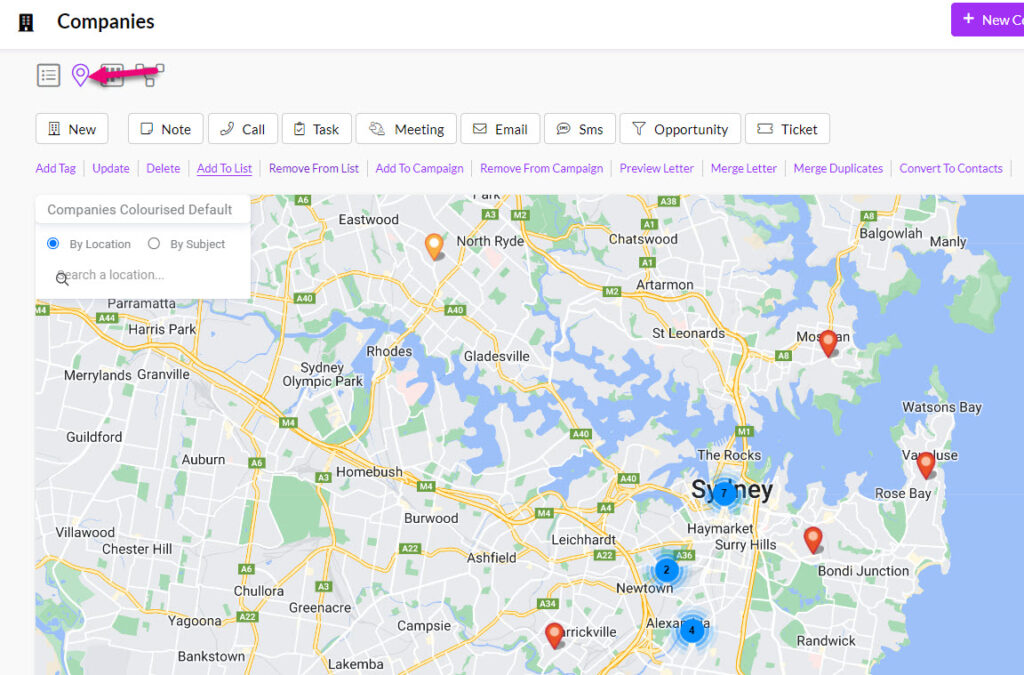
Map view
If you have address information in the relevant records, you can visualise these records on a map. Click here to learn more.
![]()
Kanban view
Depending on the area of CRM you are in, this view allows you to visualise records by Stage, Status, Lifecycle Stage, Type or who they are Assigned To. Click here to learn more.
![]()

Merge Duplicates view
This view will display a list of potential duplicates and allow you to manage them. Click here to learn more.
![]()

Calendar view
Where records have start and end dates and times, you can use the calendar to visualise them e.g. Tasks, Meetings, Calls, Jobs, Production etc. Click here to learn more.
![]()

Dashboard view
In several areas of CRM you can quickly access reporting using Dashboard view, which will give you access to a range interactive graphs and charts that let you drill down into your data. Click here to learn more.


Reporting
There are several ways you can access reporting in CRM.
Dashboards
- These can be accessed using the view selector at the top of the screen (where available).
- You can also access them from Reporting > Dashboards which is a repository of every Dashboard in CRM.
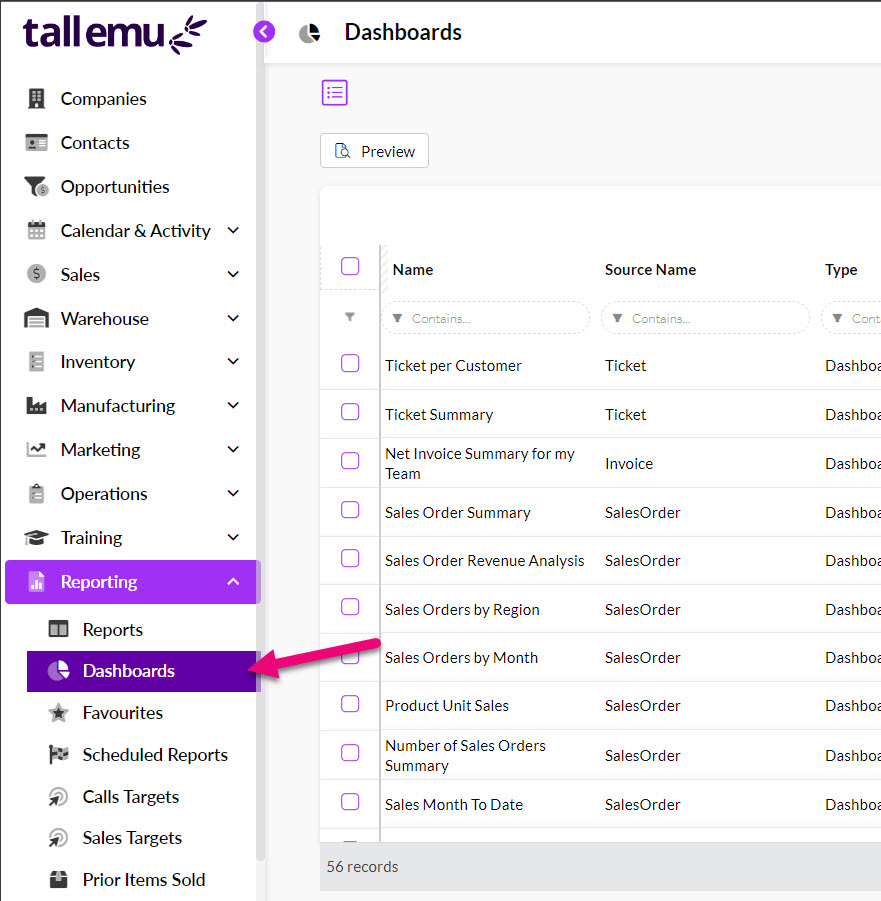
- Just click on any Dashboard to open it and reveal the option to save it to your Favourites or view it.

Reports
- You can access these from Reporting > Reports.

- To quickly open a report, select it on the list and click on Preview.
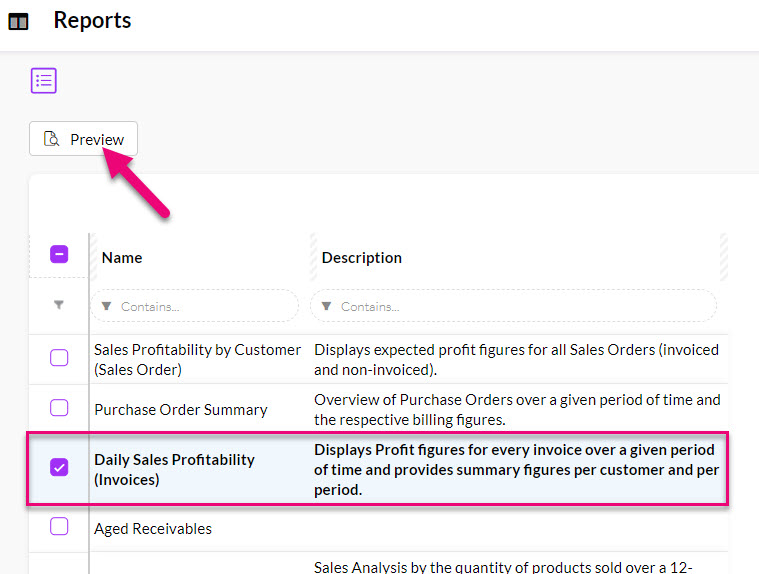
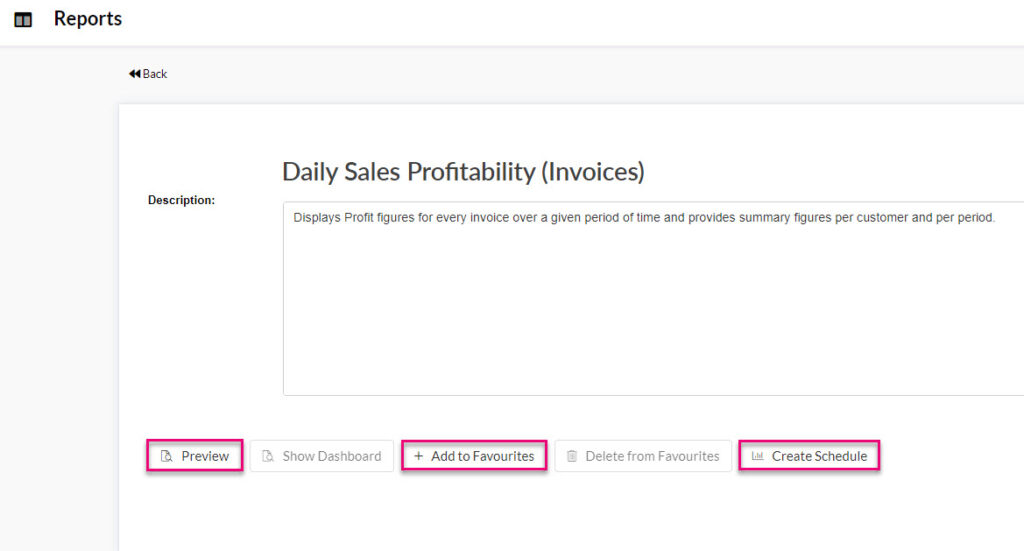
- You can also click on a report to reveal further options to add it to your Favourites list or set it to email out on a schedule. You can also view the report from this screen.
Scheduling Reports
In Reporting > Reports there are a range of reports you can run on an ad-hoc basis, but you can also schedule reports to be automatically emailed.
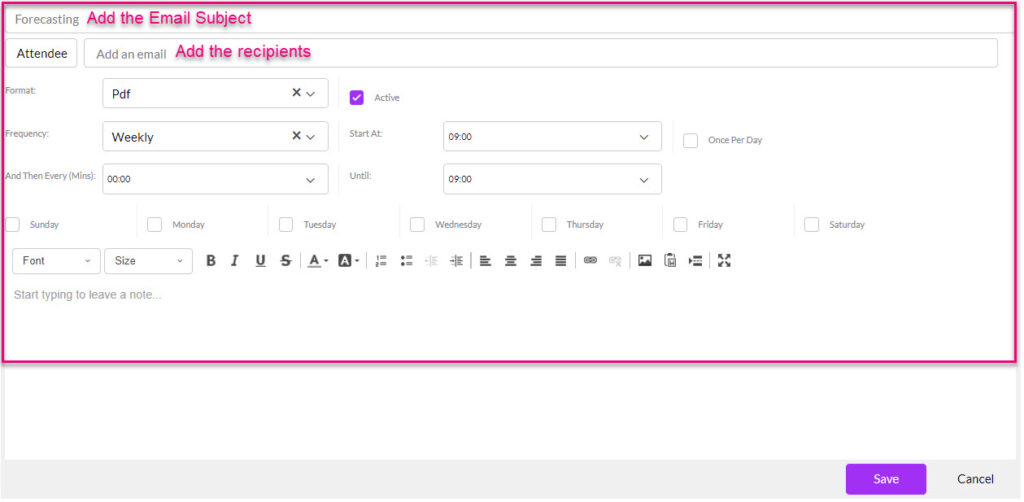
- Open any report and click on the Create Schedule button, then input the specifics.
- You can specify the exact frequency that the email is sent – daily, weekly, monthly, even multiple times a day.
- This then sends an email to the recipients you specify with a copy of a report attached; in the format you have chosen (i.e. PDF, xls or CSV) with any optional email text you want to add.

To disable or adjust schedules, go to Reporting > Scheduled Reports you can see anything you have scheduled previously – just click on a record to open it and adjust the details, or de-select the Active box to disable the workflow.
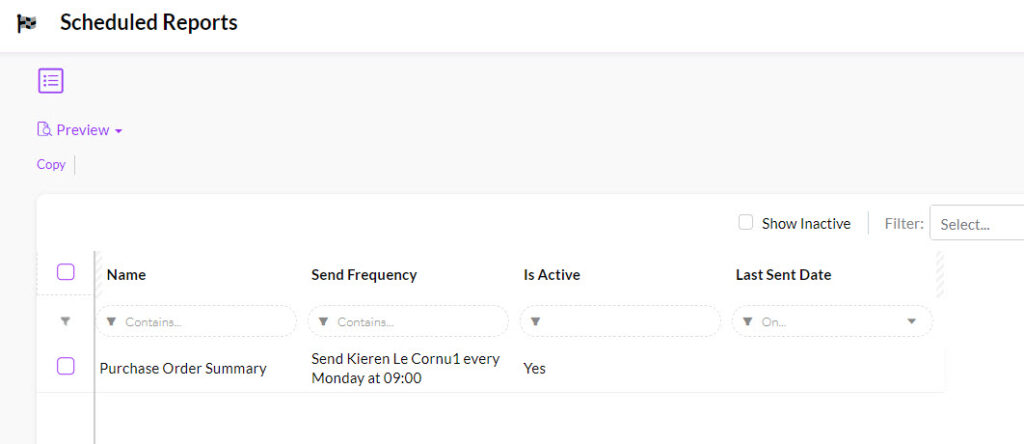

Pro Tip: if you have a lot of reports scheduled and can’t remember exactly what they are, select one in the Scheduled area and use the preview button to quickly view it.

Favourites
So that you don’t have to search every time you want to open a particular Report or Dashboard, you can mark frequently used ones as a Favourite.
Reporting > Favourites allows you to keep your own list of Reports and Dashboards for quick access.

Filtering your data
Your first line of reporting will always be List View; from here you can:
- Show and hide columns.
- Change the display order of columns.
- Sort records.
- Filter records or create Advanced Filters.
- Set up Layouts.
Export data to create your own reports
In a lot of areas or CRM you can export data to Excel and then use this to create your own reports. Click here for more information on exporting your data.
