-
- Getting Started
- Record Tabs
- Managing Duplicate Records
- Setting Up Grid Layouts
- Show and Hide Columns
- Key setup steps
- Additional setup steps
- Tips & Tricks
- Pinning Activities
- Bulk update
- Timeline
- Bulk uploading images
- Advanced Filters
- Automated Workflows
- System Admin in CRM
- Search, sort and report
- Calendar View
- Dashboard View
- Using Views
- Import troubleshooting
- List View
- Set up your customers in CRM
- Working with Activities in CRM
- Basic Navigation
- Using the Map View
- Using the Kanban View
- Configuring Dropdown Lists
- Creating New Records
- Open or Edit Existing Records
- View Details on Map Pins
- Syncing Your Accounting System
- Change the Column order
- Setting up your CSV file for Import
- Filter Map Records
- Company Information
- Sorting Records
- Export data
- Filtering Records
- Import Data from Excel or CSV
- Colourise Map Records
- Set Up Security Groups
- Invite Other Users
- Connect Outlook
- Connect to Mailchimp or Campaign Monitor
- Set Up Other Reference Data
- Configure Online Quoting
- View Reports and Dashboards
- Connect Burst SMS
- Viewing Tags
- Adding and Editing Tags
- Sorting and Filtering with Tags
- Jobs, Assets & Service Management
- Manufacturing
- Operations
- Reporting
- Training
- Workflow Management
- Quoting & Selling
Advanced Filters
To save you having to repeat the process of running the same searches over and over, you can perform the process once and then save it as an Advanced Filter so you can quickly select it in future.
There are 2 ways to create an Advanced Filter:
- Set up one or more Filters and then save the configuration as an Advanced Filter.
- Build an Advanced Filter from scratch.
1. Save an existing Filter as an Advanced Filter
- Set up your column Filters with the desired searches.
- Click on the box to add a new Filter.

- CRM will automatically bring the details of your column Filters into the Advanced Filter – you just need to give it a name and decide whether or not it will be Shared:
- If this is ticked, other Users will be able to see and use it.
- If this is NOT ticked, you will be the only person who can see and use it. (it will be Private).
- You can also add any additional search criteria at this point (optional), then click OK when you are done.

2. Create an Advanced Filter from scratch
- Click on the box to add a new Filter.

- You need to give it a name and decide whether or not it will be Shared:
- If this is ticked, other Users will be able to see and use it.
- If this is NOT ticked, you will be the only person who can see and use it. (it will be Private).
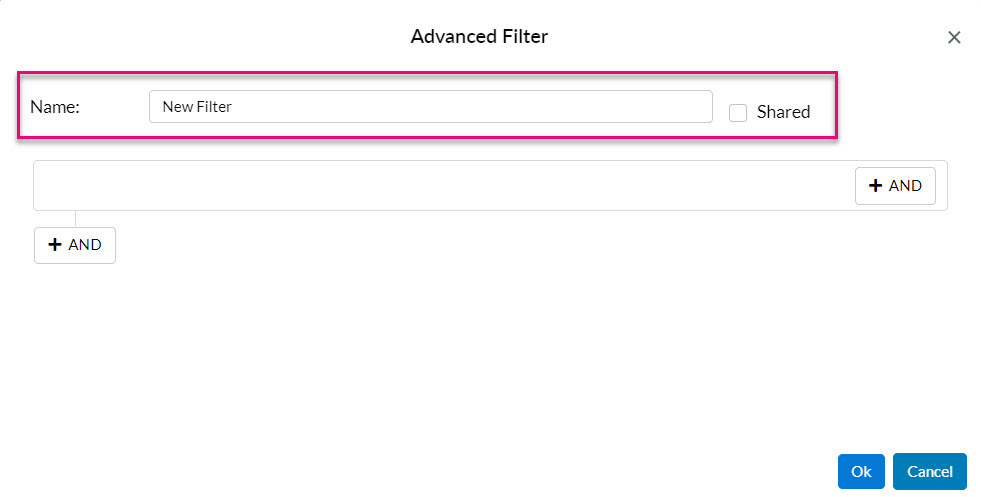
You can then start building the conditions for your Advanced Filter with these basic rules:
- Add a condition – press the + AND button. You can have as many condition lines as you want.
- Remove a condition – press the red “x” next to a line.
- Add a new group of conditions – press the group + AND button. You can have as many condition groups as you want.

Basic worked Example:
Let’s build a basic example of an Advanced Filter in Companies; I’d like to be able to quickly bring up a list of anyone who is a customer, without having to run a manual search each time.
- I enter in a Name that means the filter will be easy to find later on.
- I decide to share it with other Users as this information will be useful for everyone.
- I create the conditions I want the data to meet:
- The Lifecycle Stage field (Text field) must Equal a value of Customer.
- I’m also going to run a 2nd check here and say that the Active box (Boolean field) on the record must be True i.e. it is ticked, meaning that the record is not inactive.
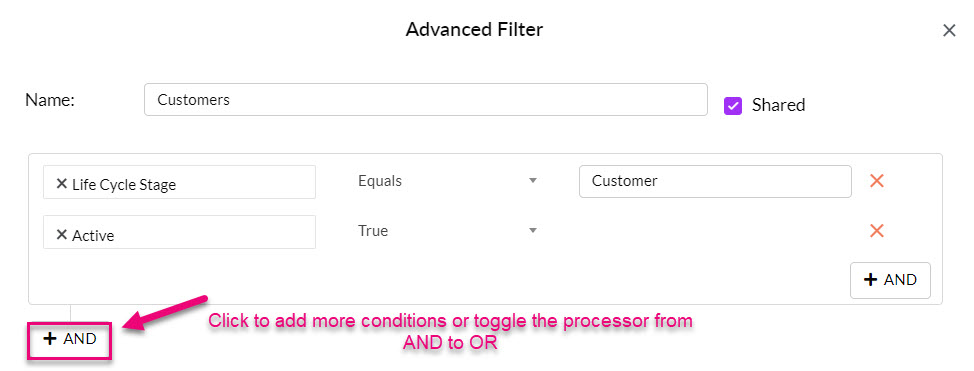
This is what my Advanced Filter looks like:

Field conditions
You will notice that as you select fields for your conditions, the options you have in the centre for the type of value that must be met will vary, depending on the type of data in the field i.e. date/time, Boolean, text, money etc.
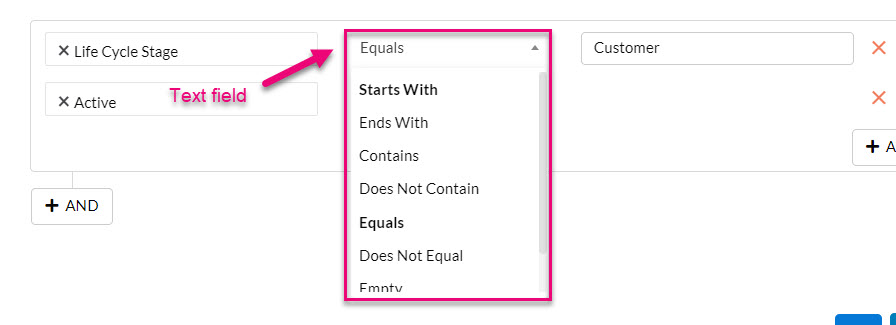


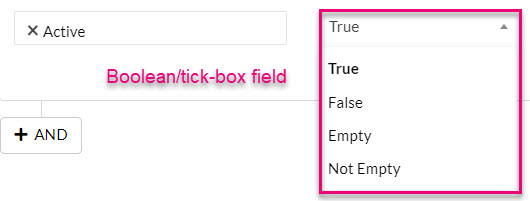
Processing conditions
Another option I have is to change the way that CRM processes my conditions.
- By default, CRM will select AND as the condition processor.
- In the example, this means CRM will look for any Company records where the Lifecycle Stage field = Customer AND Active = True. The results will only include records that meet both conditions.

- If I click on AND, I can change this to an OR processor.
- In the example, this means CRM will look for any Company records where the Lifecycle Stage field = Customer OR Active = True. The results will include records that meet both or either condition.

Groups of conditions
You can add multiple groups of conditions, which can be useful if you want to:
- Use different processors i.e. have 1 group use AND and another group use OR.
- Build complex filters that have numerous conditions that need to be processed in a specific sequence, with different processors.
To add more groups of conditions, click on the following button. You can also change the processor on each group by clicking on the word AND to change it to OR.
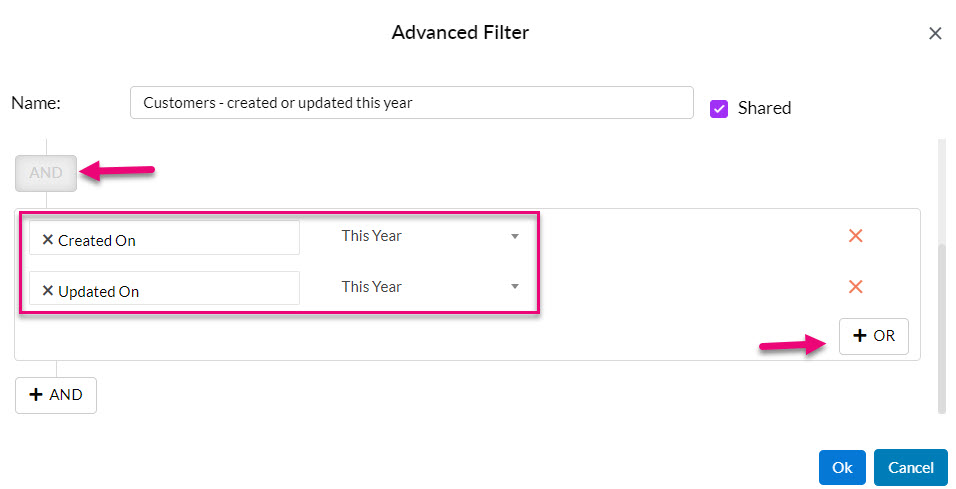
Using the earlier example, I’m going to add in a 2nd group of condition so that I can see a list of active customers that were either created or updated this year.
- I’ve used the AND processor for my 2nd group of conditions.
- For the conditions within the group, I’ve used the OR processor.
Using Rules
As you can see, there is a LOT you can do with Advanced Filters!
However, not everything needs to be handcrafted as we’ve given you some prebuilt conditions you can use – these are called Rules.
- The Rules available will vary, depending on the area of CRM you are in.
- To access Rules, when you select a field for a condition, scroll to the bottom of the list until you see Rules – everything following this heading is a prebuilt condition you can select.

If I select the Rule for “Meeting of type XXXXX in the last X days” as a field, it automatically populates the fields where I need to input criteria:
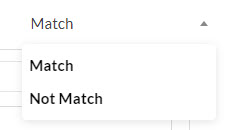
- Match/Not Match: select whether or not the conditions you input have to be met.
- In this case I need to select an Activity Type from the list and also input a number of Days.


There are a number of very useful Rules you can use all over CRM that will save you having to create multiple Advanced Filters for different Users or save time creating complex ones. One of the most useful is:
- Assigned To Me – this means that the selected records need to be assigned to the person currently logged into CRM, which means you don’t need to create a different filter for each User, one filter will automatically display the records for that User.
Accessing & editing Advanced Filters
- Once saved, your Advanced Filters will appear for selection from the Filters box. Shared and Private Filters will be shown in different areas on the list.


- Once you’ve created a Filter, you can select it to have it apply to your screen or click the box to clear the select or edit or delete the Filter.

Note: you can only edit Advanced Filters that you’ve created, not ones that other Users have made.
