-
- Getting Started
- Record Tabs
- Managing Duplicate Records
- Setting Up Grid Layouts
- Show and Hide Columns
- Key setup steps
- Additional setup steps
- Tips & Tricks
- Pinning Activities
- Bulk update
- Timeline
- Bulk uploading images
- Advanced Filters
- Automated Workflows
- System Admin in CRM
- Search, sort and report
- Calendar View
- Dashboard View
- Using Views
- Import troubleshooting
- List View
- Set up your customers in CRM
- Working with Activities in CRM
- Basic Navigation
- Using the Map View
- Using the Kanban View
- Configuring Dropdown Lists
- Creating New Records
- Open or Edit Existing Records
- View Details on Map Pins
- Syncing Your Accounting System
- Change the Column order
- Setting up your CSV file for Import
- Filter Map Records
- Company Information
- Sorting Records
- Export data
- Filtering Records
- Import Data from Excel or CSV
- Colourise Map Records
- Set Up Security Groups
- Invite Other Users
- Connect Outlook
- Connect to Mailchimp or Campaign Monitor
- Set Up Other Reference Data
- Configure Online Quoting
- View Reports and Dashboards
- Connect Burst SMS
- Viewing Tags
- Adding and Editing Tags
- Sorting and Filtering with Tags
- Jobs, Assets & Service Management
- Manufacturing
- Operations
- Reporting
- Training
- Workflow Management
- Quoting & Selling
Setting Up Grid Layouts
Creating Layouts on the grid view can help you view your data in an intuitive way that makes sense for your needs.
It also saves you having to repeat the process of adding & removing columns, you can perform the process once and then save it as a Layout so you can quickly select it in future.
You can create as many layouts as you need (and even share them with your team) so you can quickly get access to the information you need, when you need it.
- Set up your columns in the desired arrangement.
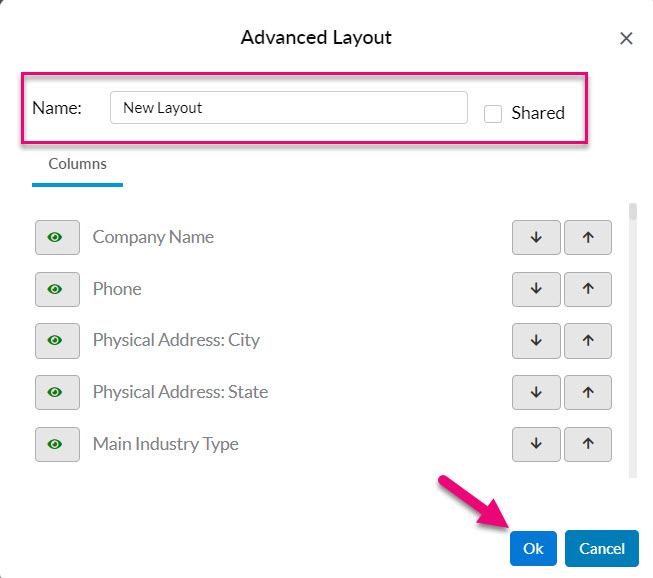
- Click on the box to add a new Layout.

- A new box will open where you can enter in a name for your Layout and choose whether or not it will be Shared:
- If this is ticked, other Users will be able to see and use it.
- If this is NOT ticked, you will be the only person who can see and use it. (it will be Private).
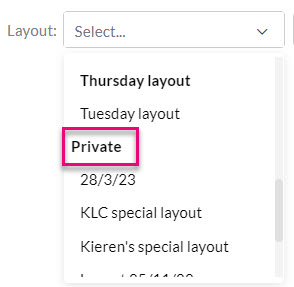
- Once saved, your Layout will appear for selection from the Layout box. Shared and Private Layouts will be shown in different areas on the list.

- Once you’ve created a Layout, you can select it to have it apply to your screen or click the box to clear the select or edit or delete the Layout.
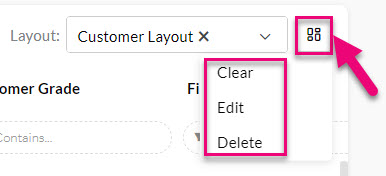
Note: you can only edit Layouts that you’ve created, not ones that other Users have made.
You can also:
- Show and hide columns.
- Change the display order of columns.
- Filter records or create Advanced Filters.
- Sort records.
Related articles