-
Getting Started
- Getting Started
- Record Tabs
- Managing Duplicate Records
- Setting Up Grid Layouts
- Show and Hide Columns
- Key setup steps
- Additional setup steps
- Tips & Tricks
- Pinning Activities
- Bulk update
- Timeline
- Bulk uploading images
- Advanced Filters
- Automated Workflows
- System Admin in CRM
- Search, sort and report
- Calendar View
- Dashboard View
- Using Views
- Import troubleshooting
- List View
- Set up your customers in CRM
- Working with Activities in CRM
- Basic Navigation
- Using the Map View
- Using the Kanban View
- Configuring Dropdown Lists
- Creating New Records
- Open or Edit Existing Records
- View Details on Map Pins
- Syncing Your Accounting System
- Change the Column order
- Setting up your CSV file for Import
- Filter Map Records
- Company Information
- Sorting Records
- Export data
- Filtering Records
- Import Data from Excel or CSV
- Colourise Map Records
- Set Up Security Groups
- Invite Other Users
- Connect Outlook
- Connect to Mailchimp or Campaign Monitor
- Set Up Other Reference Data
- Configure Online Quoting
- View Reports and Dashboards
- Connect Burst SMS
- Viewing Tags
- Adding and Editing Tags
- Sorting and Filtering with Tags
- Accounting
-
CRM Integrations
- CRM Integrations
- Customer Portal
- Novum Networks
- Connecting with WooCommerce
- Time Tracker
- Connecting with PayWay
- VOIPLine
- Setting Up Emails
- Google Maps
- Novum Networks
- WooCommerce integration
- WooCommerce integration settings
- Customer Portal for customers
- Connecting with BurstSMS
- Payment Gateways
- Connecting Stripe
- Troubleshooting the Outlook Add-In
- Syncing Your Outlook Emails, Calendar & Contacts
- Installing Inbox Insights
- Connecting with WooCommerce
- Connecting with Mailchimp
- Connecting with Machship
- Connecting with Ezidebit
- Connecting with eWay
- Connecting with Campaign Monitor
- Jobs, Assets & Service Management
- Manufacturing
- Marketing
- Operations
- Products, Inventory & Pricing
- Reporting
- Sales Pipeline
- Shipping & Freight
- System Settings
- Templates
- Training
- Workflow Management
- Quoting & Selling
Xero bank accounts for stock movements
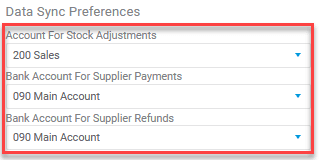
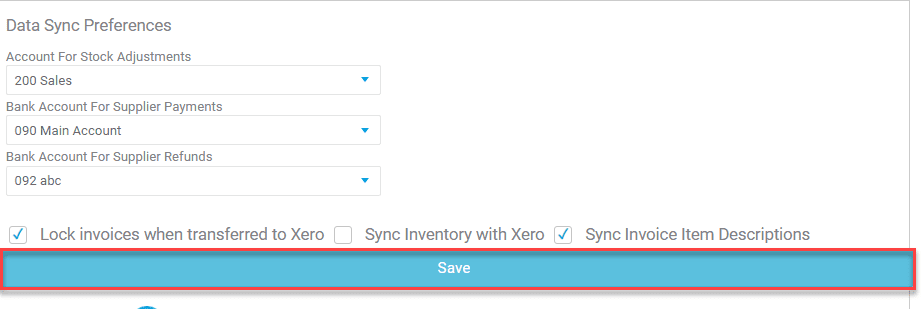
You will need to add Xero bank accounts preferences to CRM on your sync settings page.
When exporting stock adjustments (Stocktakes, Stock Adjustments and Work Orders) from CRM to Xero, we create supplier invoices and supplier credit notes. When this happens, the quantities and values of stock are being adjusted; the purpose of these bank accounts is to select a destination in Xero for the value adjustments to be posted.
![]()
To set these bank accounts up correctly in Xero for use in CRM:
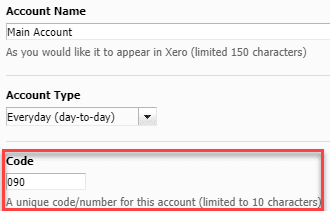
- Create and manage you bank accounts in Xero from Accounting > Bank accounts.

- You then need to give the bank accounts a code, to do this, go to Accounting > Chart of accounts.

- Select and open a bank account and populate the Code box and then save your changes. You will need to repeat this process for each bank account you will be linking to CRM.
- Come into your Xero integration sync settings page in CRM and account the relevant bank account to each area and click on Save to apply the changes.
Related articles