Add your accounting data
Before you start
It will take just a few minutes for you to add your existing data to the CRM CRM from the following accounting systems:
- Xero
- MYOB AccountRight – (this must be the cloud version, not Essentials or Premier)
If you’re using MYOB Exo, we will set up the data integration for you. This is because there are a range of complex MYOB connection settings and steps that need to be completed, so we’ll do the hard work for you.
If you’re not using one of these accounting systems, you can still import data into your CRM from a number of other sources – we’ll show you how to do this in the Integrate other services & data section, so you can skip this section and move onto the next step – System Setup.
It is important that you have access to credentials that allow full system access within your accounting system. If you try and integrate data using credentials that only provide limited access to your accounting system, you will experience a range of sync issues. More detail about the required permissions for each type of accounting software is provided below.
What importing data from your accounting system does
Our accounting software integration is guaranteed to save you time and resources.
Linking your CRM with your accounting system provides in-field access to all sales and product data that your team might need, as well as reducing data entry requirements through the optional auto-sync of key information – you’ll get to experience the true benefits of the product by adding your data.
The accounting link is the cornerstone of most CRM systems because when you’re successfully connected, you’re able to easily sync:
- All tax codes and GL codes.
- All employees.
- All products.
- All companies and contacts.
- All historic sales, invoices and payments.
The initial import process will bring over all your employees and users (past and present) from your accounting software – these users do not automatically get access to the CRM and will be initially set as inactive. You can then choose whether to activate and invite any of these users to join your trial database.
Your accounting system data won’t be updated or overwritten once this process is complete – you can choose if and when this happens in the System Setup section. By default, CRM is not initially configured to automatically sync with your accounting system so it’s perfectly safe to connect your data during your trial.
When your trial period ends, all your CRM data will be automatically deleted after a period of 30 days.
the CRM offers two-way connection to help streamline and automate your sales process. Our Xero integrations lets you:
- Import existing customers into CRM (including all previous sales data).
- Import your product file to quote and sell based on your existing accounting data.
- Export new customers and sales to accounts to remove duplicate data entry and save time.
Things to note:
- When Xero is first connected, the process brings in all data. At present, there is no way to manually select the data that is imported from Xero.
- We create a user record within CRM for every employee in Xero. If you’d like an employee to be able to login to the CRM, we’ll show you how to invite them in the next section on System Setup.
- If you’re concerned about permissions and data access, you can set individual or team-based restrictions/permission levels – we’ll show you how to do this in the next section on System Setup.
- You need to ensure that you have access to Xero credentials that have a ‘Standard’ permission role assigned – this is required for the sync to work correctly.
Connect to Xero
To connect CRM with Xero, follow the simple steps below.
- Navigate to the Admin menu, and choose Integrations.
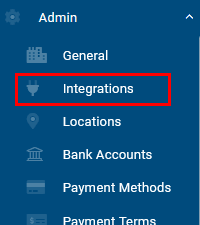
- Choose to Activate the Xero connection.
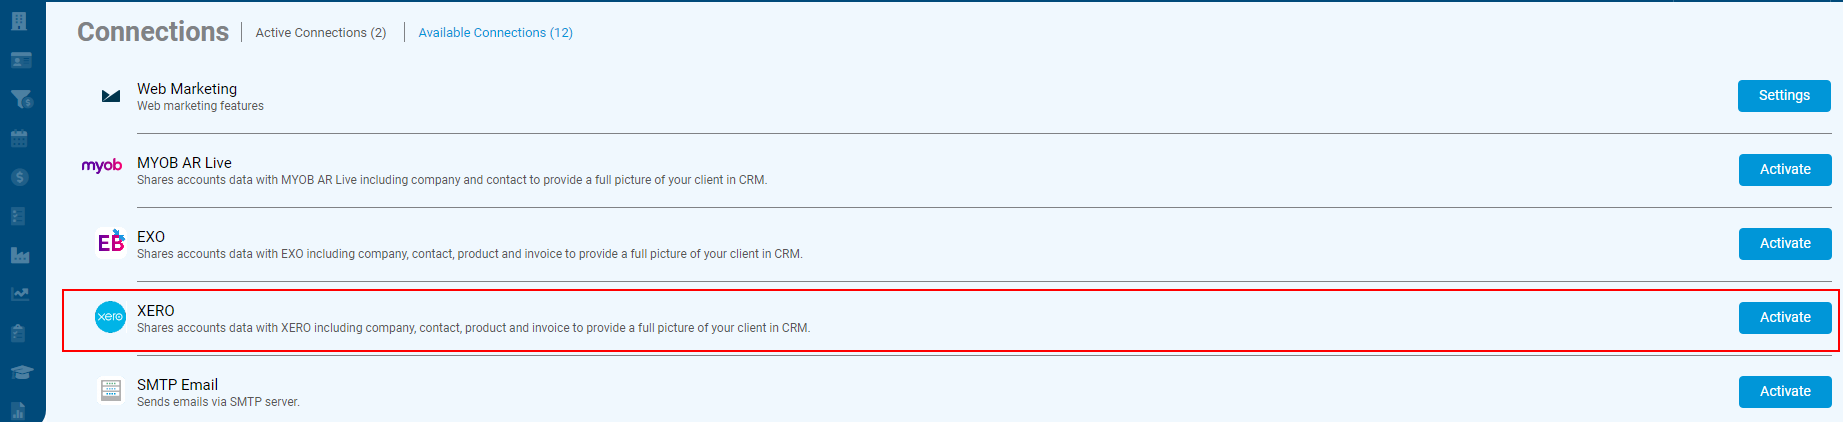
Accessing Xero connection settings
- To connect with Xero, simply click on the Connect to Xero button. You will be taken to Xero’s authorisation portal where you will need to log in with your Xero details.
- You need to ensure that you are logging into Xero with credentials that have a ‘Standard’ permission role assigned – logging in with credentials for an ‘Invoice Only’ or ‘Read Only’ role will not populate data to CRM as there is not an adequate level of permission to implement the integration.

Connecting to Xero in CRM
- Click to allow the CRM access to your organisation.

Authorising the CRM CRM in Xero
- Once you have logged into the Xero authorisation portal, you’ll return to the CRM CRM and should click on Connect to start the import process.
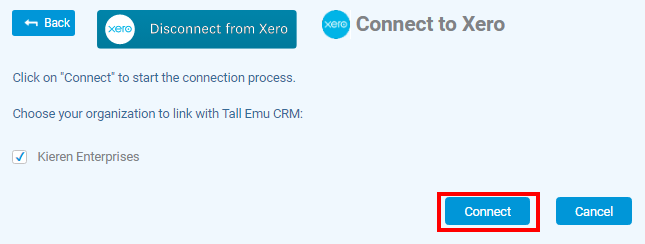
Starting the Xero import from CRM
- The import process will take a few minutes to complete. When complete, you will see a confirmation screen letting you know the CRM is connected to Xero.
- For your trial, untick the boxes next to Lock invoice when transferred to Xero and Sync Inventory with Xero.
Note that all other sync preferences are set to Manual – this means that data will only move between the systems if you choose to manually import or export records.
- Optional: If you would like to set up a scheduled sync for your data between Xero and your CRM, we’ll show you how to do this in the next section – System Setup.

Successful Xero connection with sync options
the CRM offers two-way connection to help streamline and automate your sales process. Our MYOB integration lets you:
- Import existing customers into CRM (including all previous sales data).
- Import your product file to quote and sell based on your existing accounting data.
- Export new customers and sales to accounts to remove duplicate data entry and save time.
Before you connect MYOB AccountRight
In order to successfully connect to MYOB AccountRight, there are a few set up criteria that need to be confirmed before the connection is initiated.
- You must ensure you are using the cloud version of MYOB AccountRight (not Essentials or Premier or any other version of MYOB).
- The user log-in you use for connection must have full administrator access permissions for the sync to be successful.
- You need to create a new user for the CRM CRM and ensure that the user has authority to log on. In MYOB, make sure the box beside This user will sign on with a my.MYOB account (Recommended) is checked, as follows:
- Access these settings from the User Access option on the Setup toolbar.
- Click on New User.
- Tick the box beside This user will sign on with a my.MYOB account (Recommended).
- Copy and paste the name (TallEmuCRM) into the user name field and add an email for the user.
- Ensure the box beside Administrator is checked at minimum – this provides an appropriate level of permission.
- Click Save & Invite User, then follow the prompts to accept the invitation and log in.

Navigating to User Access settings in MYOB AR

MYOB AccountRight setup steps 2
Things to note:
- When MYOB AccountRight is first connected, the process brings in all data. At present, there is no way to manually select the data that is imported from MYOB.
- We create a user record within CRM for every employee in MYOB. If you’d like an employee to be able to login to the CRM, we’ll show you how to invite them in the next section – System Setup.
- If you’re concerned about permissions and data access, you can set individual or team-based restrictions/permission levels – we’ll show you how to do this in the next section – System Setup.
Connect to MYOB AccountRight
To connect CRM with MYOB AccountRight, follow the simple steps below.
- Navigate to the Admin menu, and choose Integrations.
- Choose to Activate next to MYOB AccountRight.

Accessing MYOB AR connection settings
- To connect, simply click on the button to Connect to MYOB AccountRight and you will be taken to MYOB’s authorisation portal where you will need to log in.
- You then need to allow the CRM to access your MYOB account.

Conneting to MYOB AR in CRM

Allowing the CRM access to MYOB AR
- Once you have logged into the MYOB authorisation portal, you’ll return to the CRM CRM and should click on Connect to start the import process.

Starting the MYOB AR import from CRM
- The import process will take a few minutes to complete. When complete, you will see a confirmation screen letting you know the CRM is connected to MYOB.
- Set a default GL code for Adjustments to apply to.
- For your trial, untick the boxes next to Lock invoice when transferred to MYOB and Sync Inventory with MYOB.
- Save your changes.
Note that all other sync preferences are set to Manual – this means that data will only move between the systems if you choose to manually import or export records.
- Optional: If you would like to set up a scheduled sync for your data between MYOB AccountRight and your CRM, we’ll show you how to do this in the next section – System Setup.
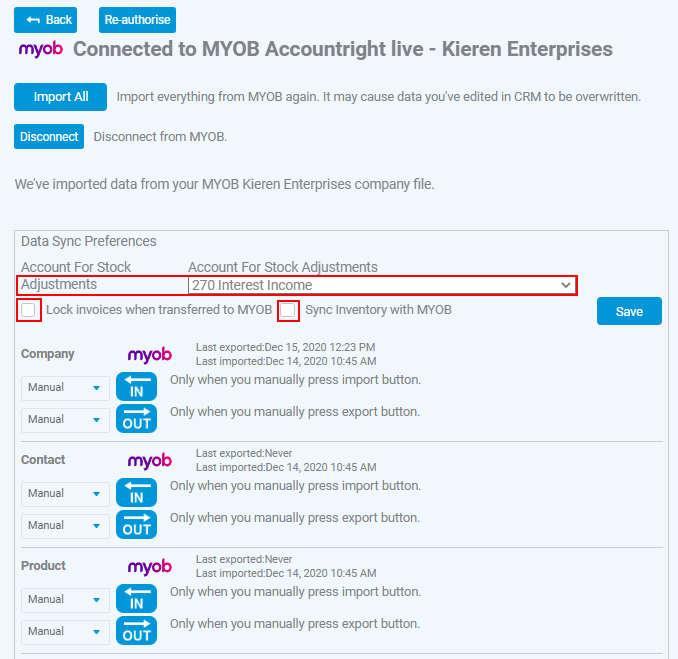
Successful MYOB connection with sync options
If you’ve imported your data successfully, why not head to the Company screen in your CRM and choose Map View. If the import was completed correctly, you’ll be able to visualise all your customers and contacts by location, giving you an overview of your imported records.
Note: by default, the locations will aggregate at suburb level, however within 1-2 hours the system will update the pins to street level addresses automatically.
- Navigate to Companies at the top of the Main Menu.

Accessing Companies
- Then select the Map Pin Icon in the view selector toward the top to change to the visual map view.

Switching to Map view in Companies
- The view will switch to a map, with your Company records imported from Xero able to be viewed as pins on the map. Hover over one of the pins to see more information about a Company.

Map view in Companies, showing your imported data